Jscriptz Checkout
Hyva-Compatible One-Page Checkout — User Guide
Version 1.0.0A modern, fully-customizable checkout experience built with Alpine.js and GraphQL. Features visual layout builder, custom fields, analytics, A/B testing, and abandoned cart recovery.
Live Demo: https://mage.test/checkout
1. Introduction
Jscriptz Checkout is a complete replacement for Magento's default checkout, designed specifically for Hyva Theme compatibility. It provides a modern, reactive checkout experience using Alpine.js instead of Knockout.js, with all cart operations handled via GraphQL.
Alpine.js Reactive UI
Lightweight, modern JavaScript framework replacing Knockout.js
Visual Checkout Builder
Drag-and-drop layout designer for complete customization
Custom Fields
Add unlimited custom fields with 15+ field types
Analytics Dashboard
Track conversion funnels, errors, and trends
A/B Testing
Built-in split testing with statistical analysis
Abandoned Cart Recovery
Automated 3-email recovery campaigns
System Requirements
| Requirement | Version |
|---|---|
| PHP | 8.1 or higher |
| Magento | 2.4.x |
| Hyva Theme Module | 1.3 or higher |
| Node.js (for Tailwind builds) | 20.0 or higher |
2. Installation
Follow these steps to install and configure Jscriptz Checkout.
Prerequisites
- Magento 2.4.4 or higher
- PHP 8.1 or higher
- Composer 2.x
- Node.js 16+ (for Tailwind CSS build)
- Valid Jscriptz license (purchased from mage.jscriptz.com)
Step 1: Get Your Composer Access Token
After purchasing the extension, log in to your Jscriptz account to get your Composer authentication token:
- Go to mage.jscriptz.com/customer/account
- Click on GitHub Access in the left sidebar
- Click Generate New Token if you don't have one
- Copy your access token (valid for 50 minutes)
Step 2: Configure Composer Authentication
Create or update your auth.json file in your Magento root directory:
{
    "http-basic": {
        "packages.jscriptz.com": {
            "username": "YOUR_LICENSE_KEY",
            "password": "YOUR_ACCESS_TOKEN"
        }
    }
}
Replace YOUR_LICENSE_KEY with your license key from the My Licenses page, and YOUR_ACCESS_TOKEN with the token from Step 1.
Step 3: Install via Composer
# Add the Jscriptz repository (first time only)
composer config repositories.jscriptz composer https://packages.jscriptz.com

# Install the Checkout module
composer require jscriptz/module-checkout
Step 4: Run Magento Setup
# Enable the module
bin/magento module:enable Jscriptz_Checkout

# Run setup upgrade
bin/magento setup:upgrade

# Compile DI (production mode)
bin/magento setup:di:compile

# Deploy static content (production mode)
bin/magento setup:static-content:deploy -f

# Clear cache
bin/magento cache:flush
Step 5: Activate Your License
After installation, activate your license in the Magento admin:
- Go to Stores → Configuration → Jscriptz → Jscriptz Checkout
- Expand the License section
- Enter your License Key from your Jscriptz License Account
- Click Save Config
- Click Verify License to confirm activation
Tailwind CSS Build (Optional)
The module includes its own Tailwind CSS build system for styling customization. If you want to customize styles:
# Navigate to the tailwind directory
cd app/code/Jscriptz/Checkout/view/frontend/tailwind

# Install dependencies
npm install

# Development build with watch mode
npm run dev

# Production build (minified)
npm run build
3. Global Configuration
Configure the global checkout behavior. These settings control the overall checkout experience across your store.
3.1 General Settings
| Setting | Description | Options |
|---|---|---|
| Enabled | Enable or disable Jscriptz Checkout globally | Yes / No |
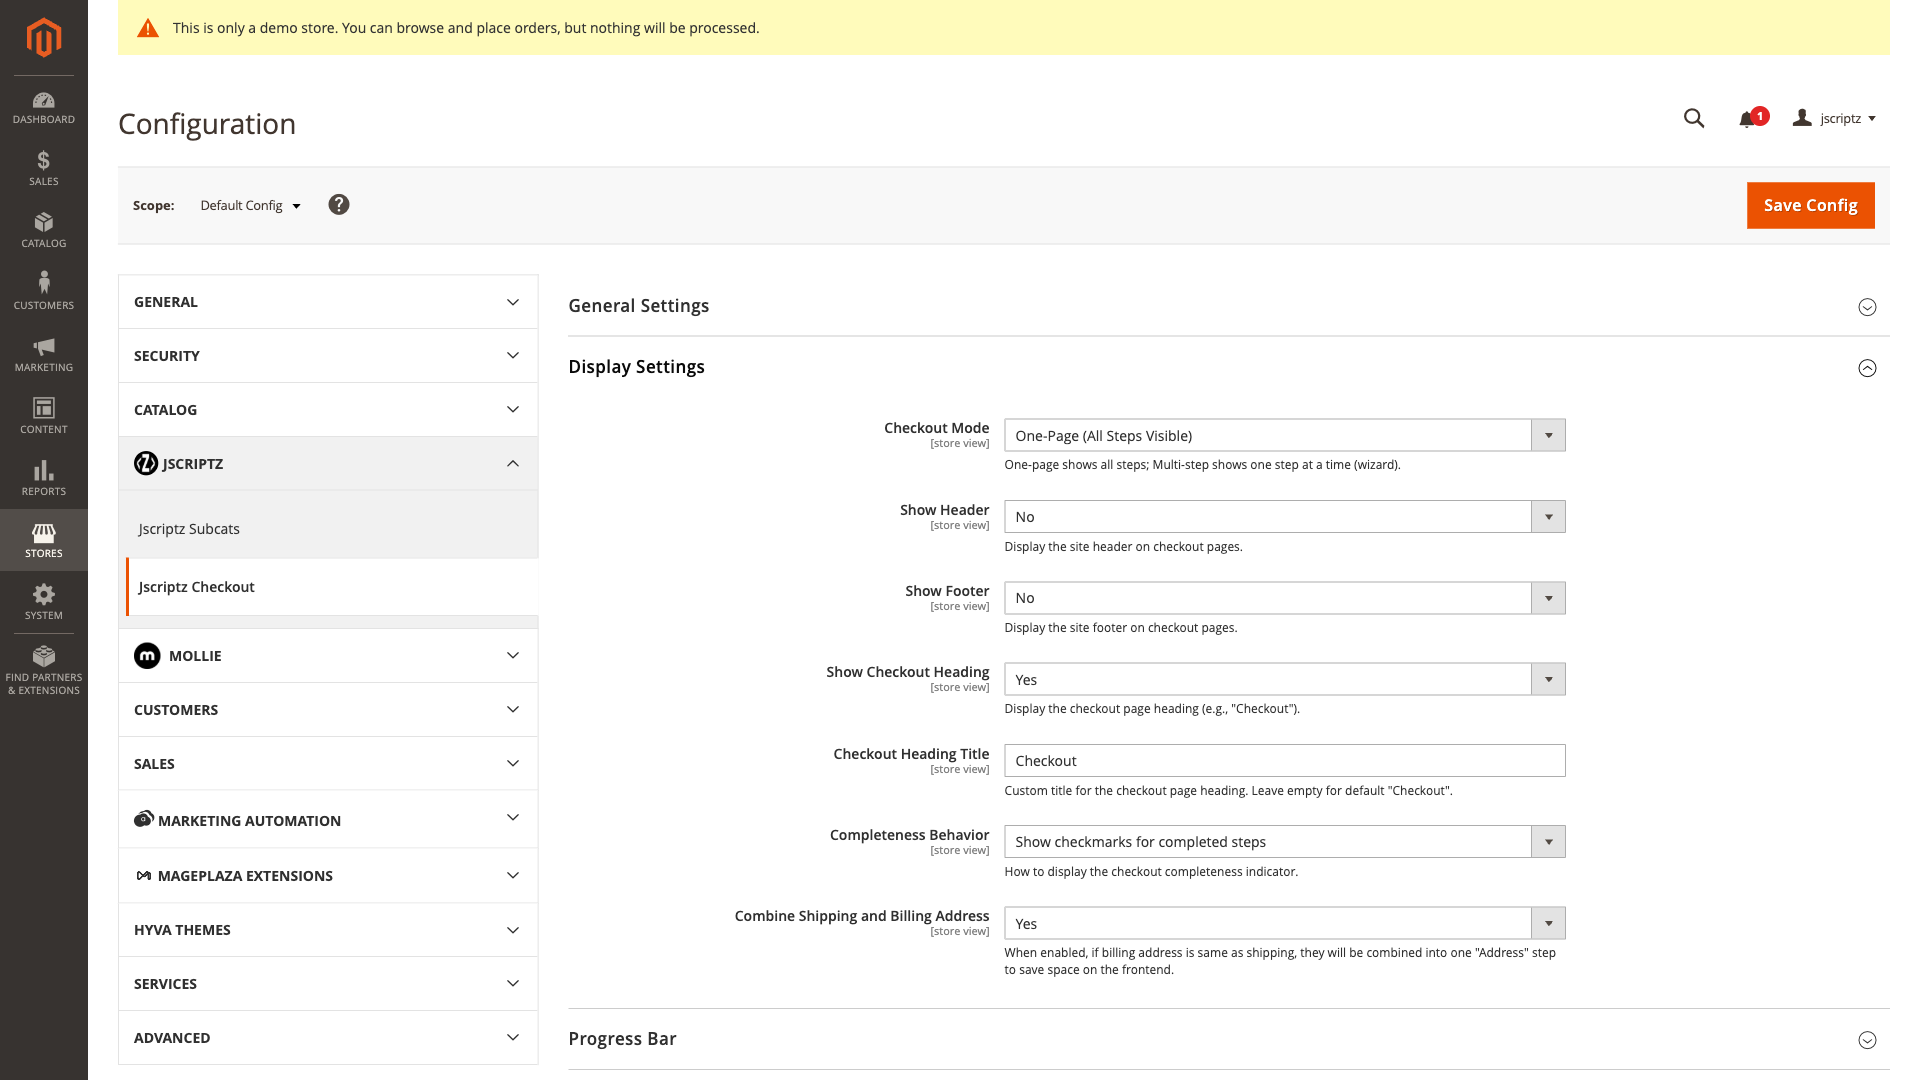
3.2 Display Settings
| Setting | Description | Options |
|---|---|---|
| Checkout Mode | Display all steps on one page or use multi-step wizard | One-Page / Multi-Step |
| Show Header | Display the site header on the checkout page | Yes / No |
| Show Footer | Display the site footer on the checkout page | Yes / No |
| Show Checkout Heading | Display a heading at the top of checkout | Yes / No |
| Checkout Heading Title | Custom text for the checkout heading | Text (e.g., "Secure Checkout") |
| Completeness Behavior | How to indicate step completion | Show Message / Hide / Disable Button |
| Combine Addresses | Combine shipping and billing when same | Yes / No |
3.3 Progress Bar
The progress bar provides visual feedback on checkout completion status.
| Setting | Description | Options |
|---|---|---|
| Enabled | Show progress bar at top of checkout | Yes / No |
| Show Step Numbers | Display numbered circles (1, 2, 3...) | Yes / No |
| Show Step Labels | Display step names below circles | Yes / No |
| Clickable Steps | Allow clicking on completed steps to navigate | Yes / No |
| Sticky | Keep progress bar visible when scrolling | Yes / No |

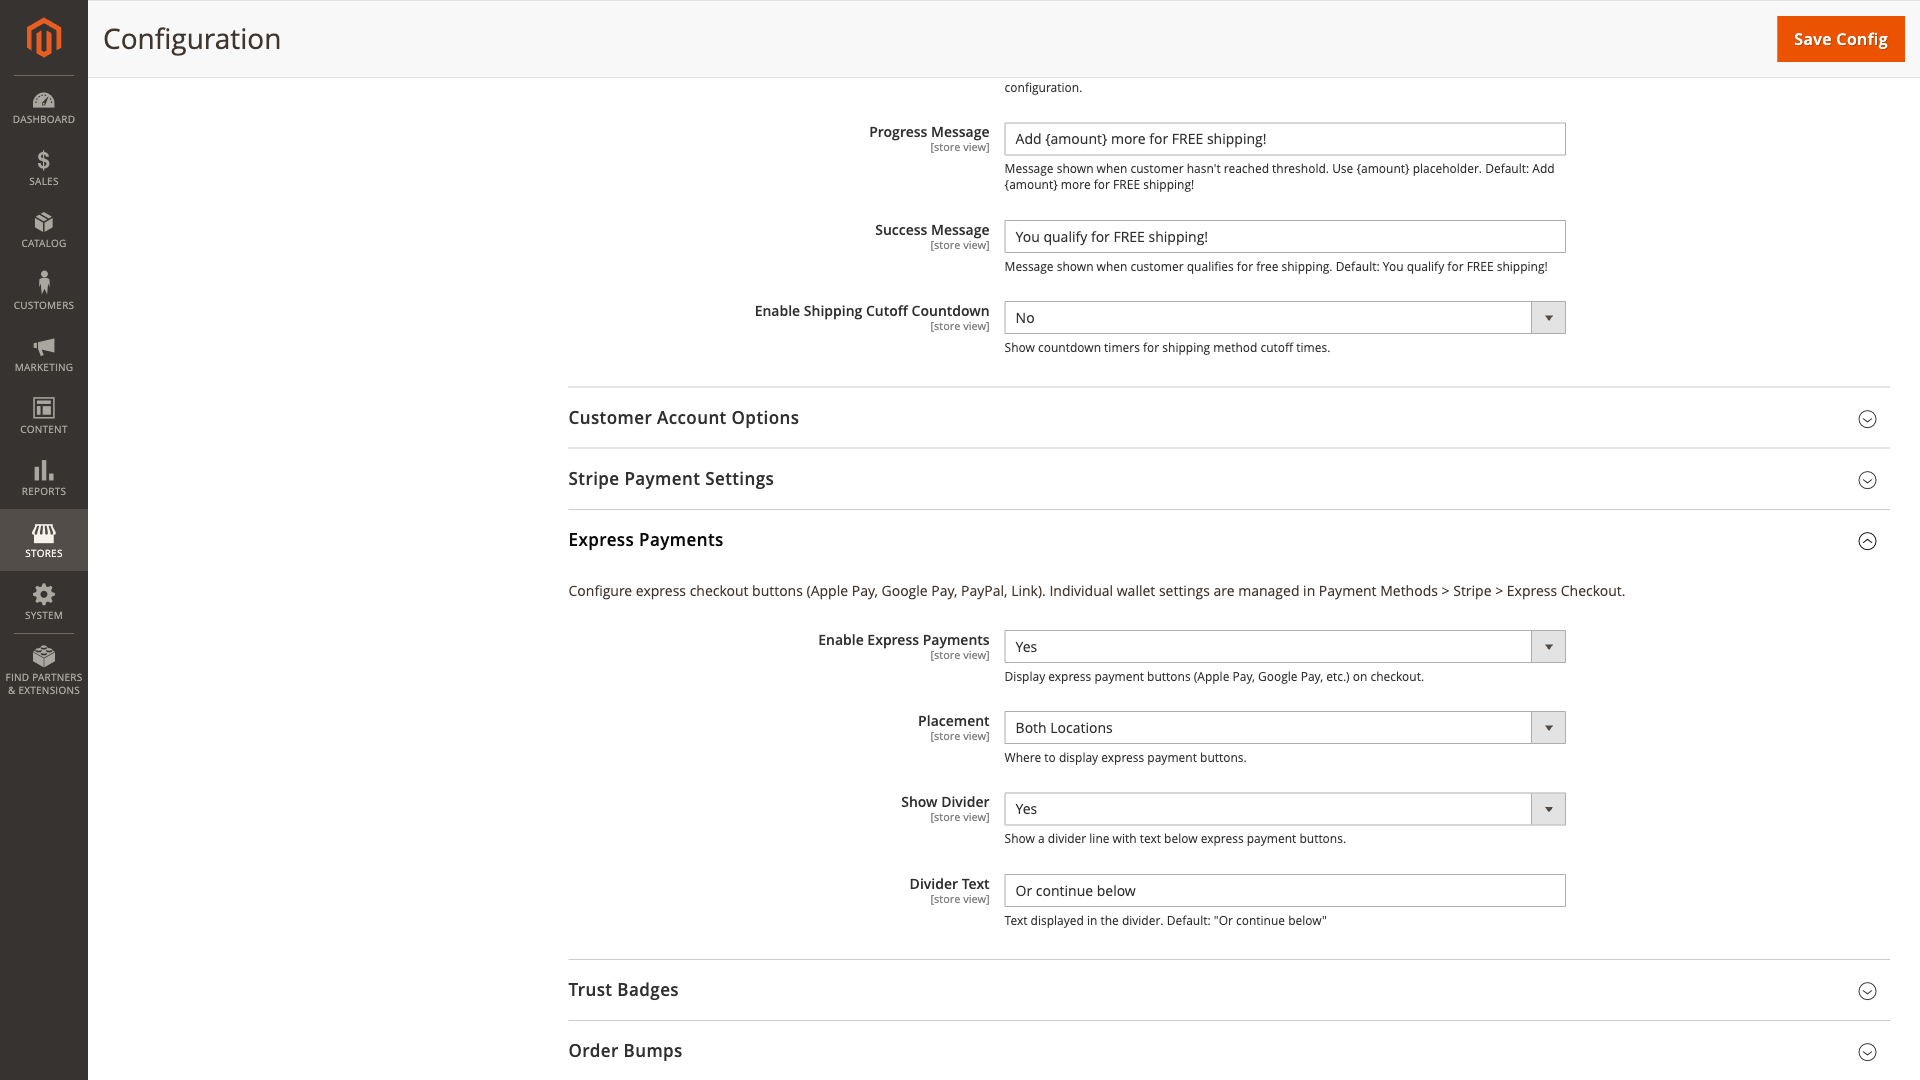
3.4 Express Payments
Configure express payment options like Apple Pay and Google Pay.
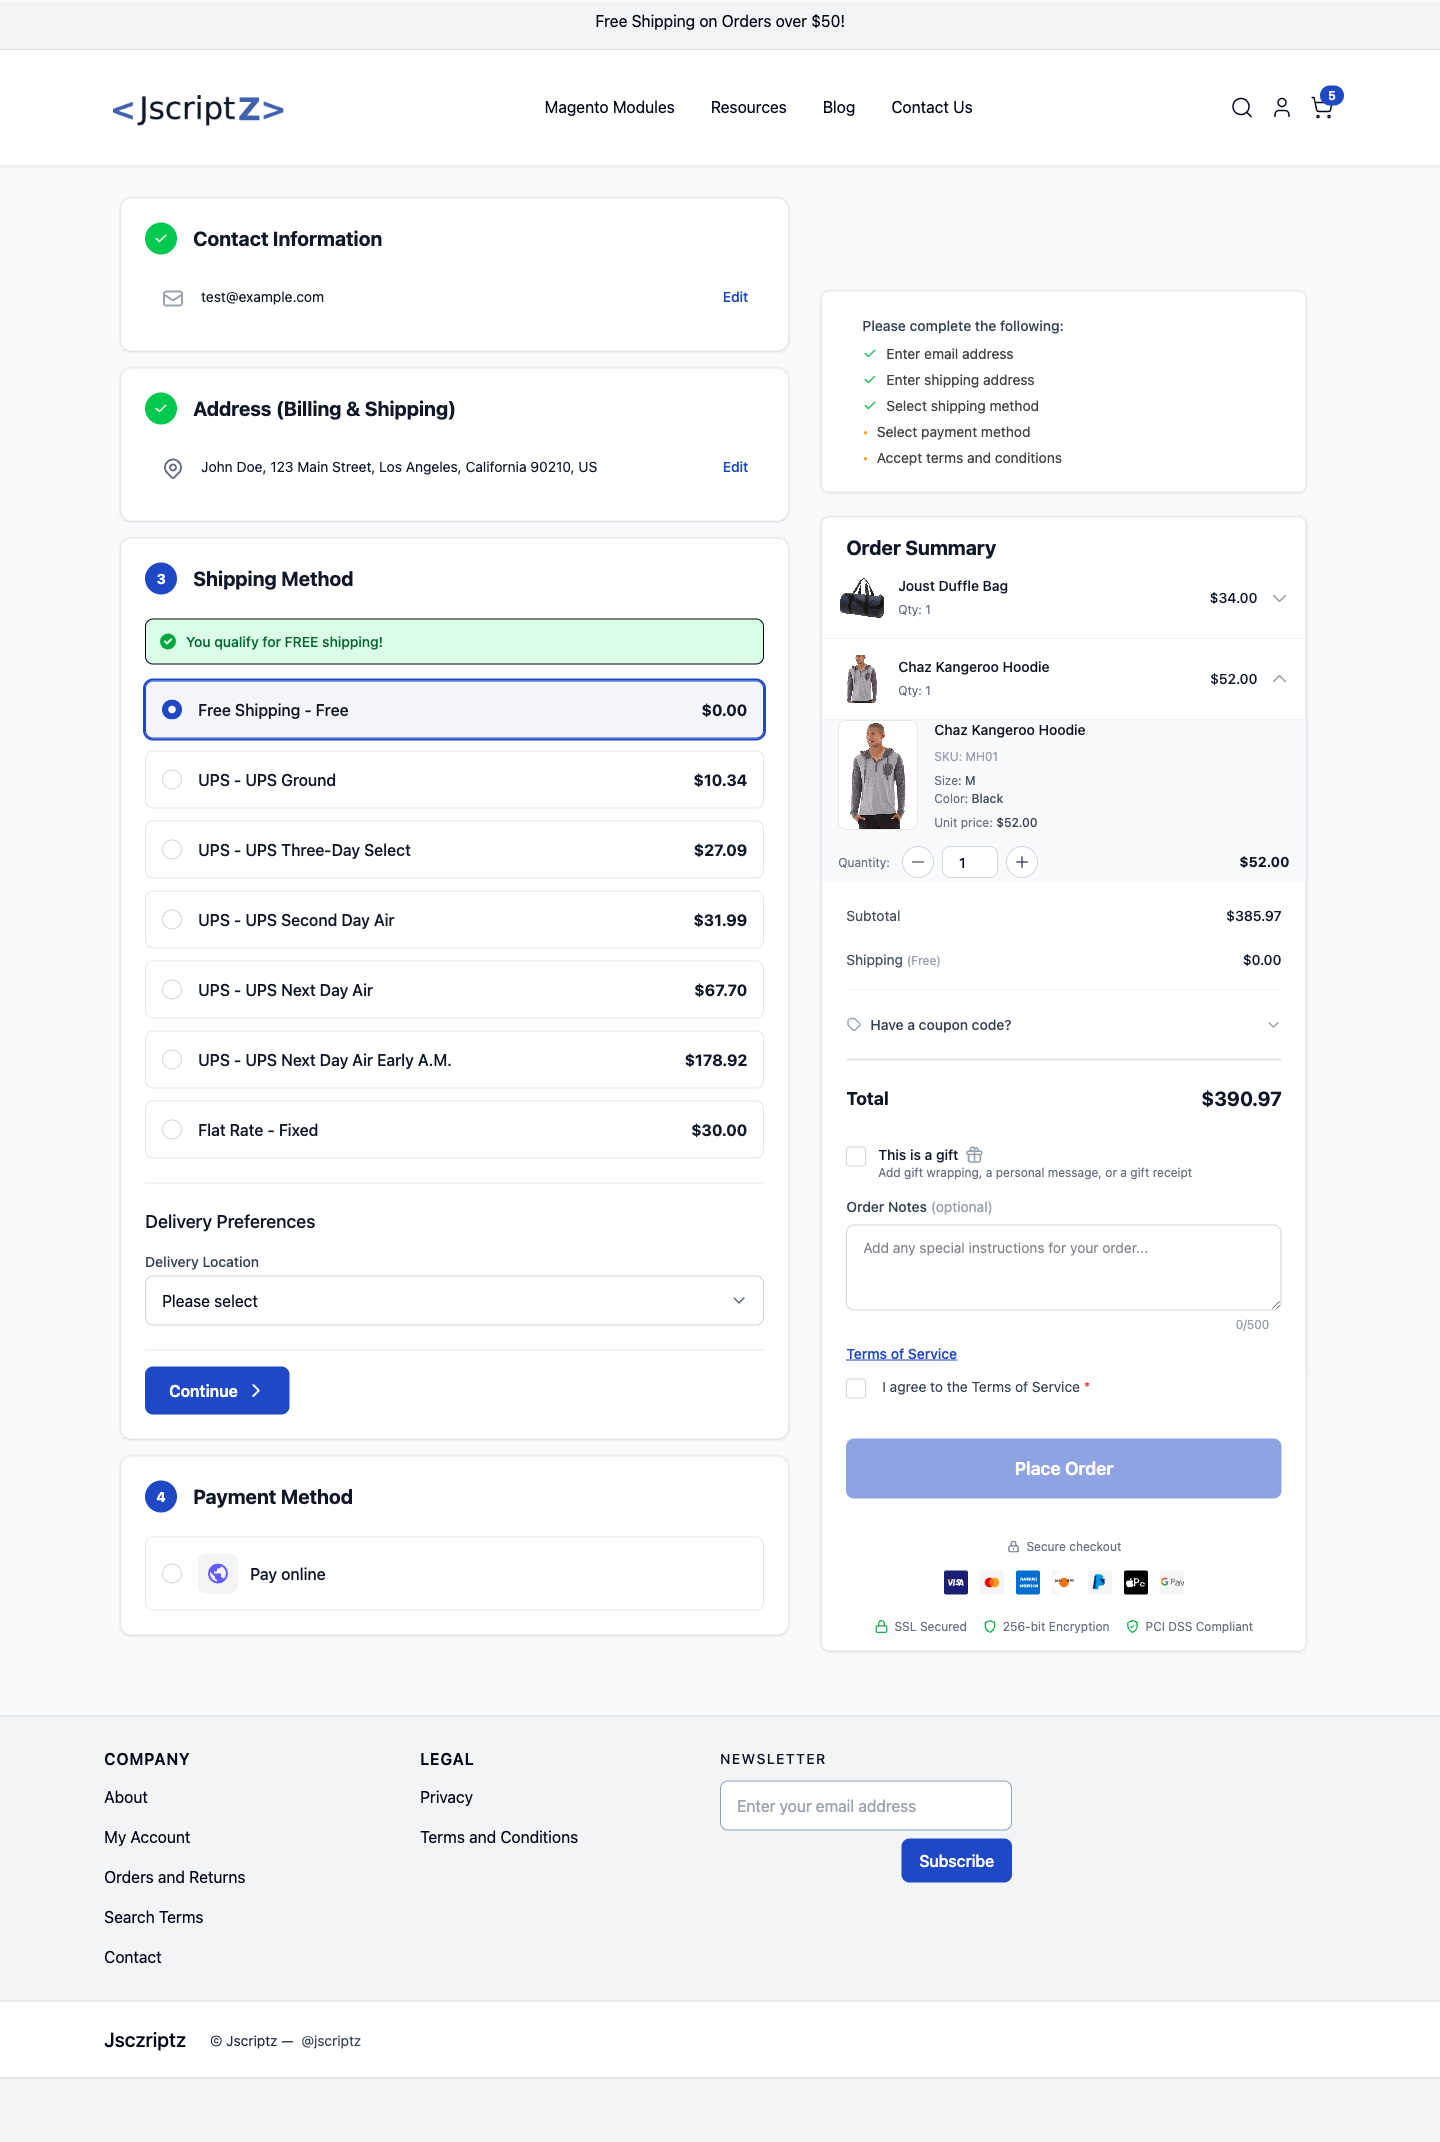
3.5 Smart Shipping Display
Smart shipping features help customers choose the best shipping option with visual badges and countdown timers.
| Feature | Description |
|---|---|
| Fastest Badge | Highlights the shipping method with shortest delivery time |
| Cheapest Badge | Highlights the lowest-cost shipping option |
| Cutoff Countdown | Shows time remaining until shipping cutoff (e.g., "Order in 2h 30m for same-day shipping") |
| Free Shipping Progress | Shows how much more is needed for free shipping threshold |
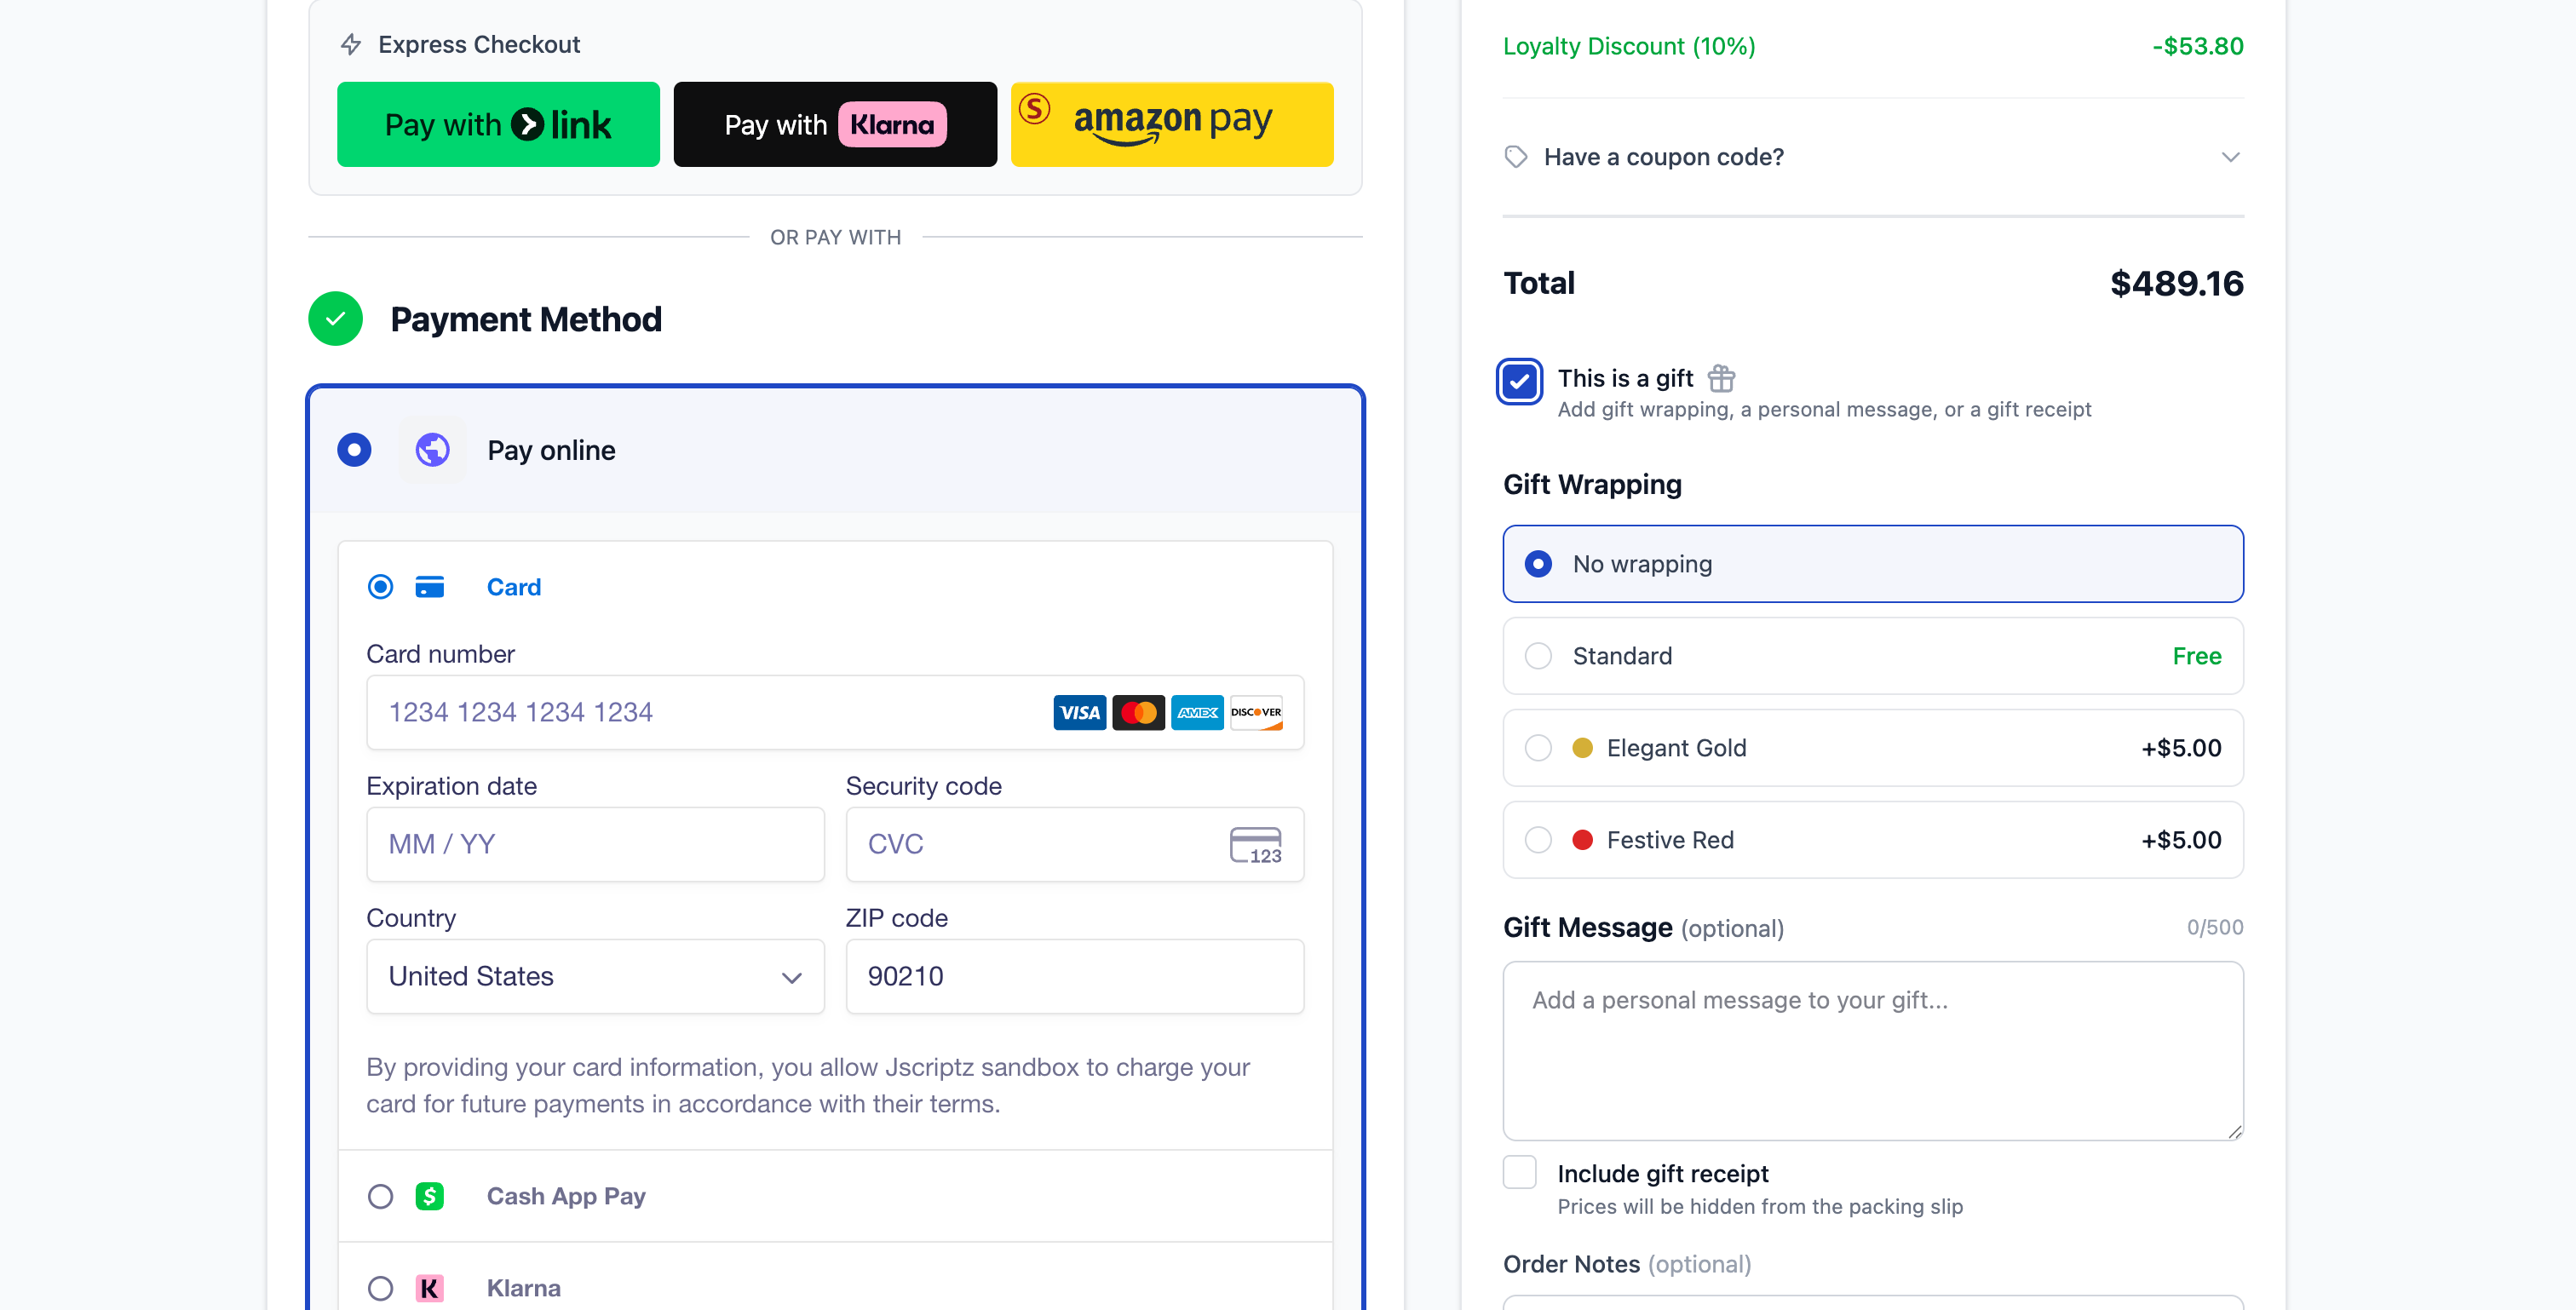
3.6 Gift Options
Enable gift wrapping, gift messages, and gift receipts for your checkout.
| Setting | Description |
|---|---|
| Enable Gift Options | Show gift options section in checkout |
| Gift Wrapping | Allow customers to select gift wrapping styles |
| Gift Message | Allow customers to add a personalized message |
| Gift Receipt | Option to include a price-hidden gift receipt |
3.7 Trust & Security Badges
Display trust badges to increase customer confidence during checkout.
| Badge Type | Description |
|---|---|
| Payment Method Badges | Show accepted payment method logos (Visa, Mastercard, etc.) |
| Security Badges | Display security certifications (SSL, PCI Compliant, etc.) |
| Guarantee Badges | Show satisfaction guarantees and return policies |
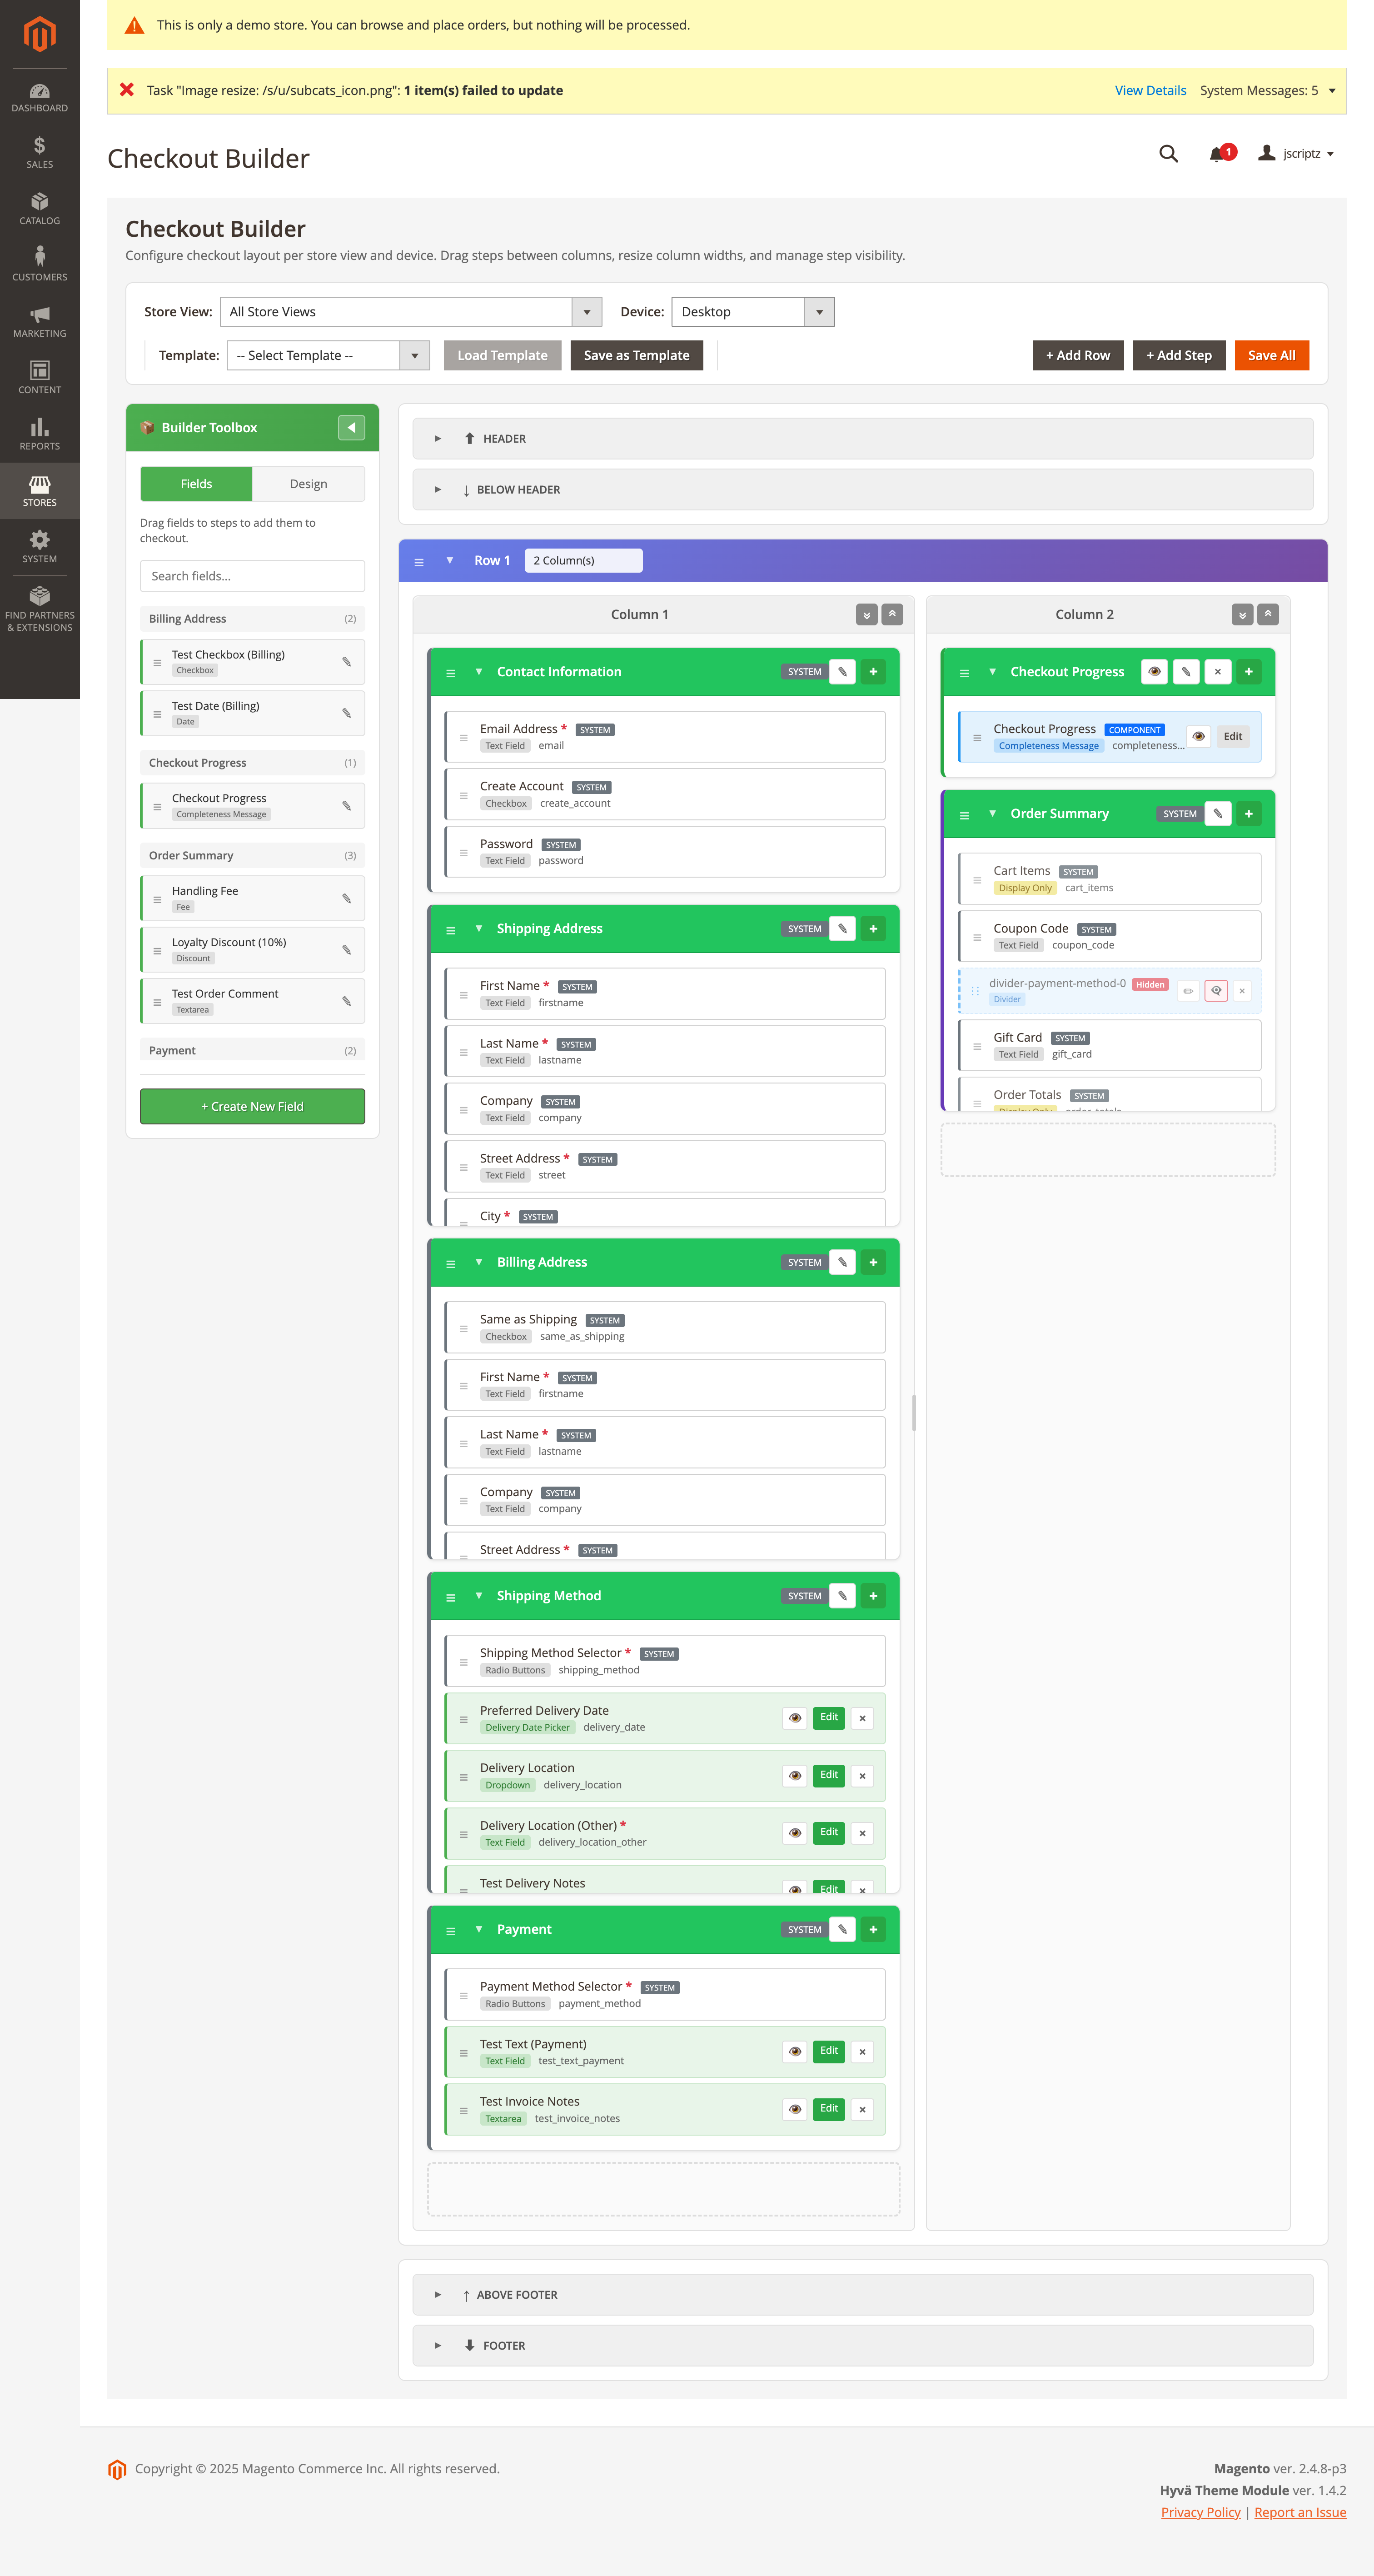
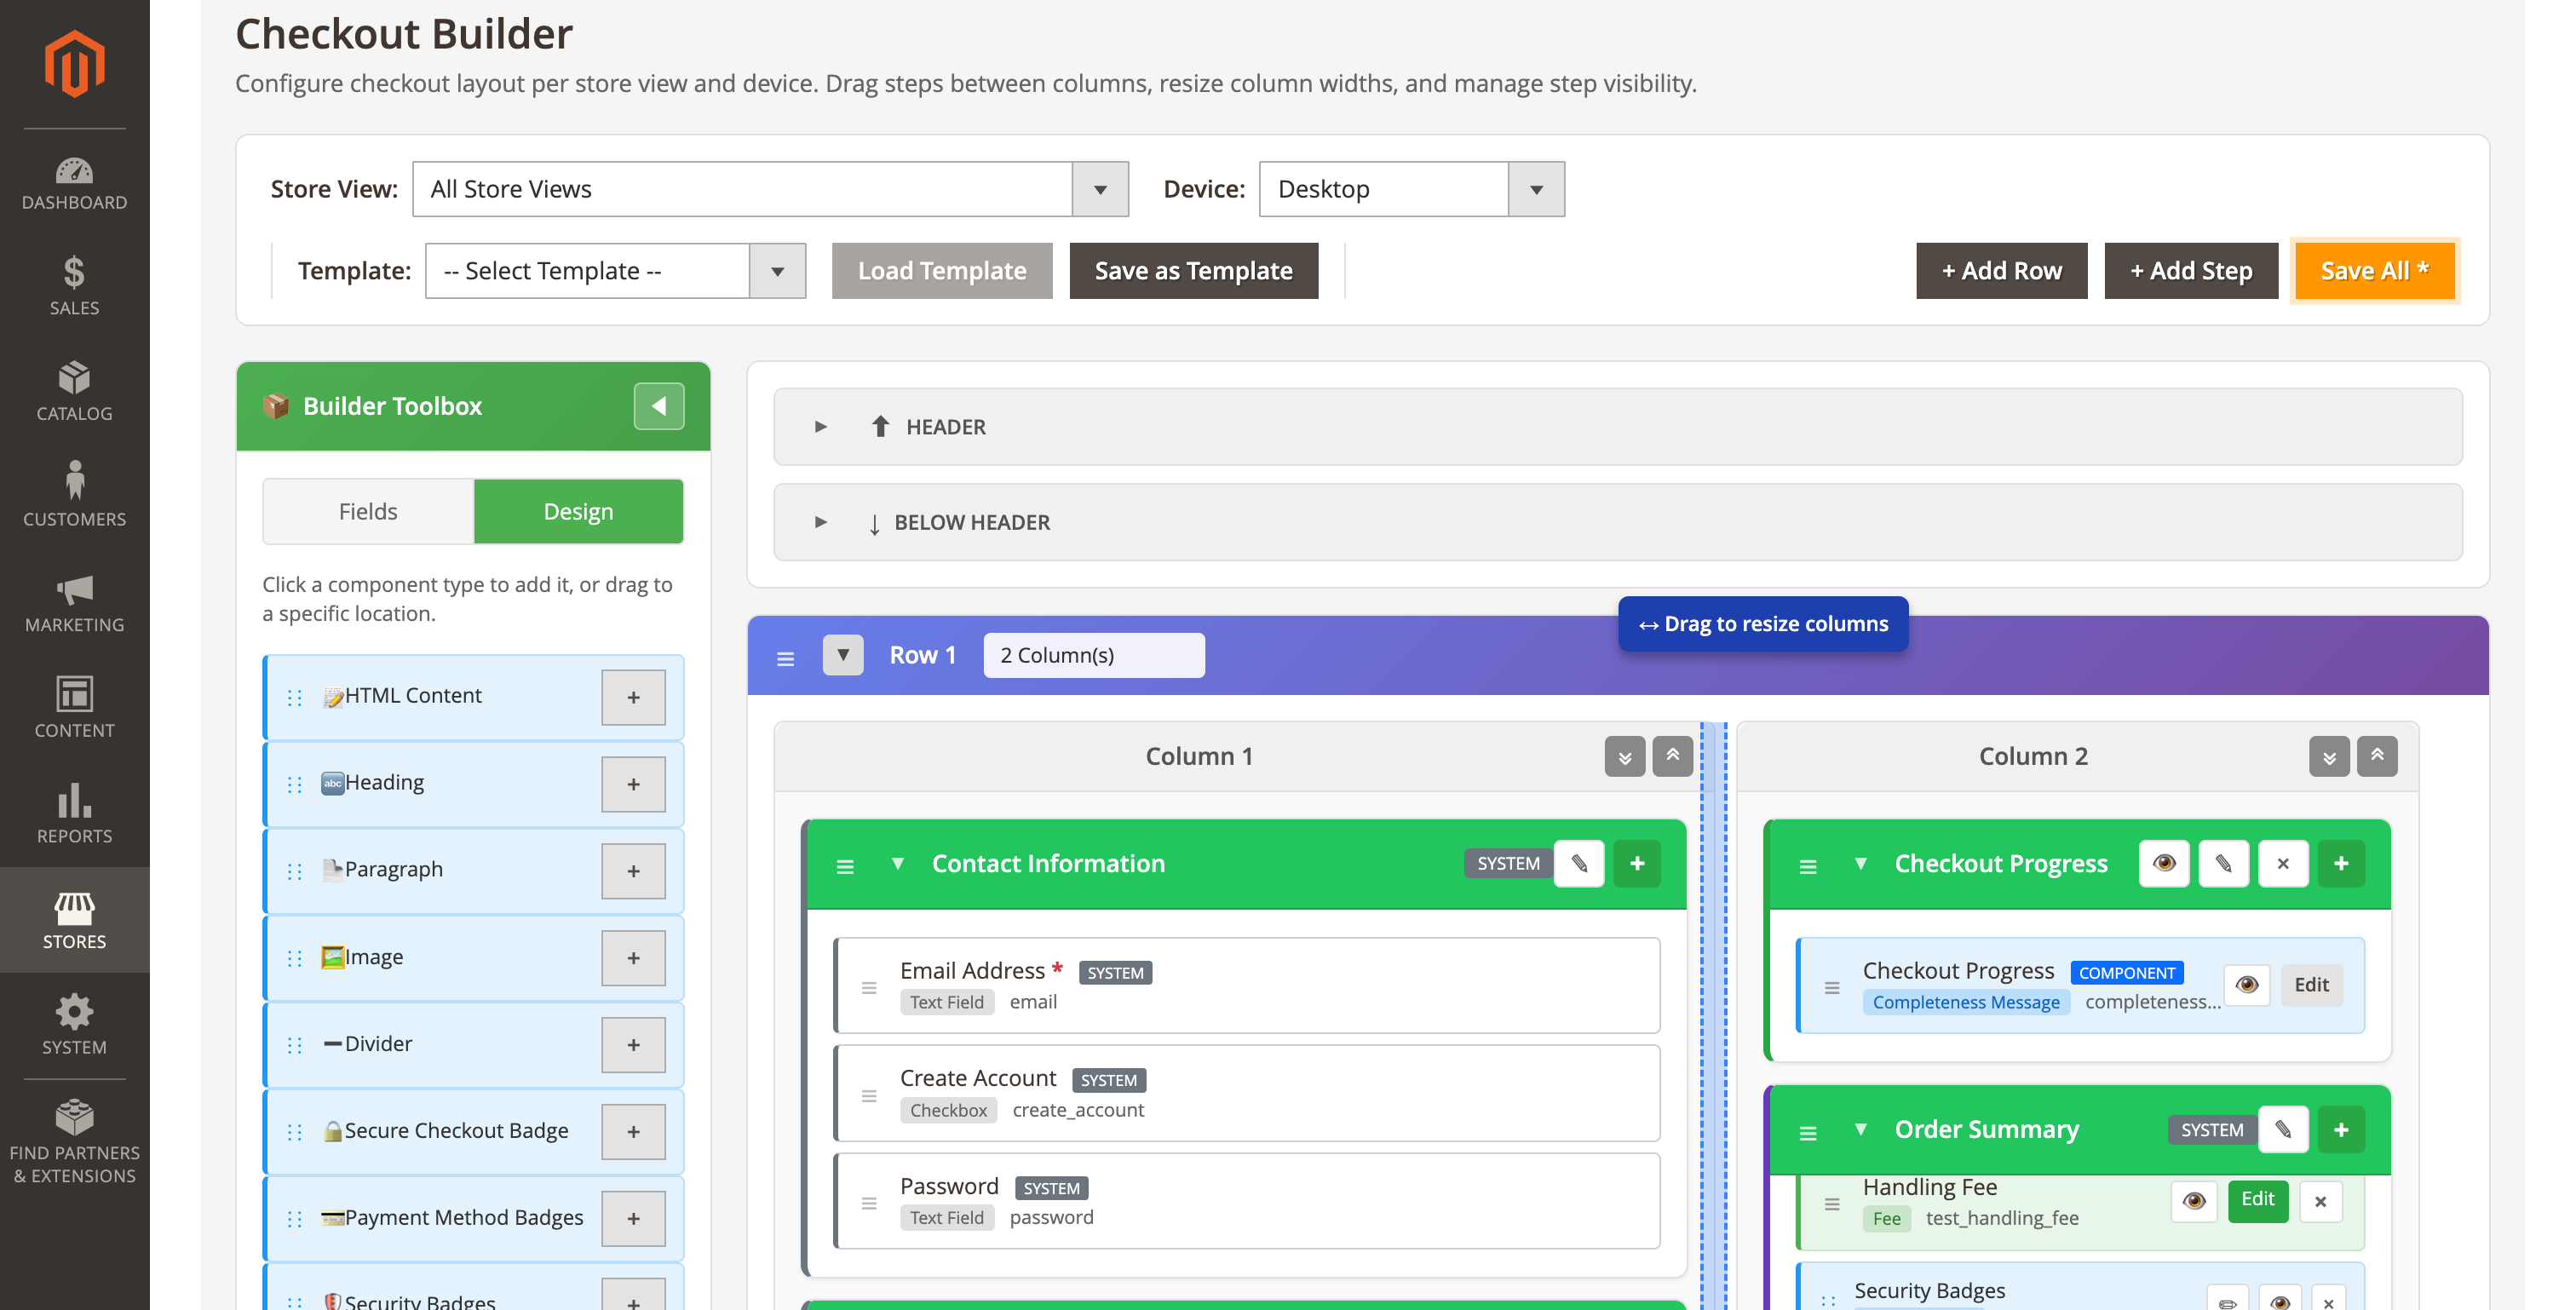
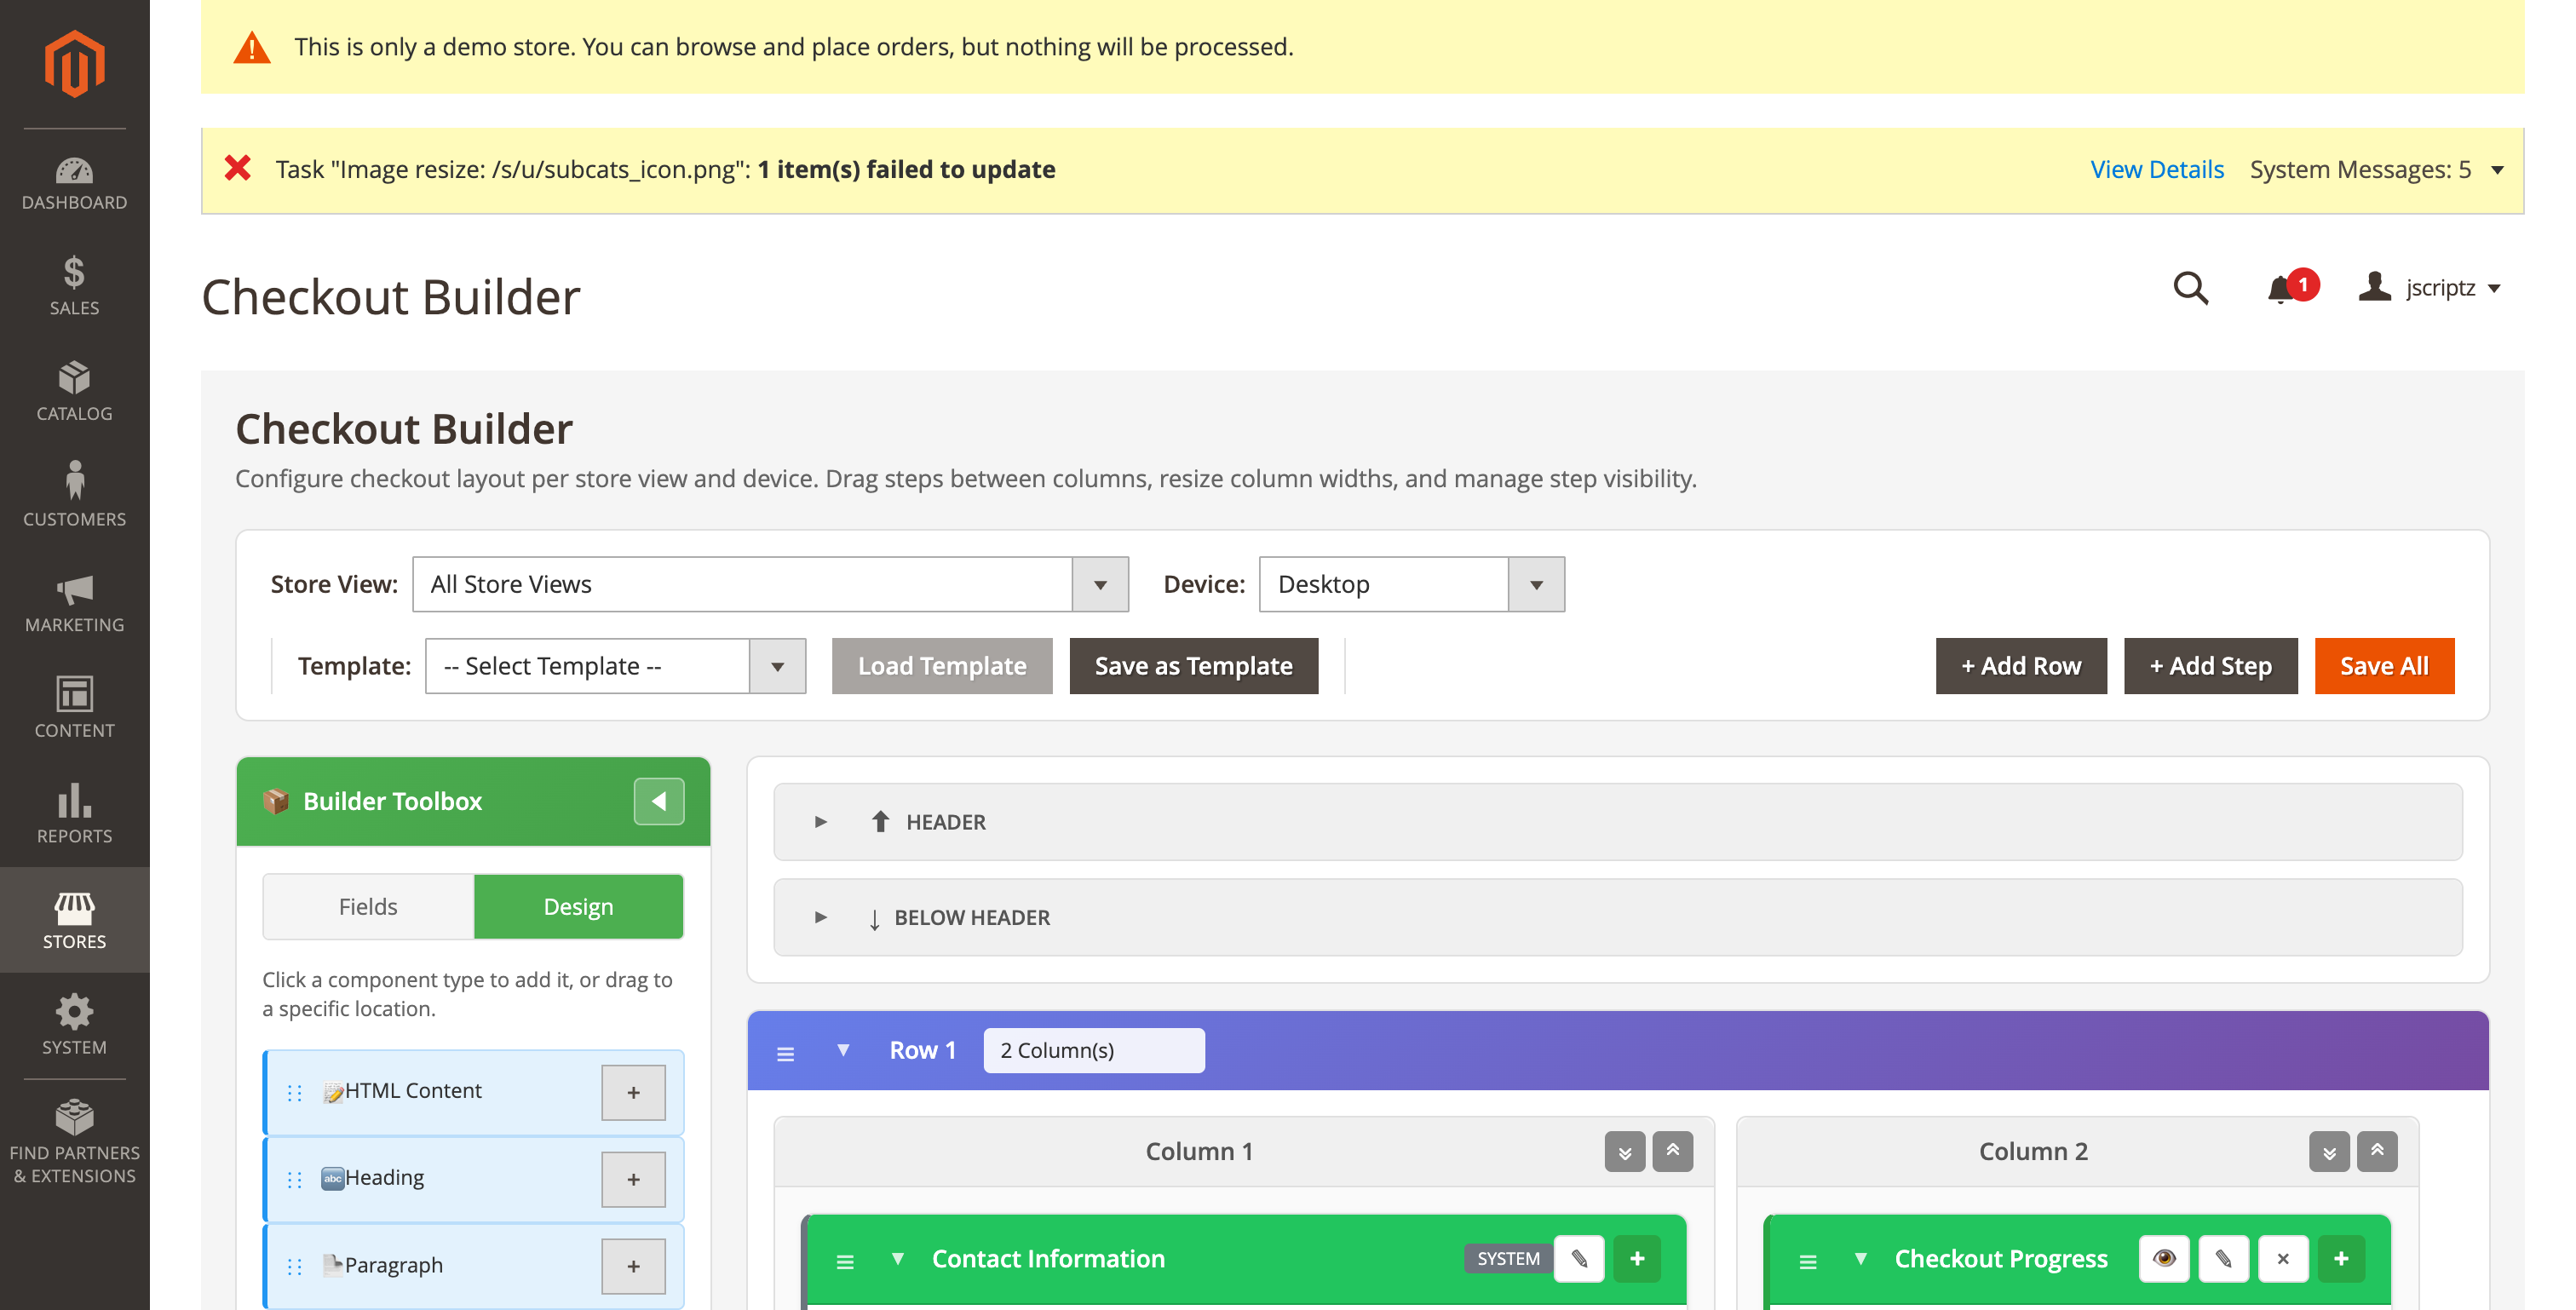
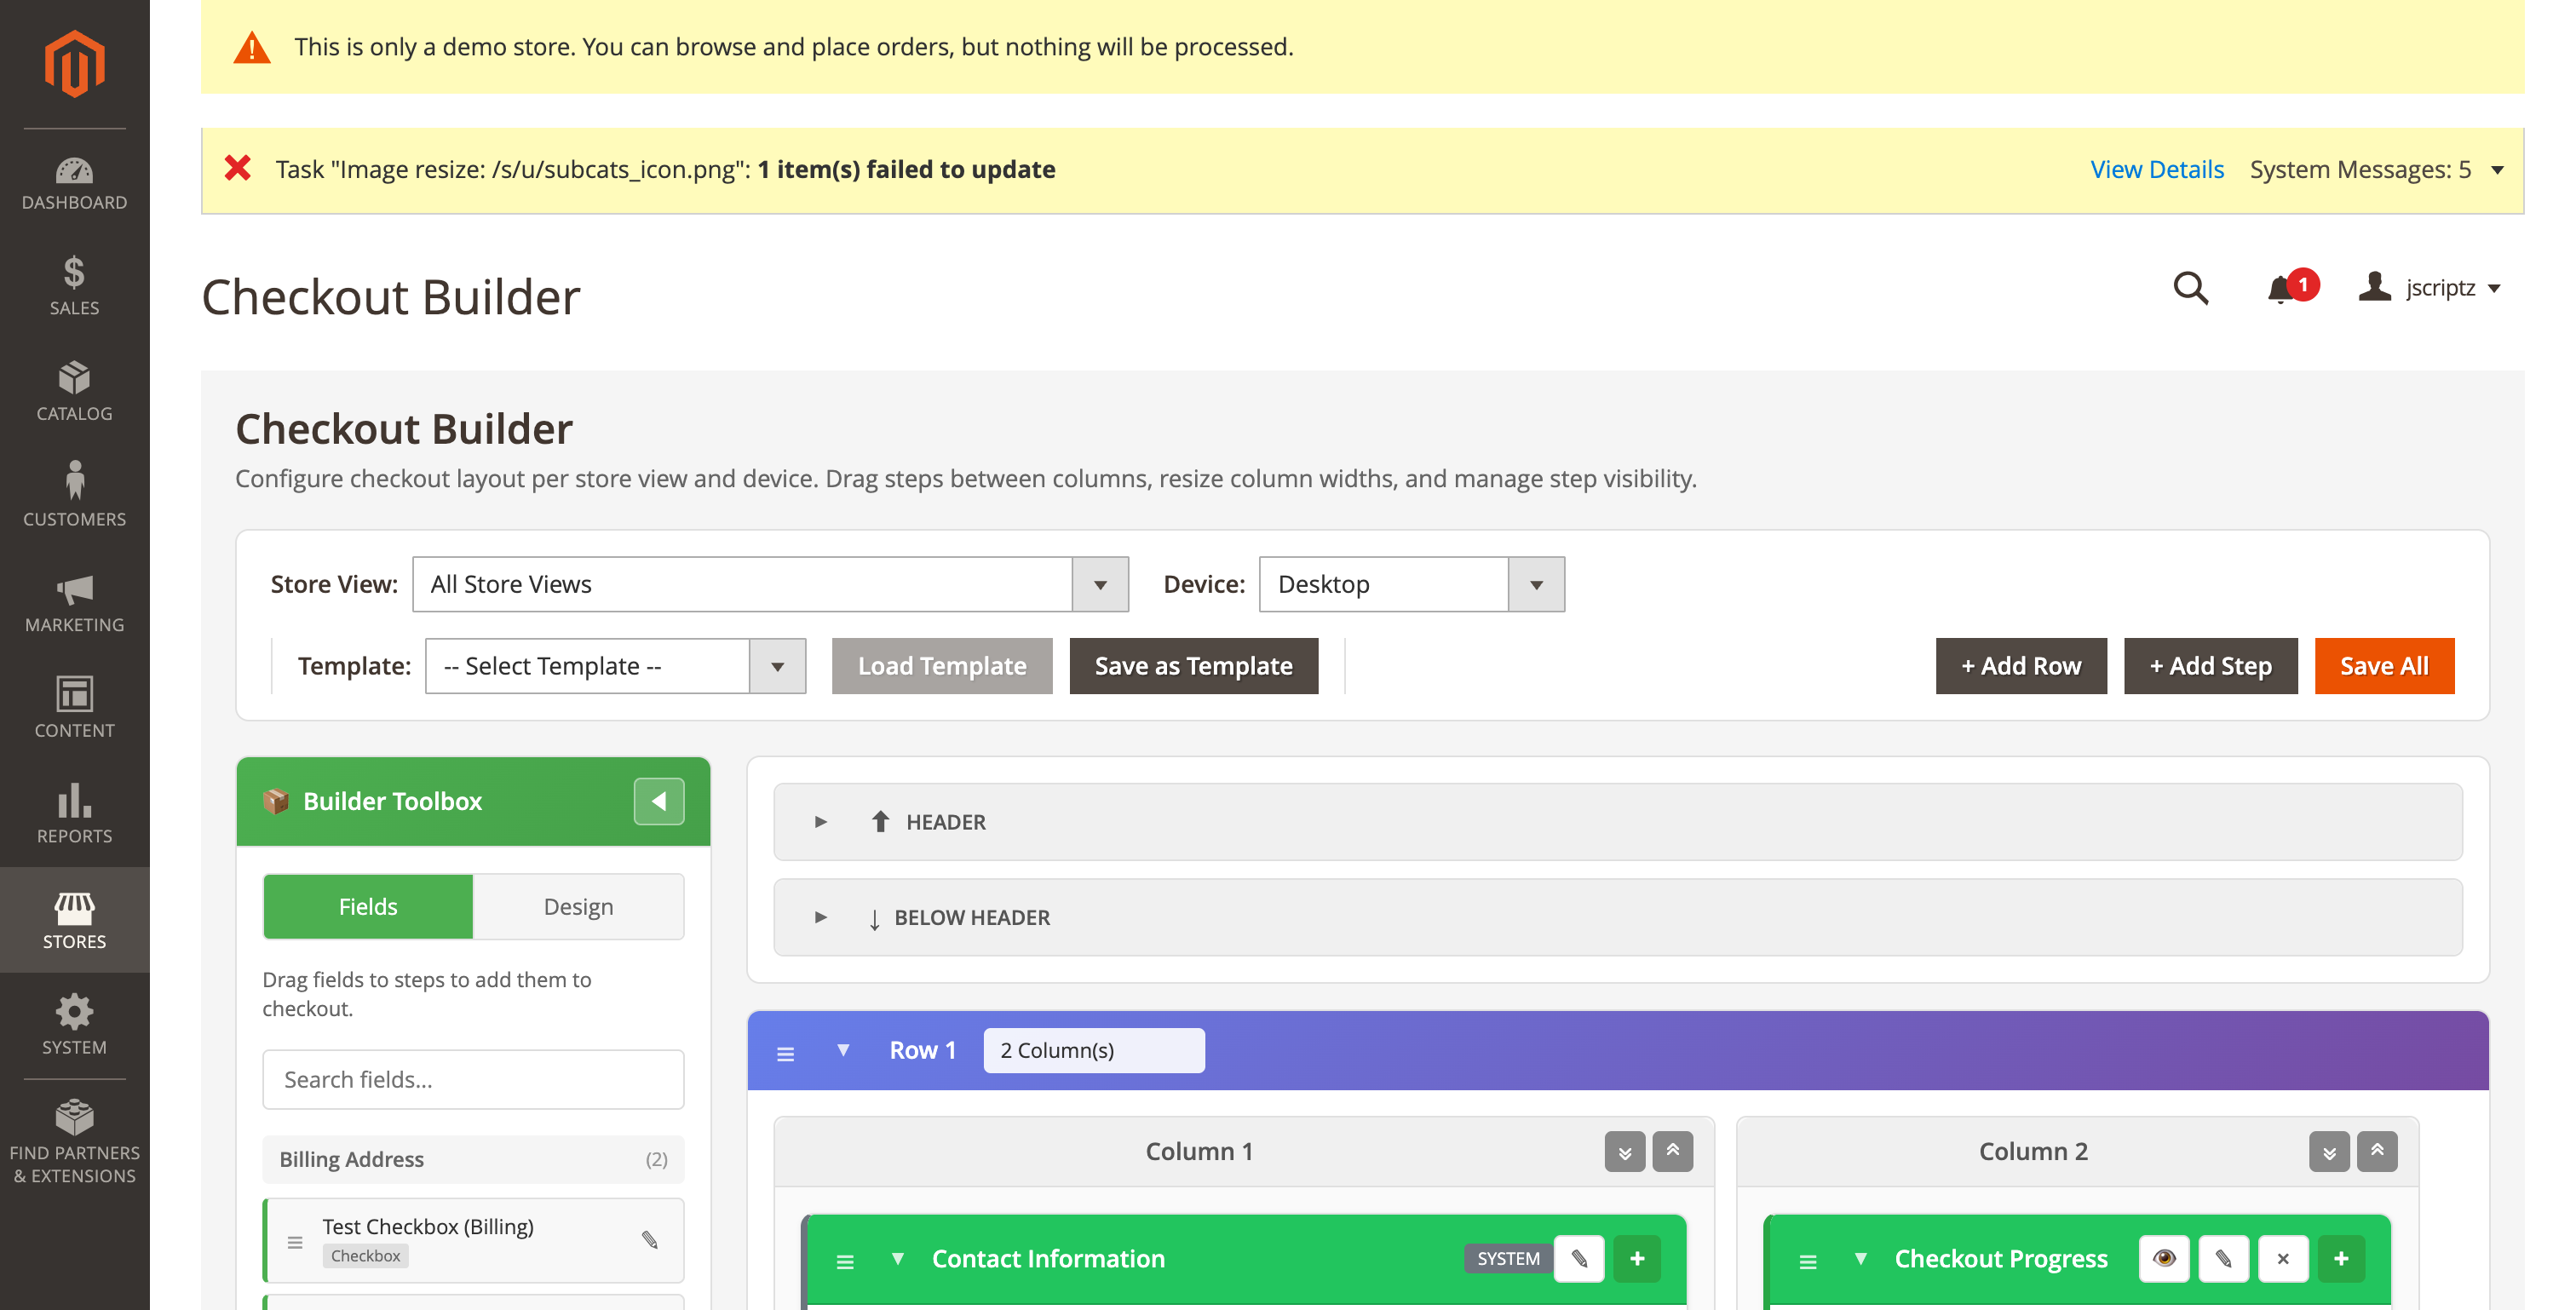
4. Checkout Builder
The Checkout Builder is a powerful visual interface for designing your checkout layout. Drag and drop steps, resize columns, and customize every aspect of the checkout experience.
4.1 Overview & Layout
The builder interface consists of:
- Toolbar - Store selector, device type, templates, and save actions
- Sidebar - Fields and Design Components tabs for drag-and-drop
- Canvas - Visual representation of the checkout layout with rows and columns
- Modals - Step editing, template management, and component configuration
4.2 Store & Device Selection
Configure different layouts for different stores and device types.
| Option | Description |
|---|---|
| Store View | Select which store view to configure (each can have unique layouts) |
| Device Type | Desktop, Tablet, or Mobile - each has independent layout configuration |

4.3 Layout Templates
Save and load checkout layouts as templates for quick configuration.
- System Templates - Pre-built layouts (2-Column, 3-Column, etc.)
- Custom Templates - Save your own layouts for reuse
- Load Template - Apply a template to the current store/device
- Delete Template - Remove saved custom templates

4.4 Row Management
The checkout layout uses a row/column grid system. Each row can contain 1-4 columns.
| Action | Description |
|---|---|
| Add Row | Click "Add Row" in the toolbar to add a new row |
| Column Count | Choose 1, 2, 3, or 4 columns per row |
| Reorder Rows | Drag rows using the handle to reorder |
| Delete Row | Remove rows by clicking the delete button |

4.5 Column Resize
Resize columns by dragging the handle between them. Column widths are saved as percentages.
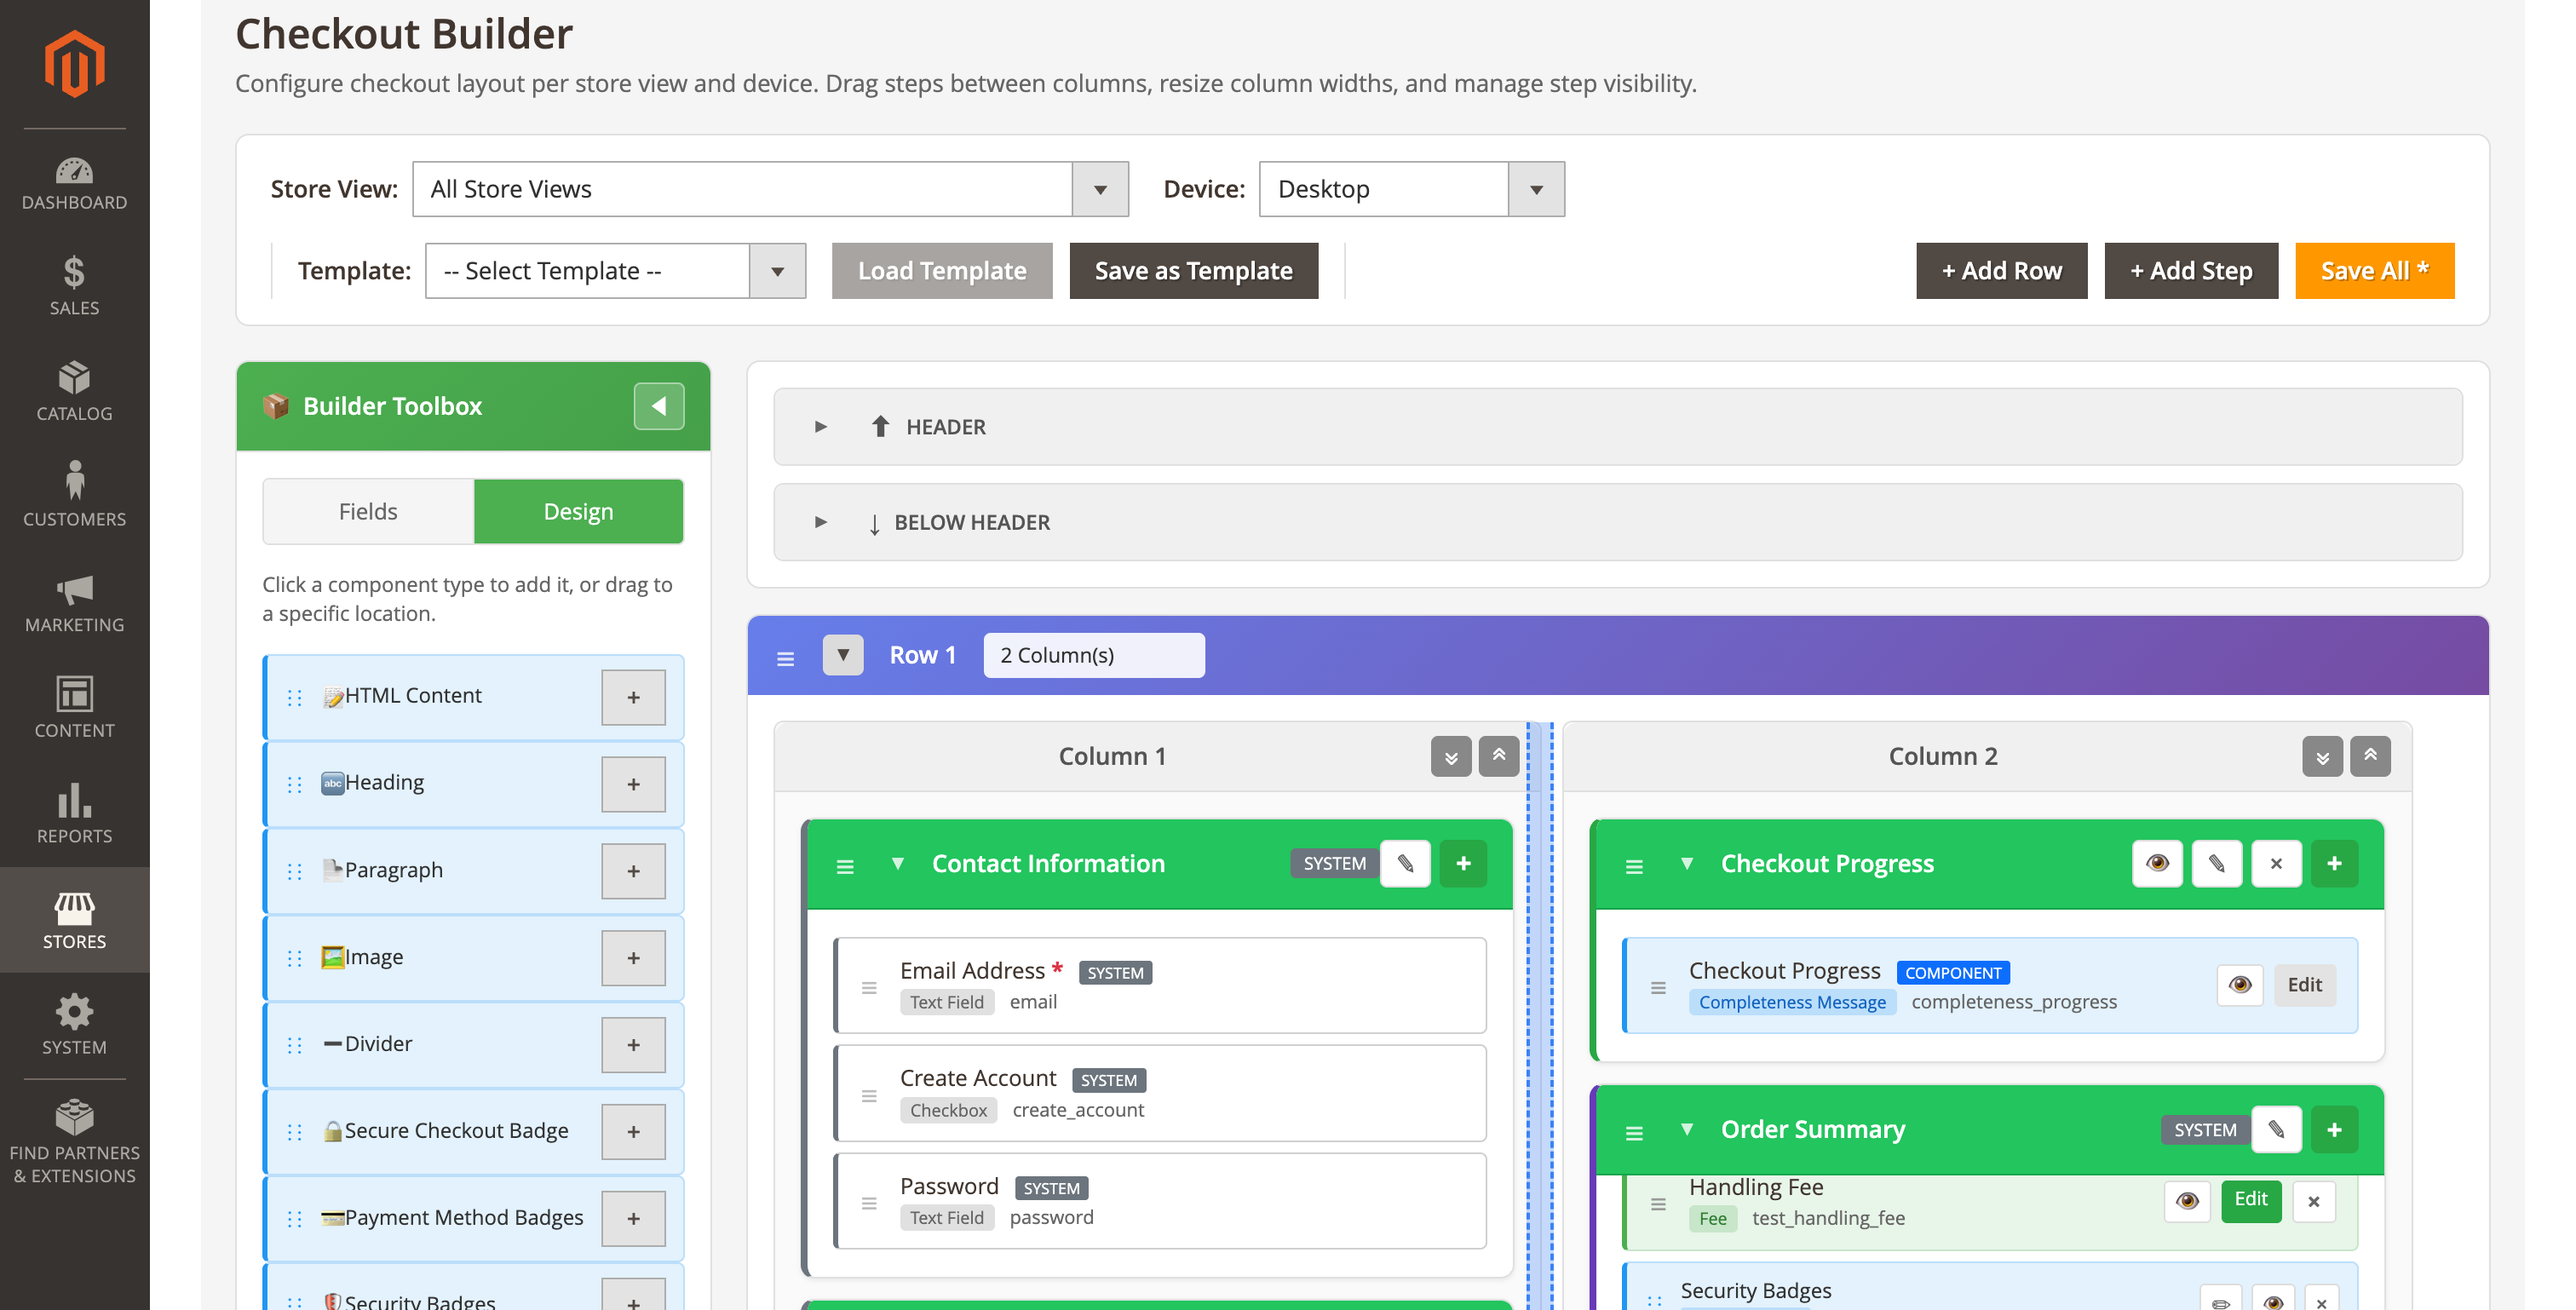
4.6 Step Management
Manage checkout steps including adding, editing, reordering, and grouping.
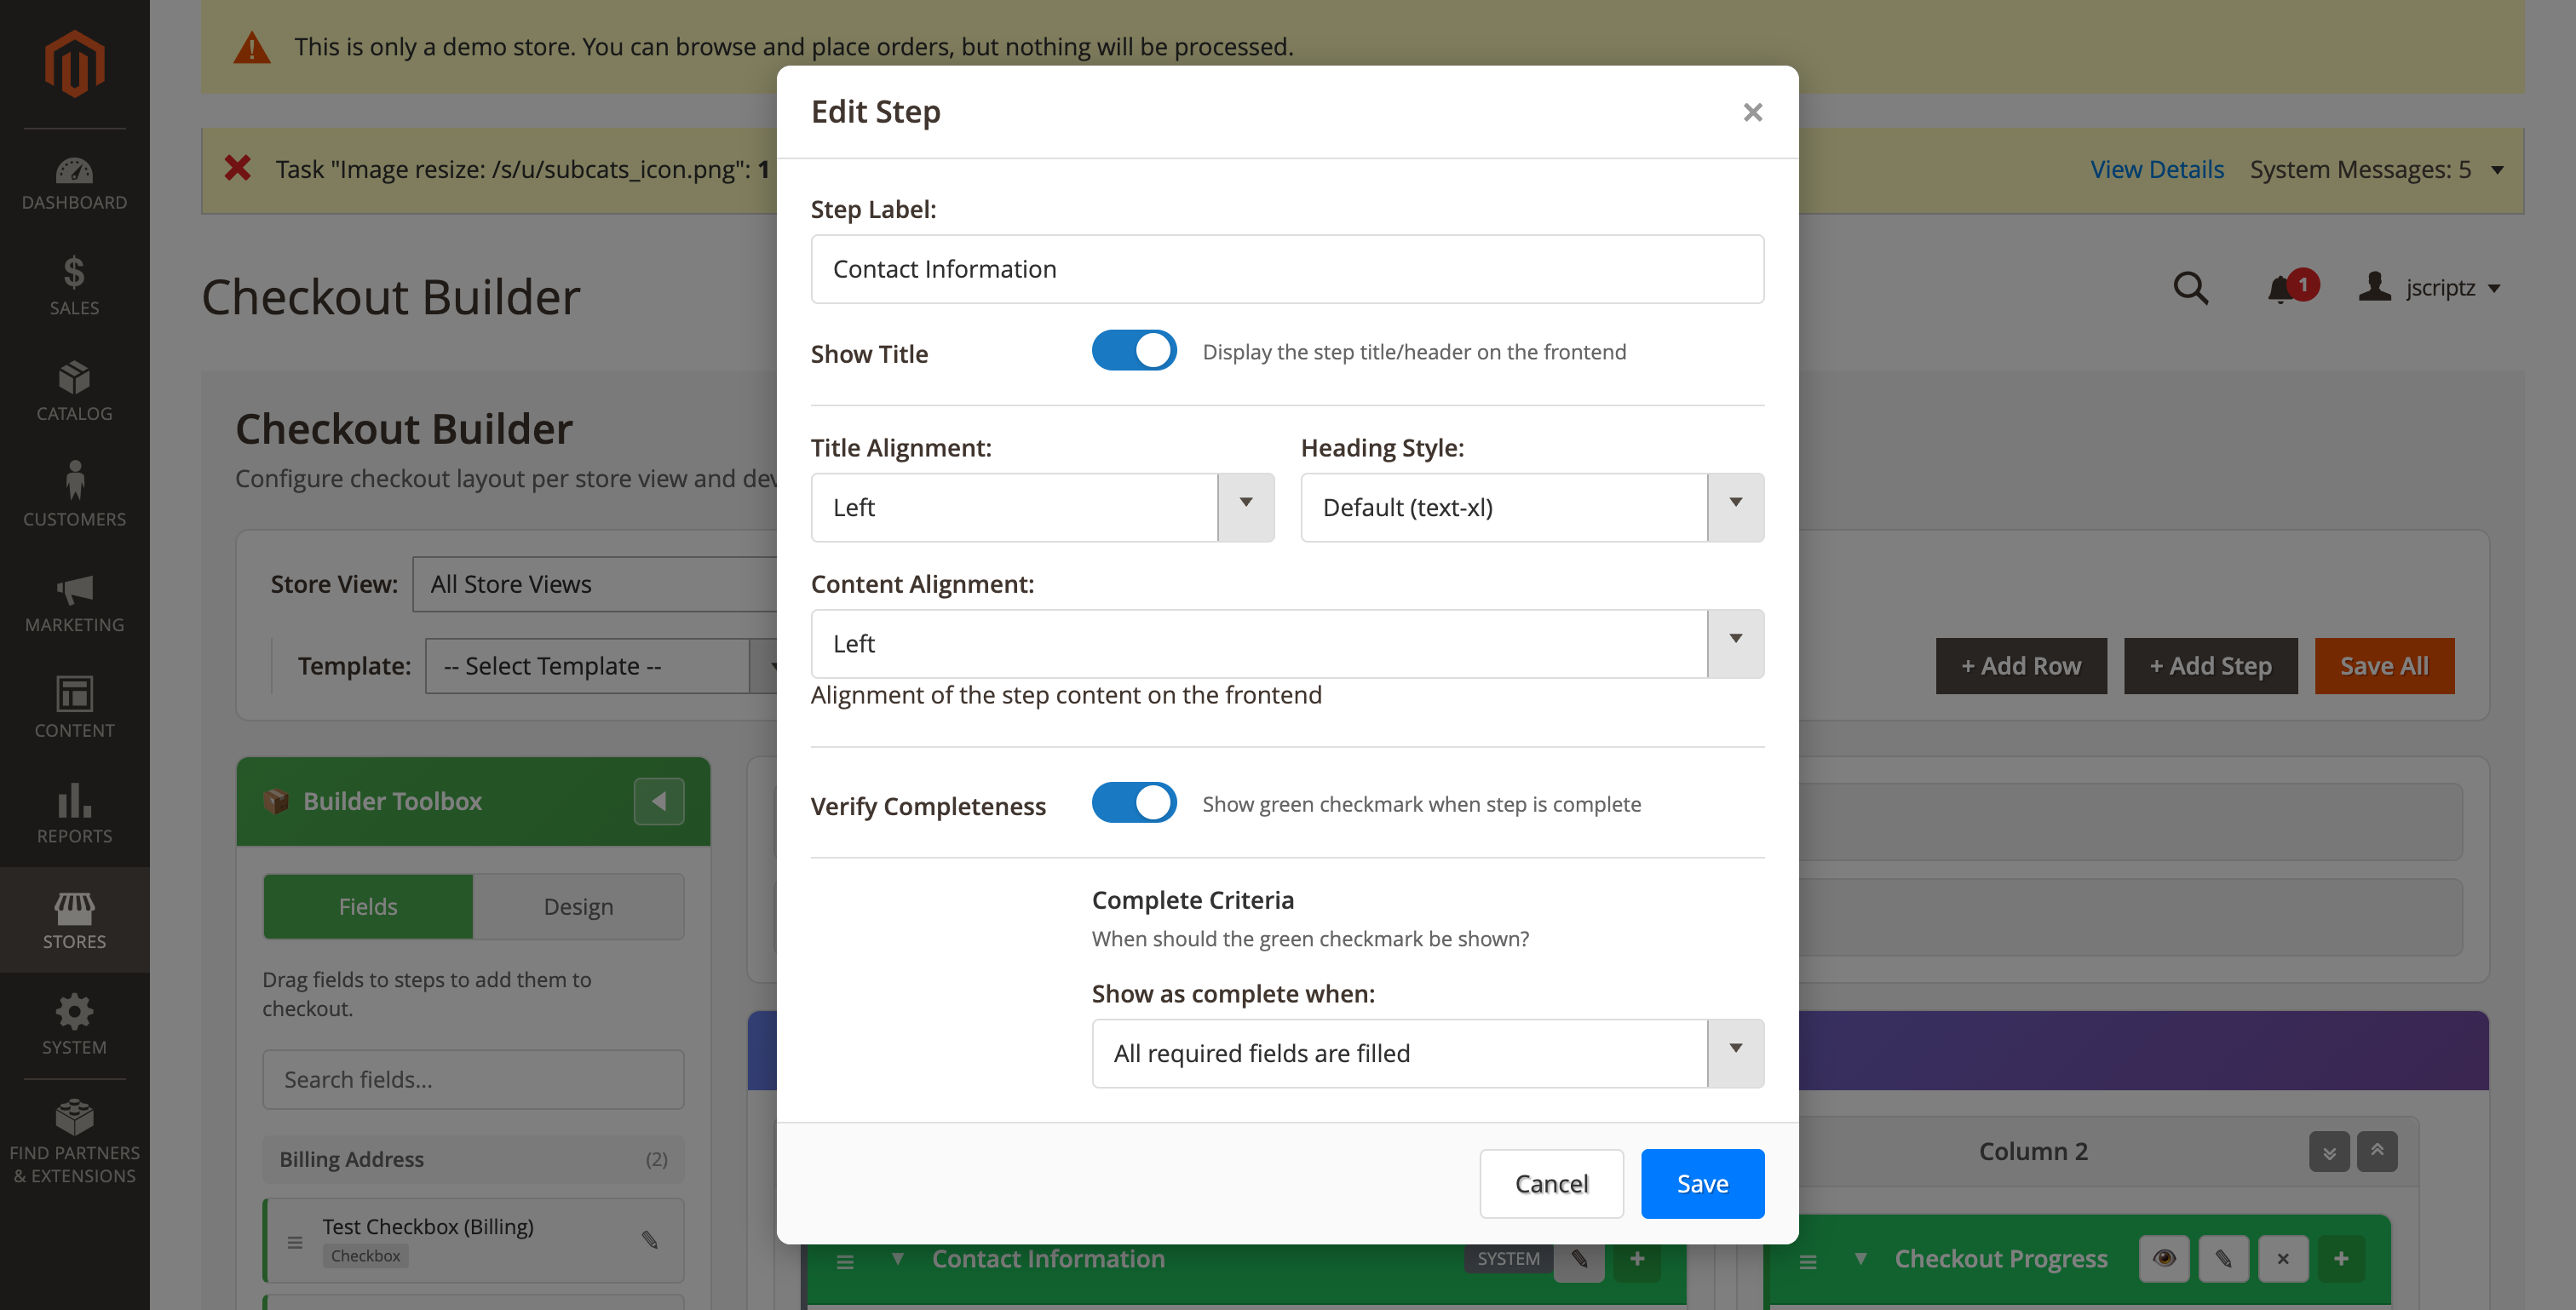
Step Properties
| Property | Description |
|---|---|
| Label | Display name for the step |
| Show Title | Whether to display the step title |
| Title Alignment | Left, Center, or Right alignment |
| Heading Style | Text size (text-xl, text-2xl, text-lg, text-base) |
| Verify Completeness | Show green checkmark when step is complete |
| Is Collapsible | Allow step to collapse when complete |
| Collapse Criteria | When to collapse: Required Fields, All Fields, or Specific Fields |
| Collapse Fields | Specific fields to check (when using Specific Fields criteria) |
- Each step's collapse behavior is controlled by its Is Collapsible, Collapse Criteria, and Collapse Fields settings
- A step requires confirmation (Continue button click) if it has a continue button field or visible custom input fields
- Steps without continue buttons auto-collapse when their collapse criteria is met
4.7 Design Components
Add visual elements to enhance your checkout layout.
| Component | Description |
|---|---|
| Heading | Add text headings with customizable styles |
| HTML | Insert custom HTML content |
| Divider | Visual separator between sections |
| Image | Display images or logos |
| Secure Checkout Badge | Trust indicator for security |
| Payment Method Badges | Accepted payment method logos |
| Security Badges | SSL, PCI, and other certifications |
| Guarantee Badges | Money-back guarantees, return policies |
| Coupon Code | Coupon code entry field |
| Gift Card | Gift card code entry field |
4.8 Fields Tab
The Fields tab shows all available fields that can be dragged to checkout steps.
- System Fields - Core checkout fields (email, address fields, etc.)
- Custom Fields - User-created fields from the Checkout Fields admin
- Search - Filter fields by name
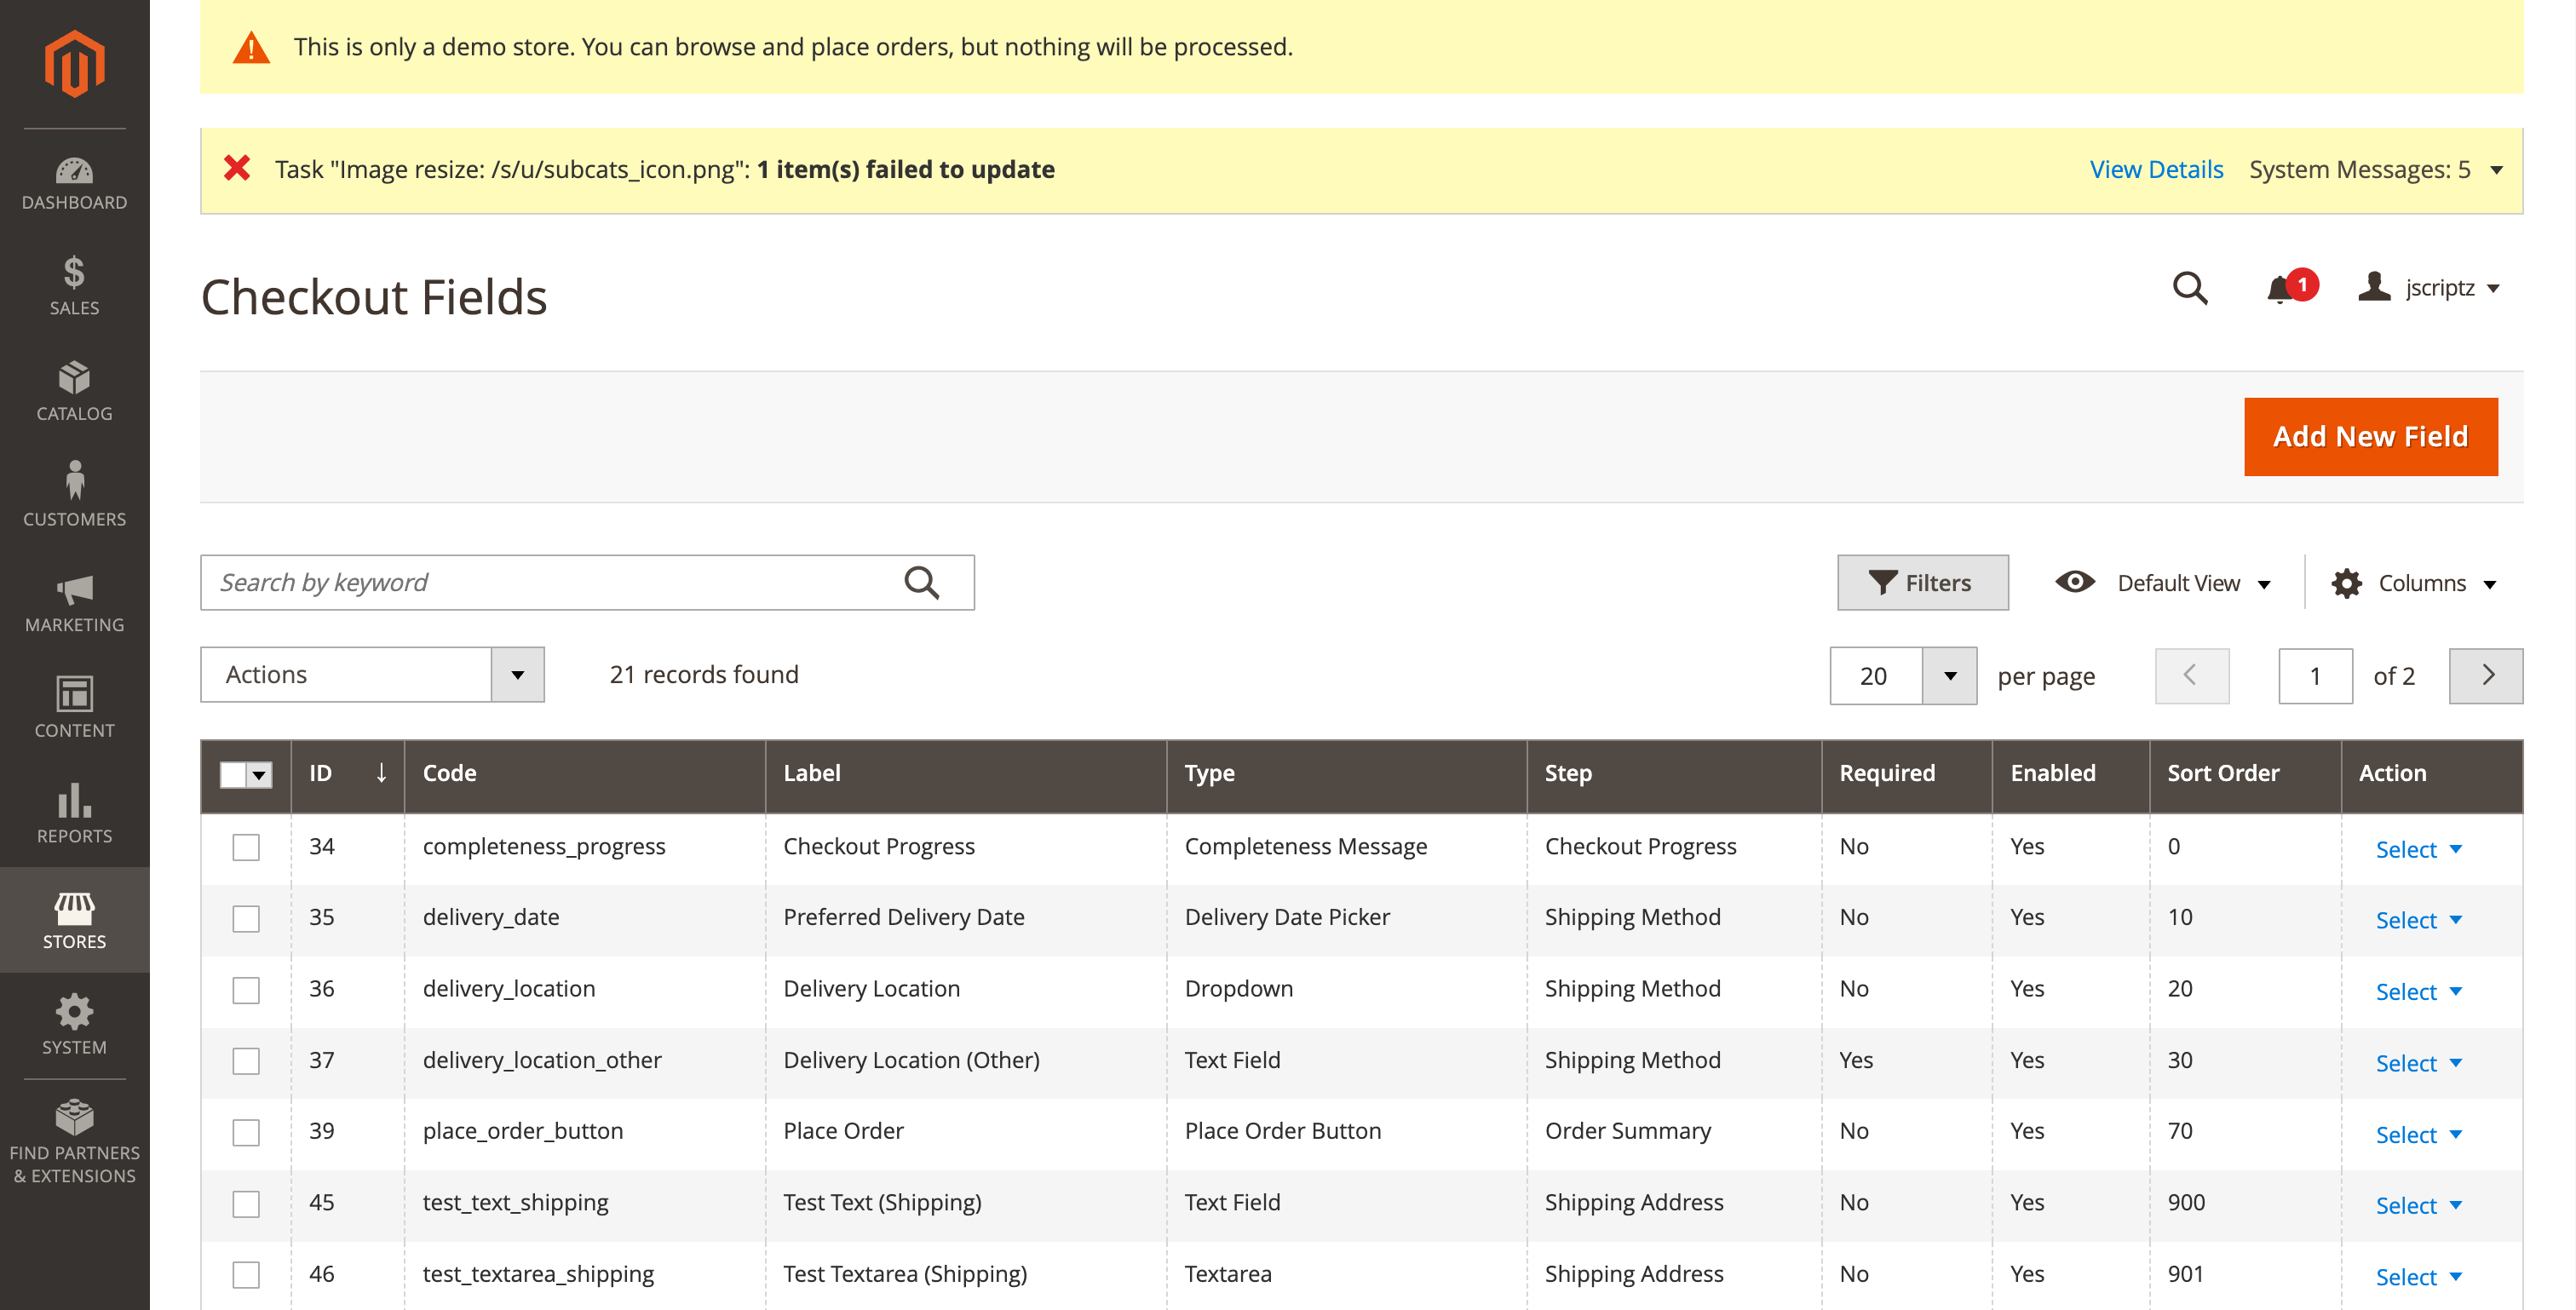
5. Custom Checkout Fields
Create custom fields to collect additional information during checkout. Fields can be displayed in orders, invoices, shipments, and emails.
5.1 Field Types
| Category | Types | Description |
|---|---|---|
| Input Fields | text, email, textarea, tel, number | Standard text input fields with various formats |
| Selection Fields | select, multiselect, radio, checkbox, yesno | Fields with predefined options |
| Date/Time | date, time, delivery_date | Date and time pickers |
| Content Fields | html, heading, paragraph | Static content display (not collected) |
| File Upload | file | Allow customers to upload files |
| UI Components | place_order_button, completeness_message, secure_badge | Special checkout UI elements |
5.2 Creating Fields
To create a new field, click "Add New Field" and configure the following:
| Setting | Description | Required |
|---|---|---|
| Field Code | Unique identifier (lowercase, underscores) | Yes |
| Label | Display name shown to customers | Yes |
| Field Type | Type of input field | Yes |
| Checkout Step | Which step to display the field in | Yes |
| Sort Order | Position within the step (lower = higher) | No |
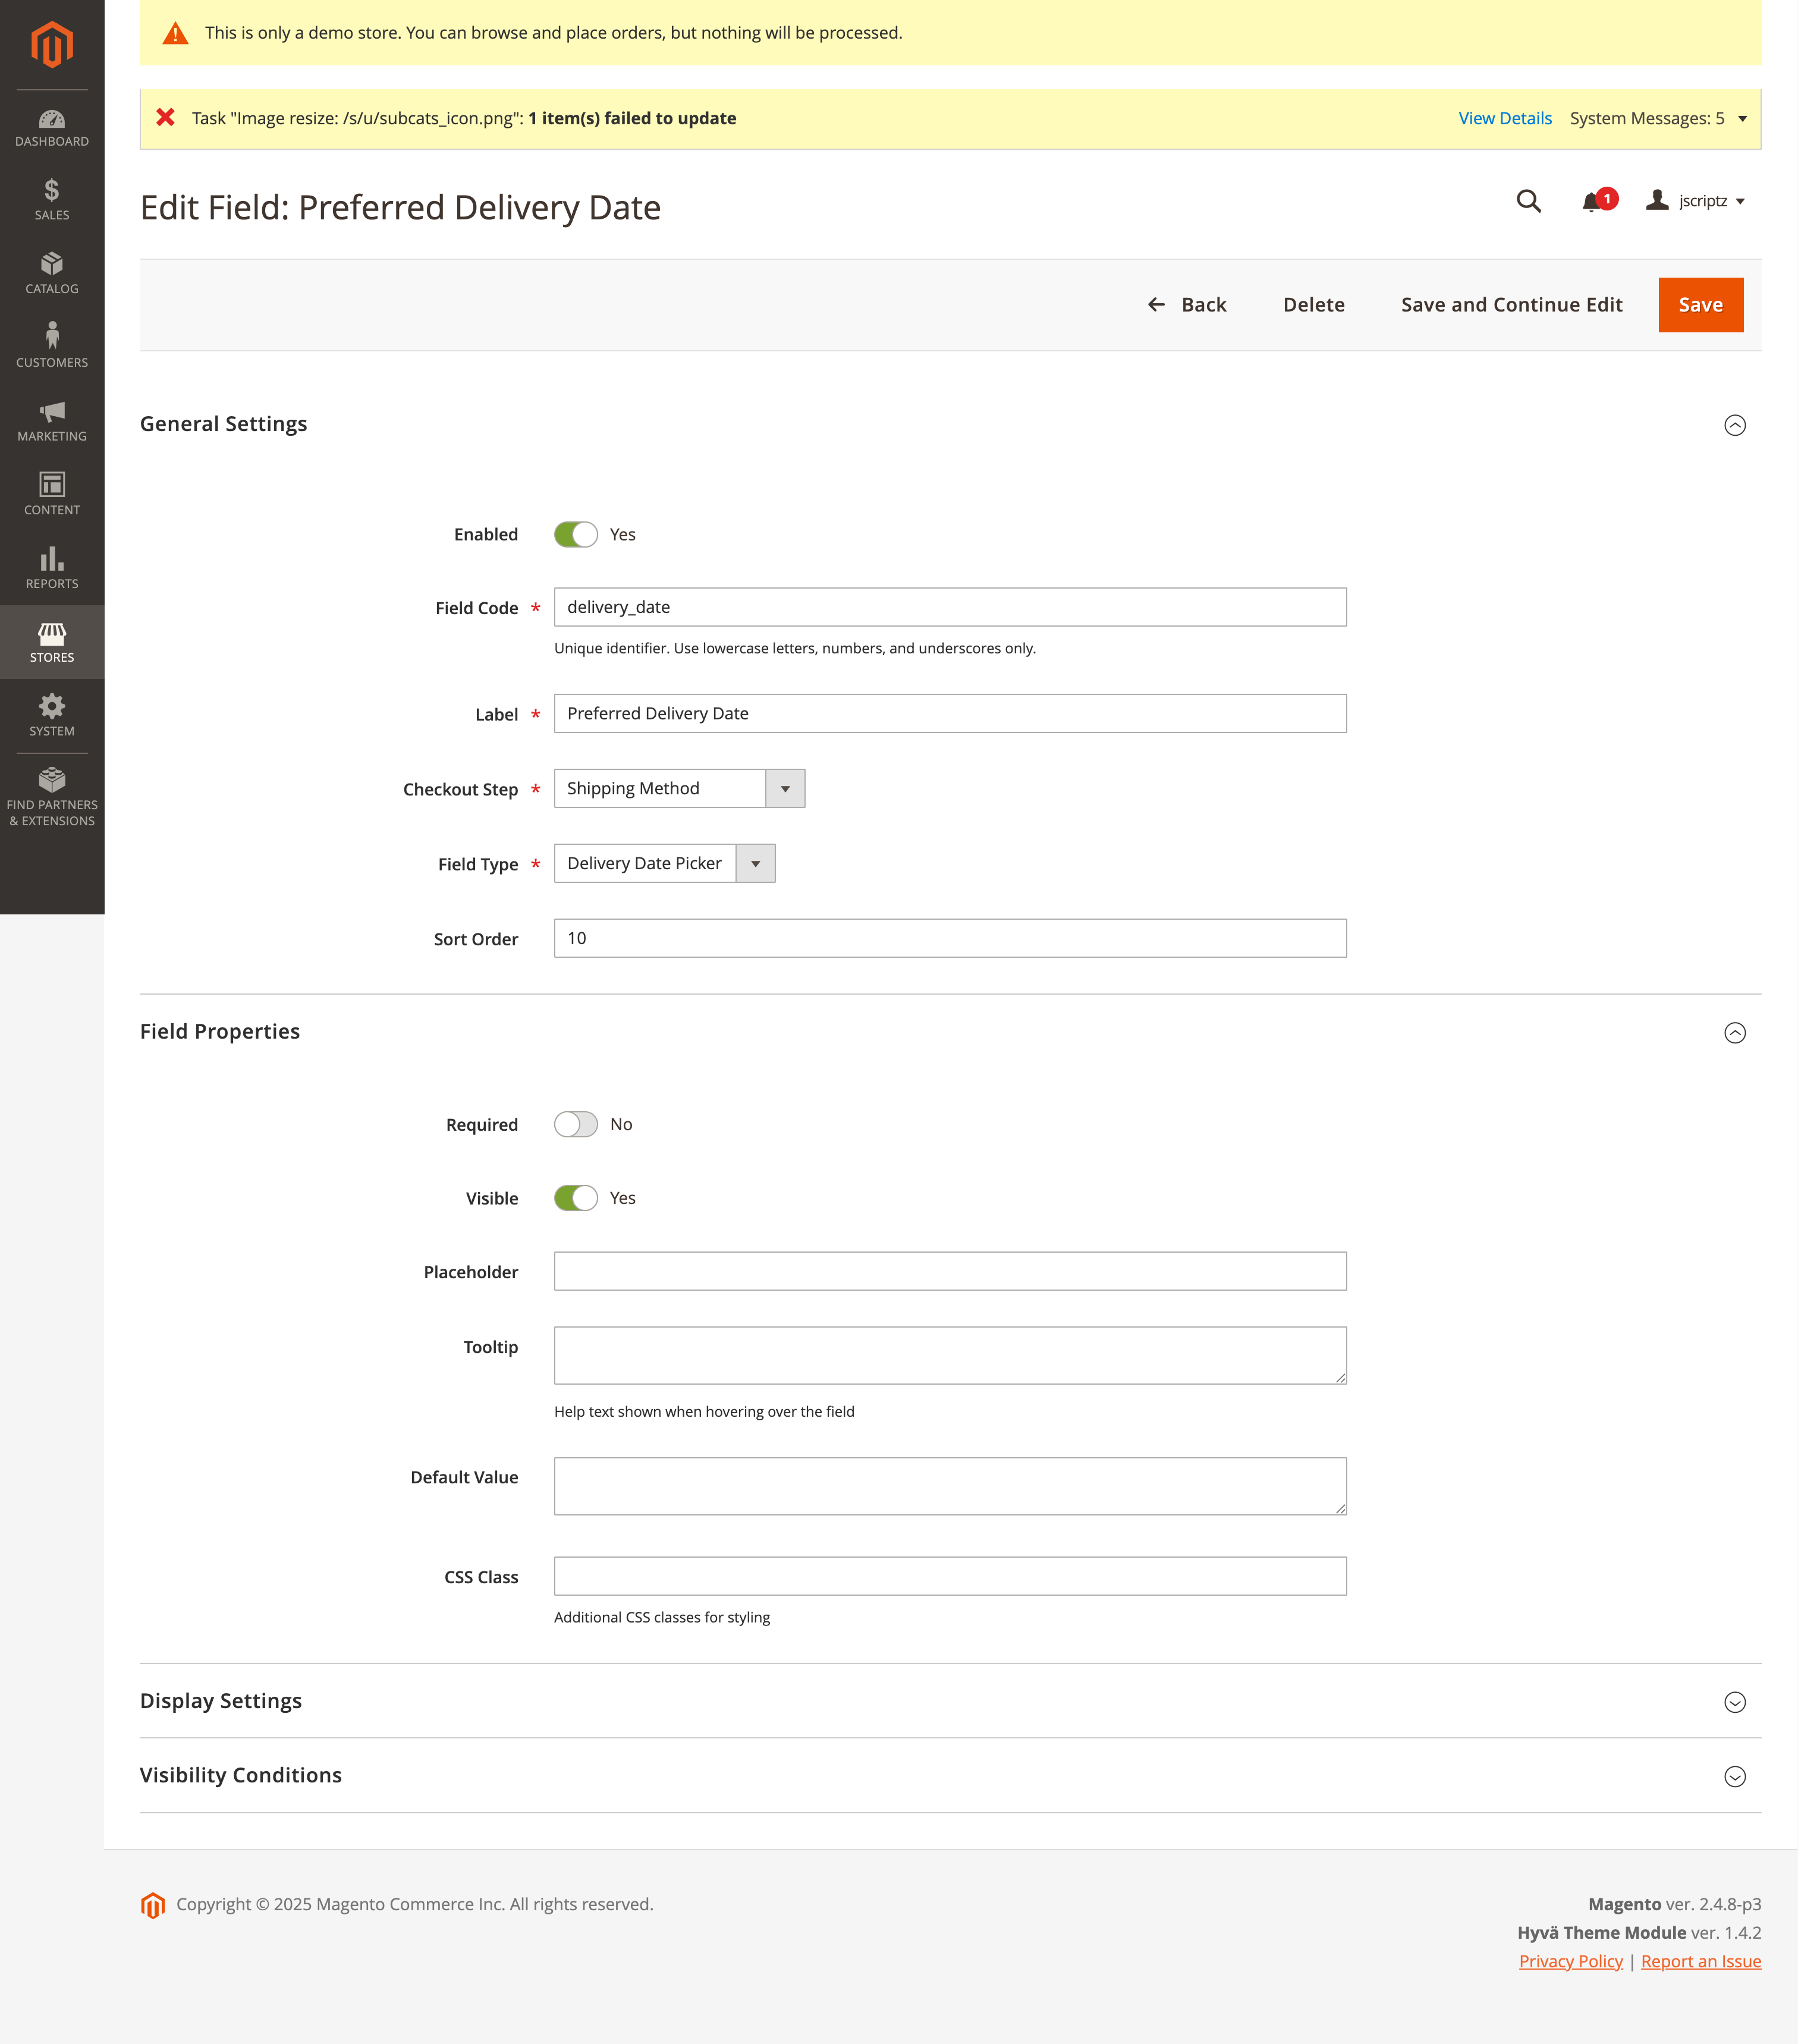
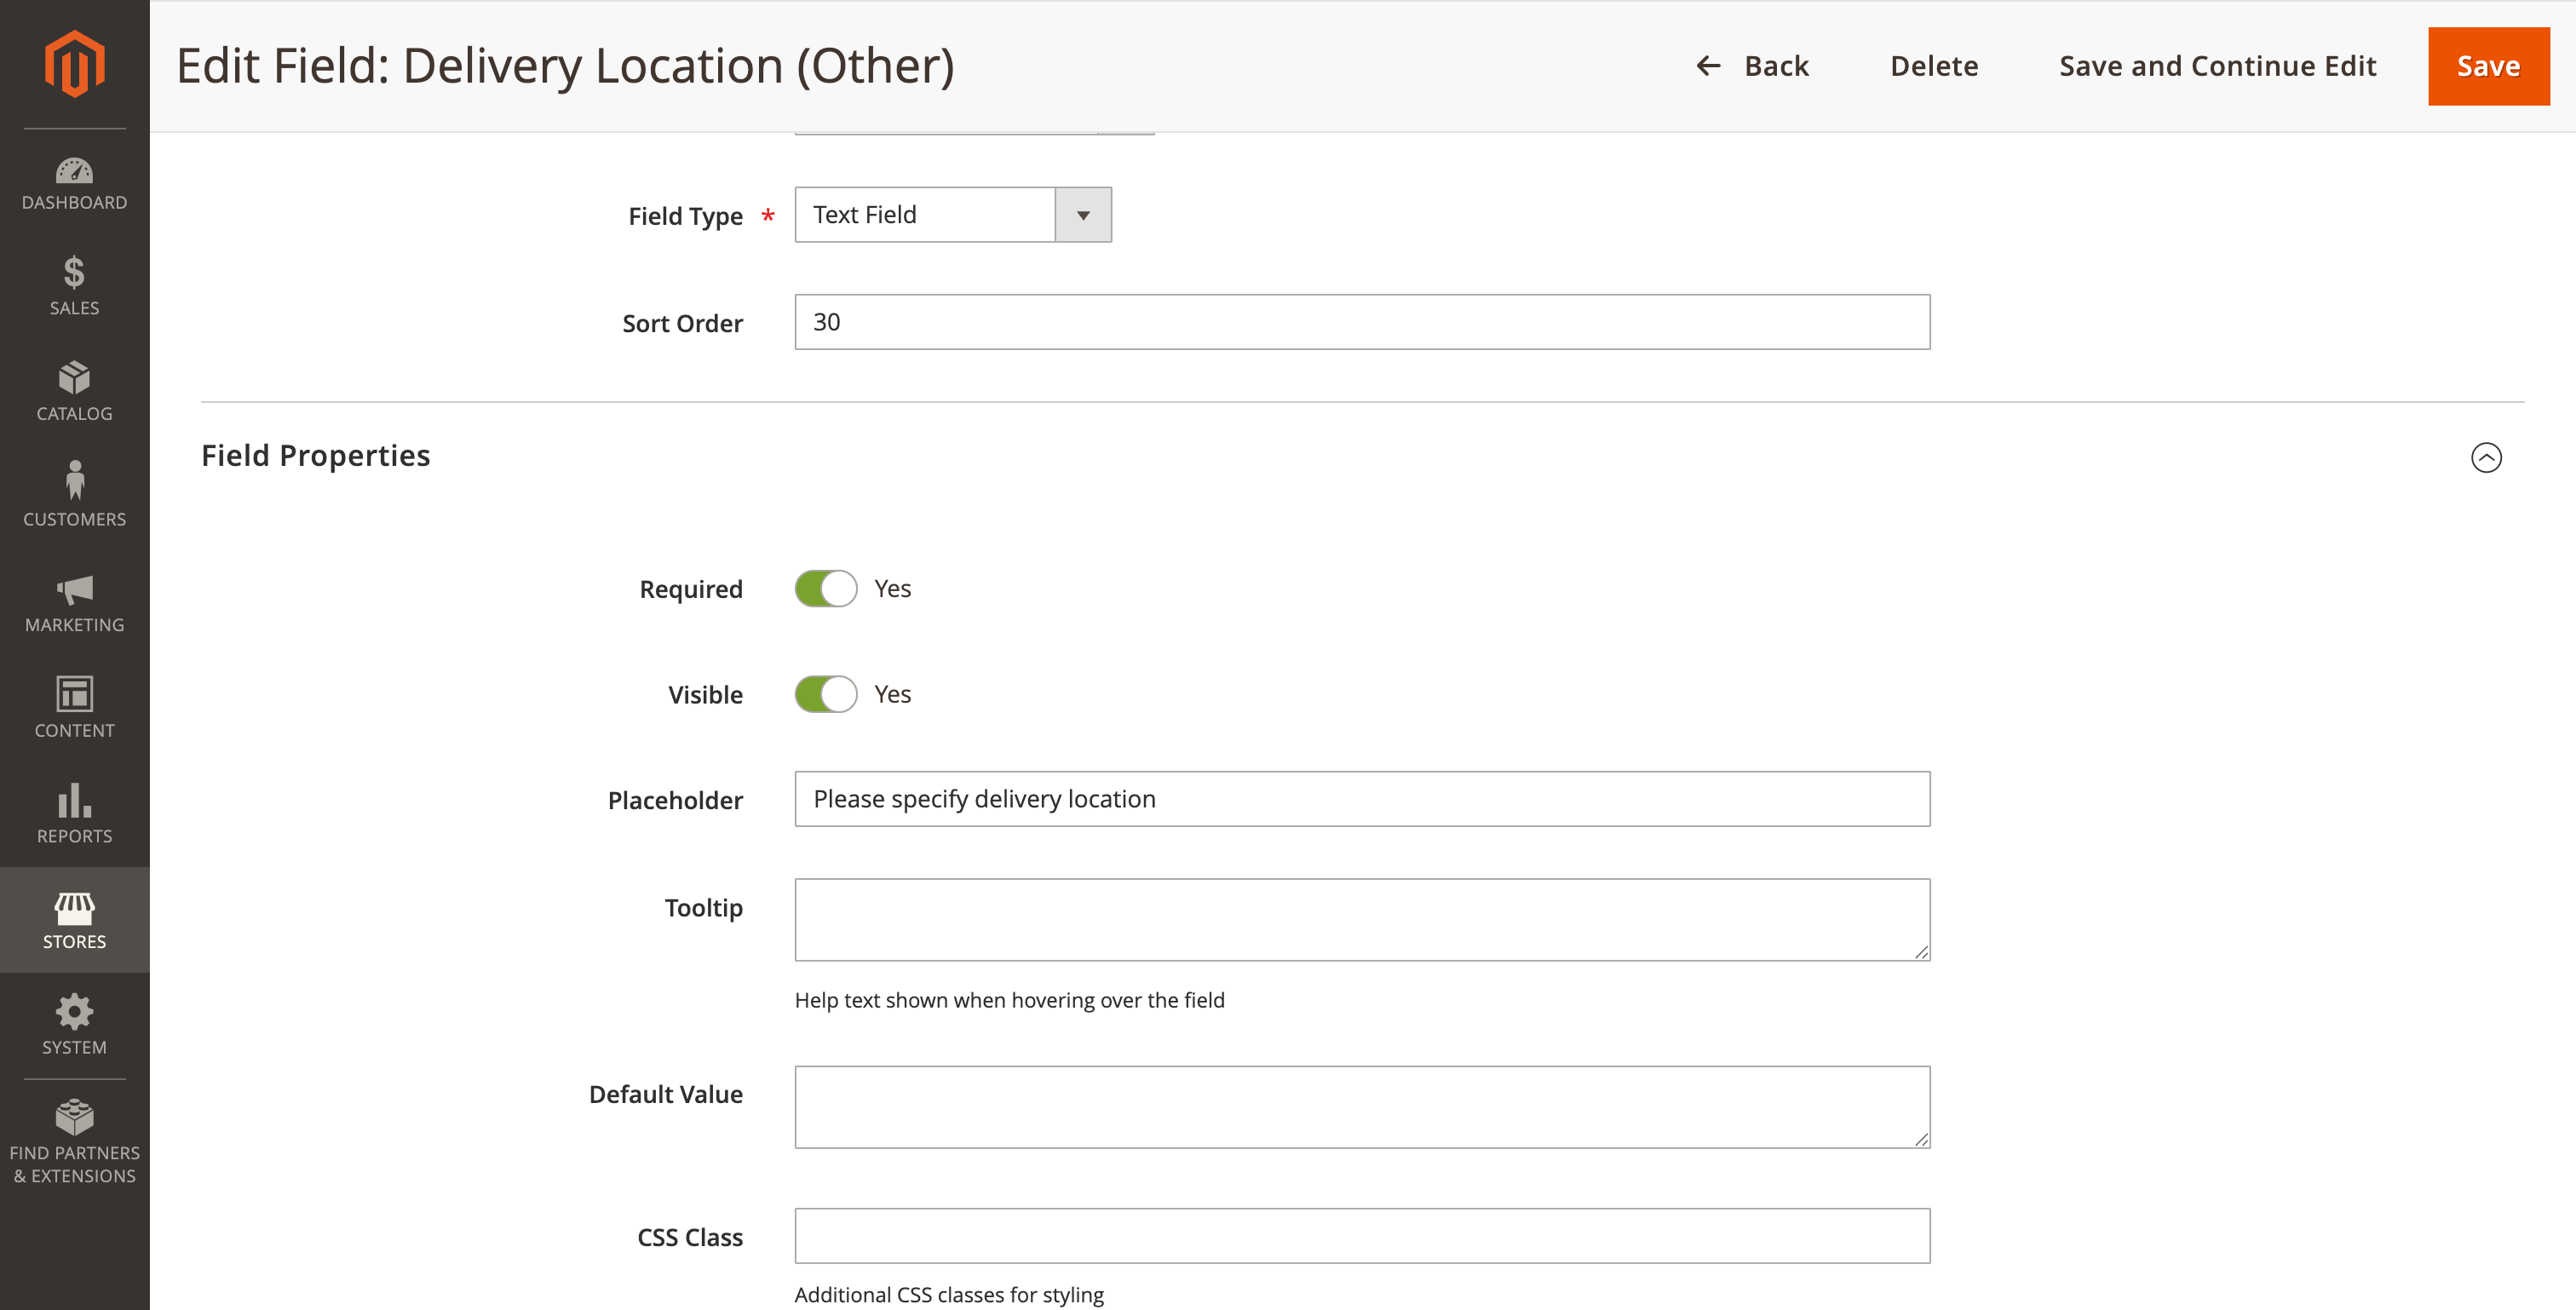
5.3 Field Properties
| Property | Description |
|---|---|
| Required | Field must be filled to complete checkout |
| Visible | Field is shown on checkout (can be hidden) |
| Enabled | Field is active and collecting data |
| Placeholder | Placeholder text inside the input |
| Tooltip | Help text shown on hover |
| Default Value | Pre-filled value for the field |
| CSS Class | Custom CSS classes for styling |
5.4 Display Settings
Control where custom field values are displayed after checkout.
| Setting | Description |
|---|---|
| Show in Order View | Display in admin order view and customer account |
| Show in Invoice | Include on PDF invoices and admin invoice view |
| Show in Shipment | Include on packing slips and admin shipment view |
| Show in Customer Grid | Add column to admin customer grid |
| Show in Admin Customer View | Display in admin customer detail page |
| Show in Frontend Account | Display in customer's My Account area |
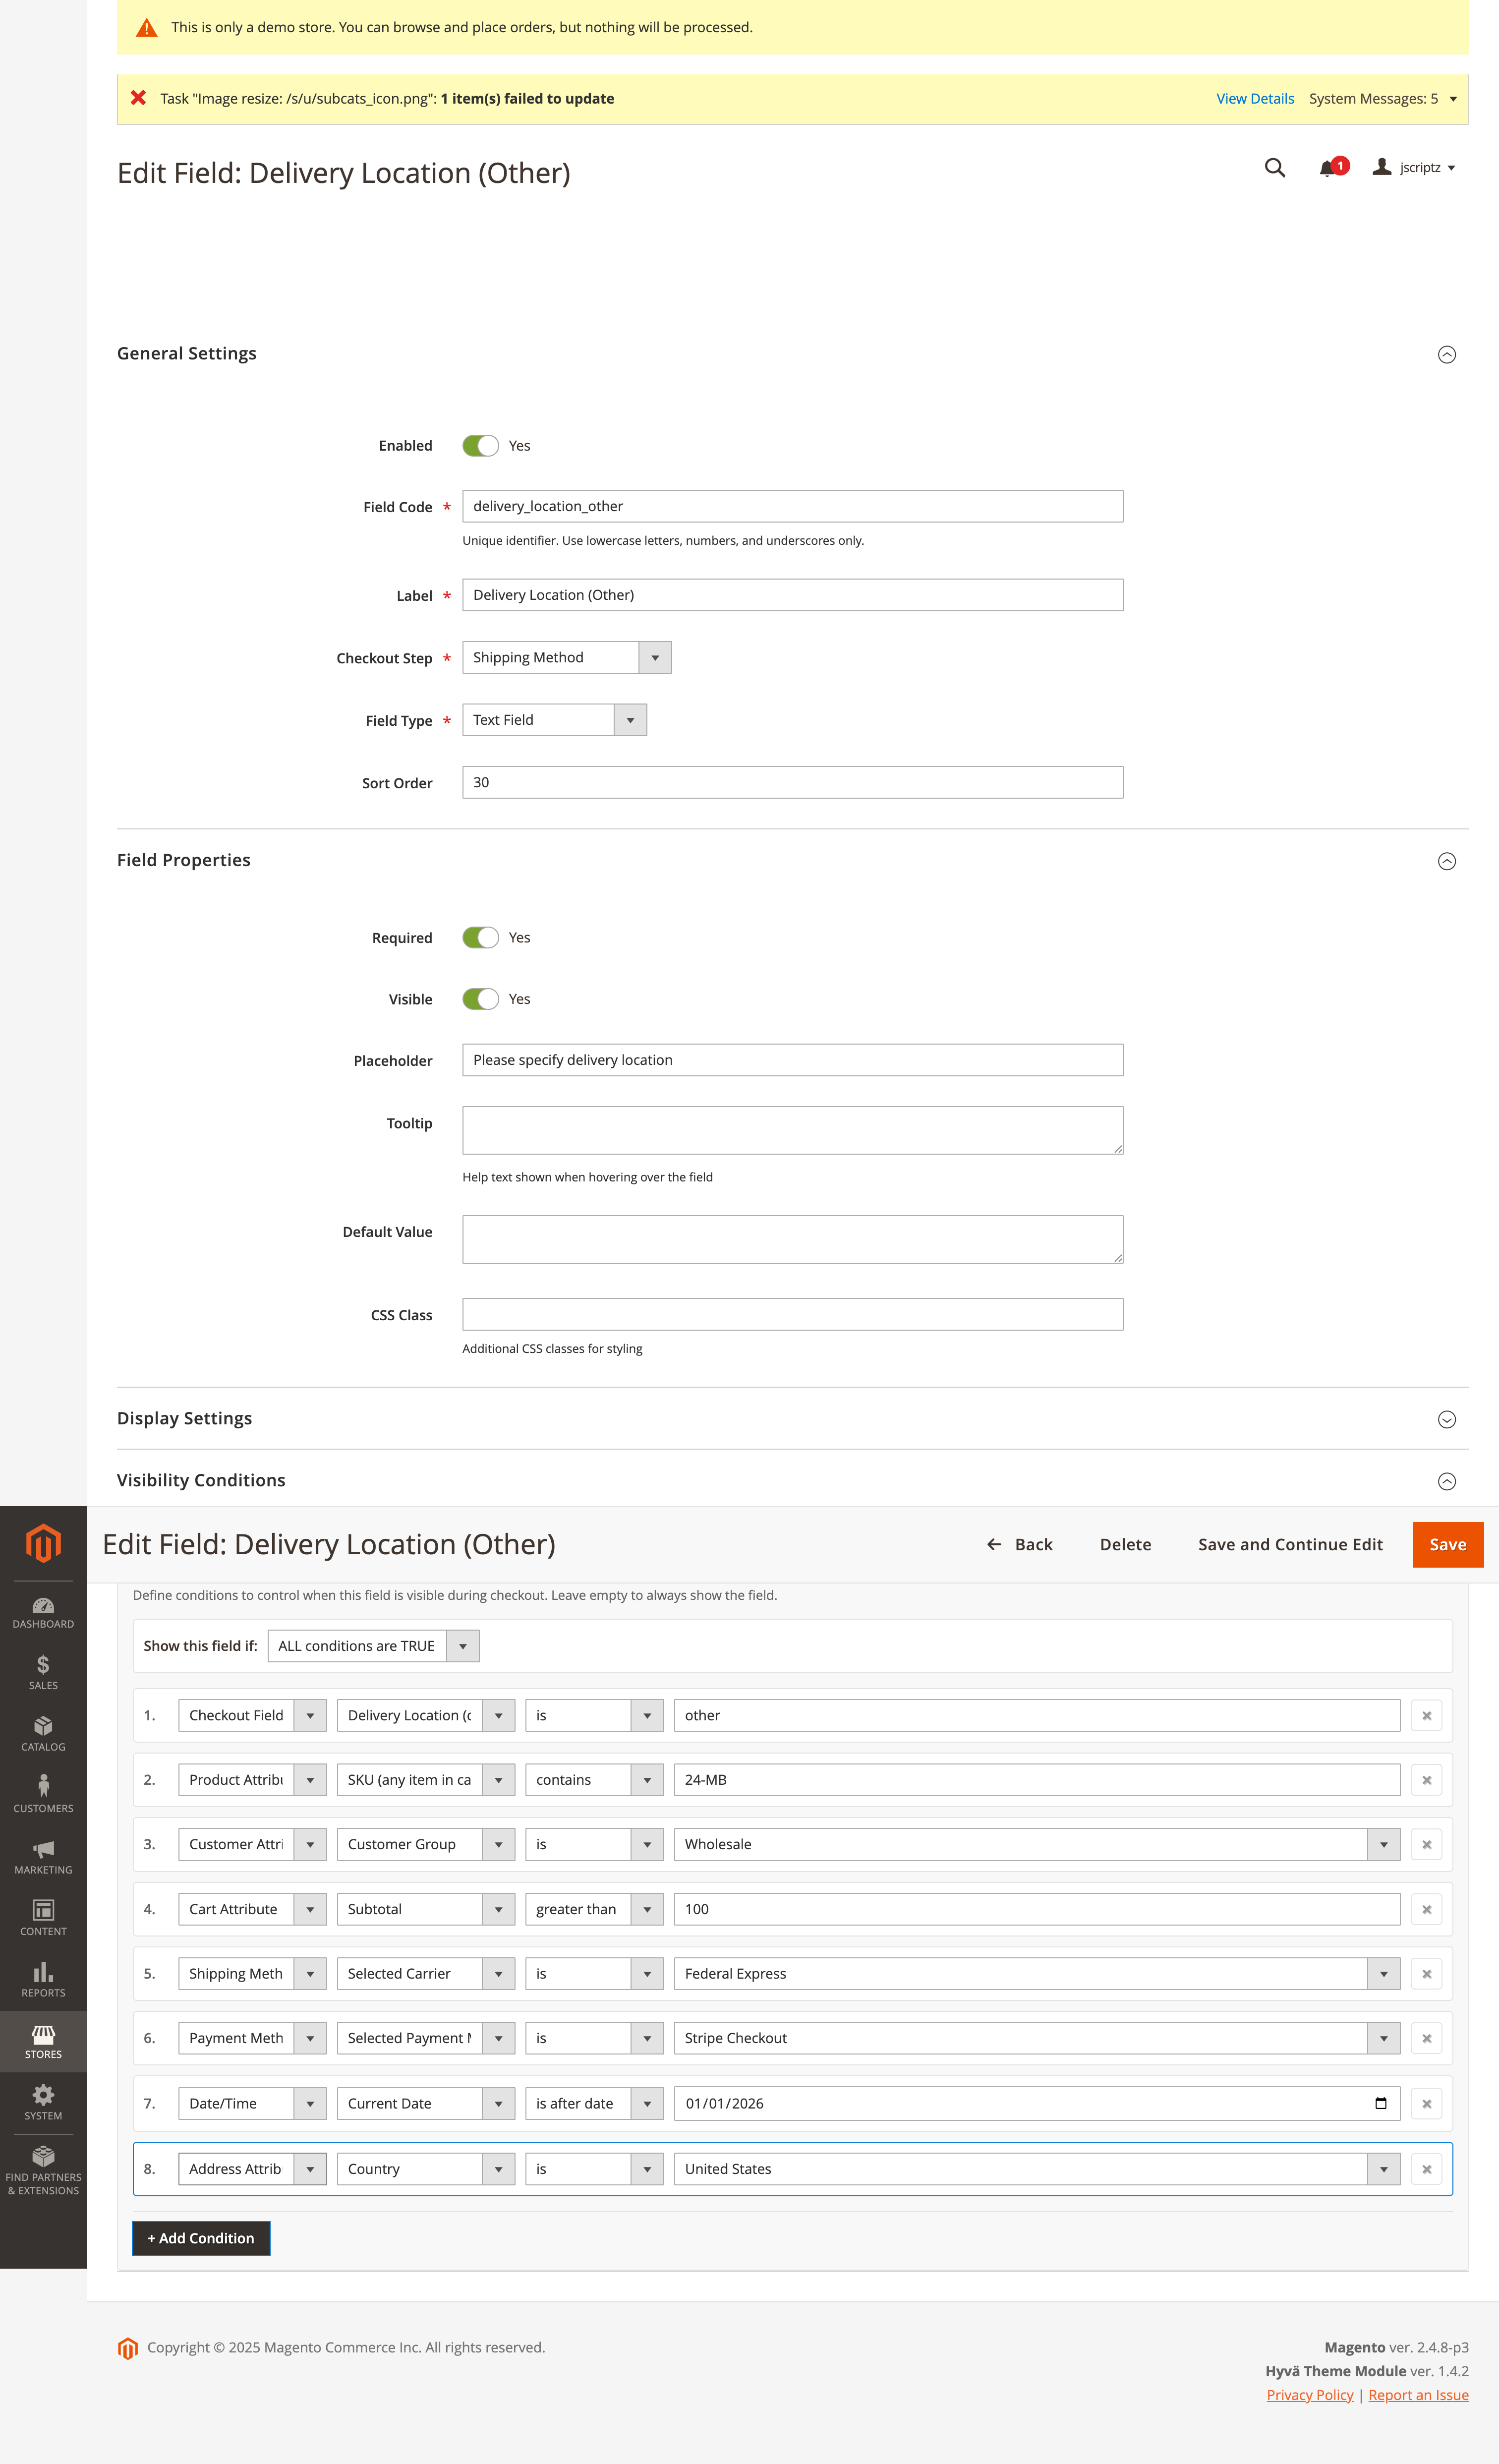
5.5 Visibility Conditions
Show or hide fields based on dynamic conditions. Supports 8 condition types:
| Condition Type | Description | Example |
|---|---|---|
| Billing Country | Based on selected billing country | Show VAT ID only for EU countries |
| Shipping Country | Based on selected shipping country | Show customs field for international orders |
| Cart Attributes | Based on cart weight, item count, subtotal | Show field if cart total > $100 |
| Customer Attributes | Based on customer group, is_guest | Show wholesale field for B2B customers |
| Checkout Field | Based on value of another field | Show "Other" text box when "Other" is selected |
| Payment Method | Based on selected payment method | Show PO number for "Purchase Order" payment |
| Shipping Method | Based on selected shipping method | Show delivery time for express shipping |
| Product Attributes | Based on products in cart | Show engraving field for engraved products |
5.6 Fee/Discount Fields
Create fields that add fees or discounts to the order total.
| Setting | Description |
|---|---|
| Amount Type | Fixed amount or percentage of subtotal |
| Amount Value | The fee/discount amount (positive = fee, negative = discount) |
| Percentage Basis | For percentage: subtotal or subtotal including tax |
| Is Taxable | Whether to apply tax to the fee |
6. Checkout Steps
The checkout process consists of several steps that can be customized via the Checkout Builder.
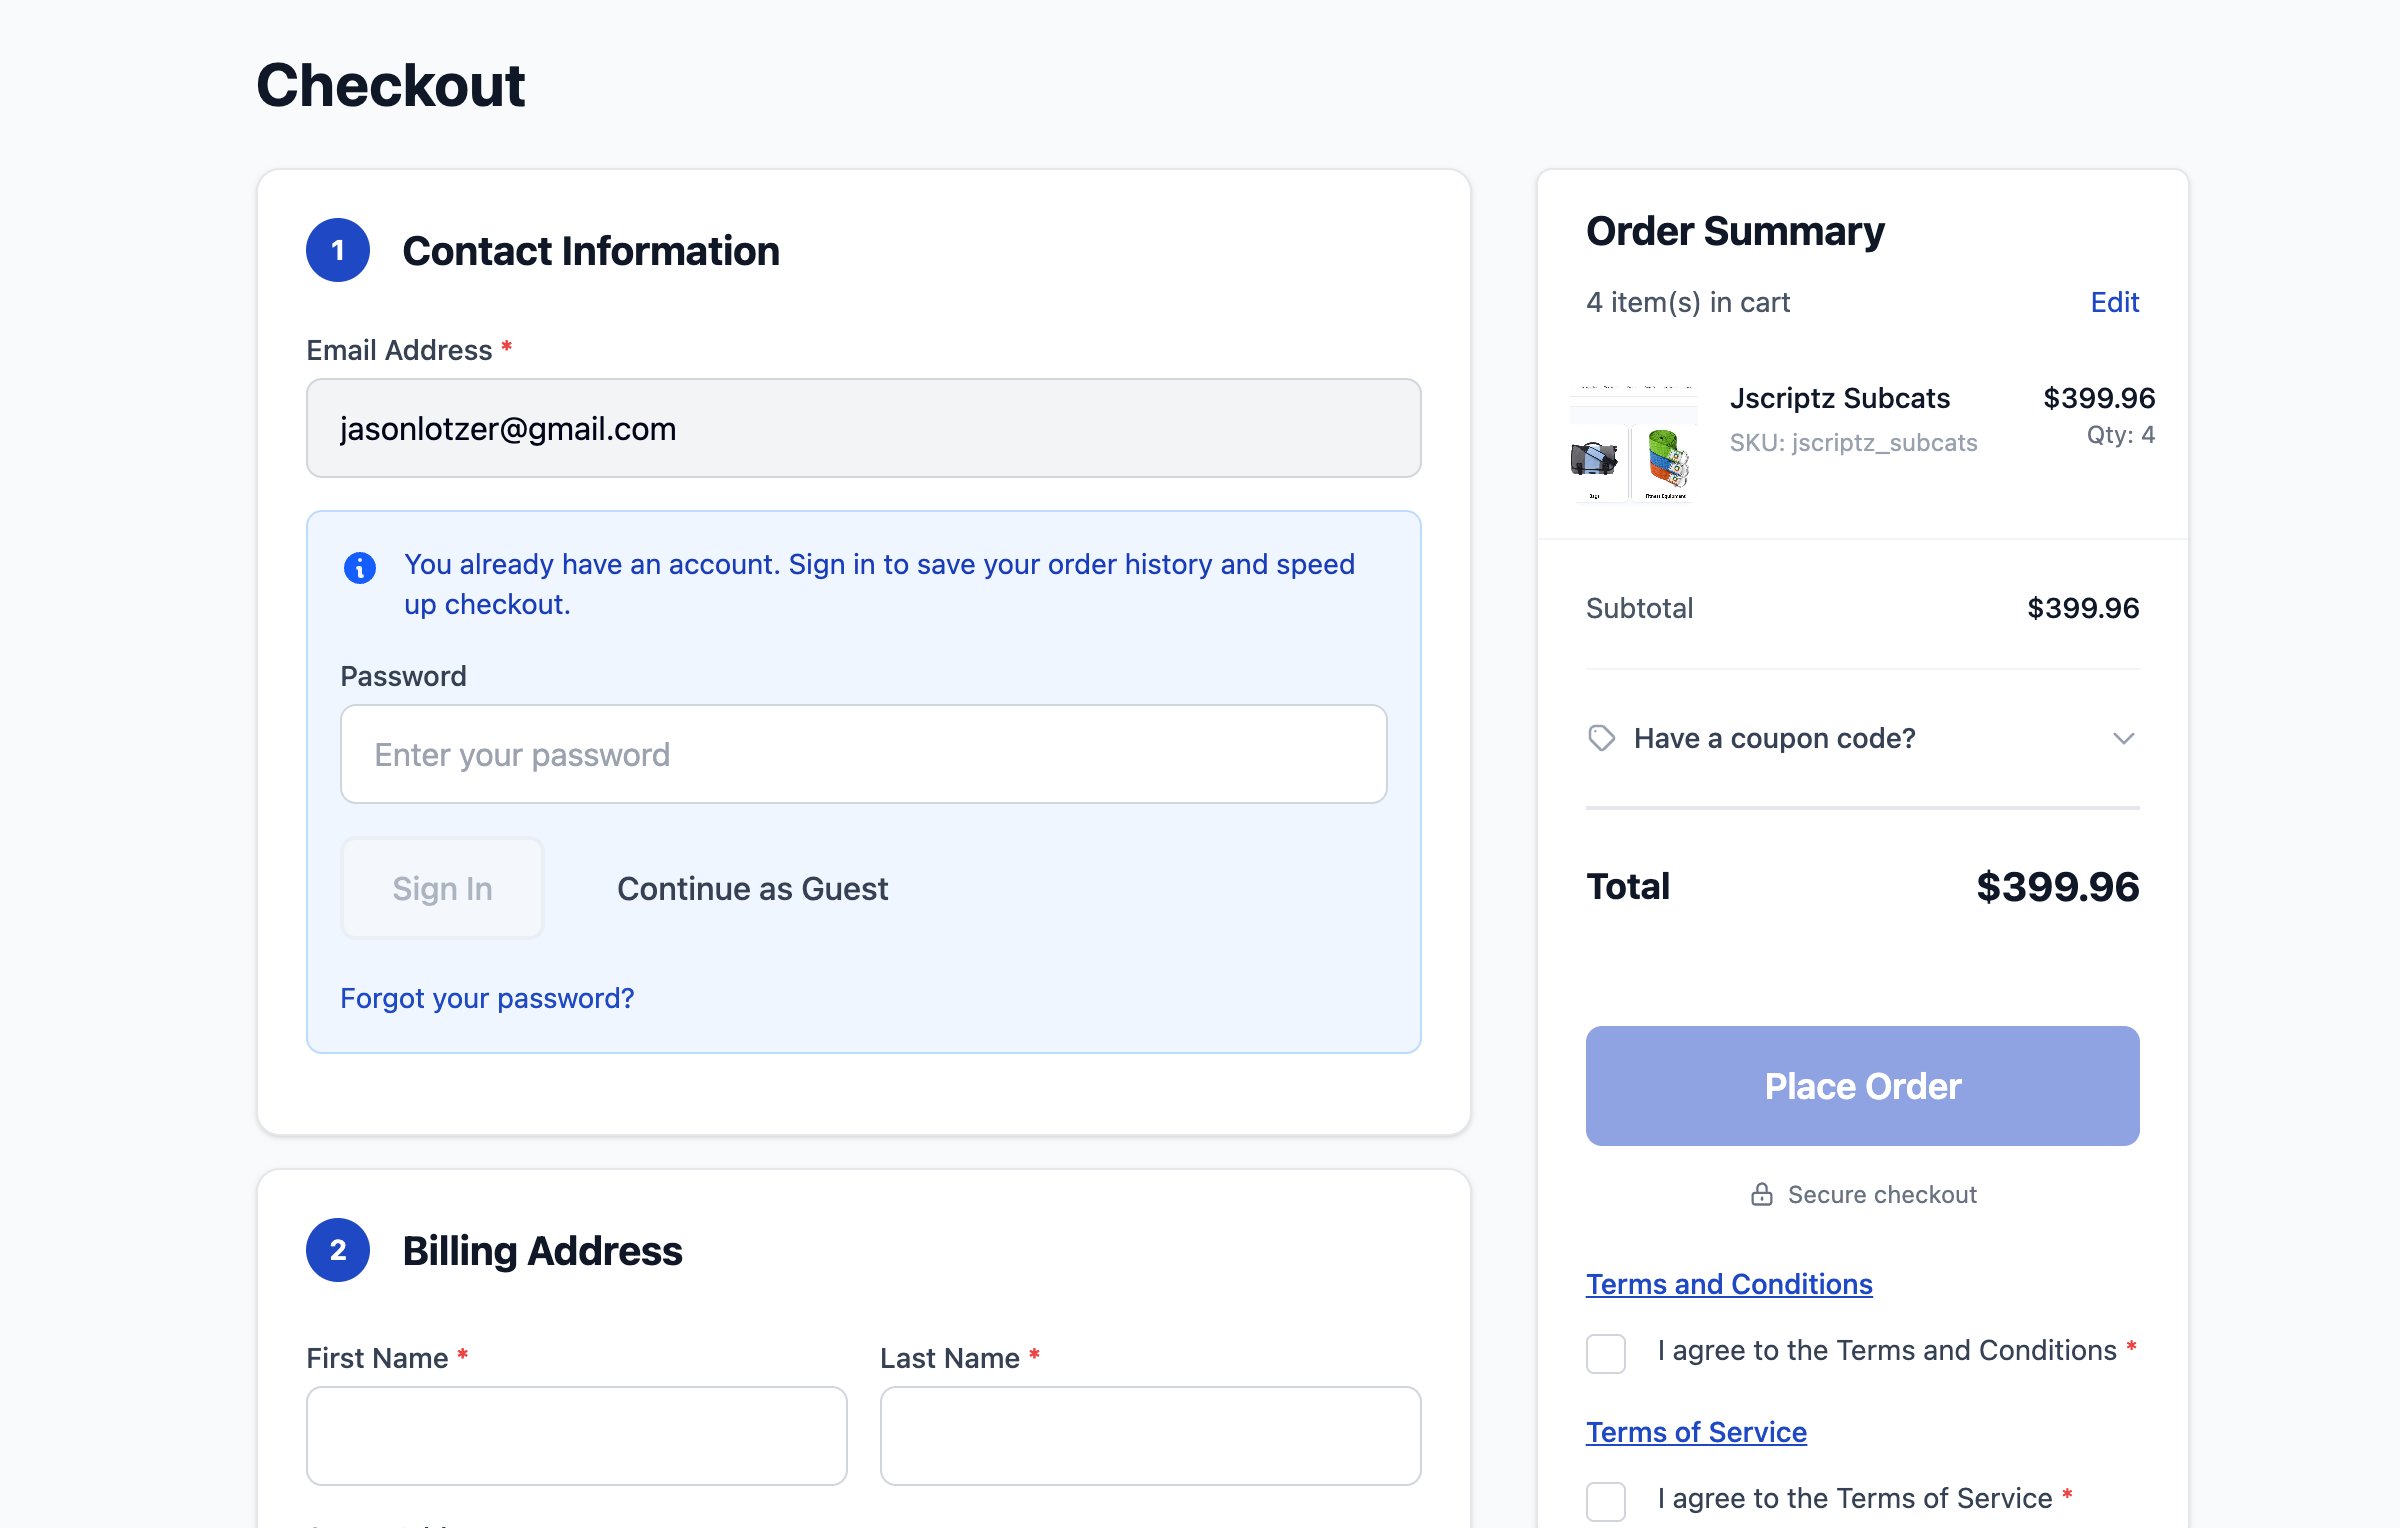
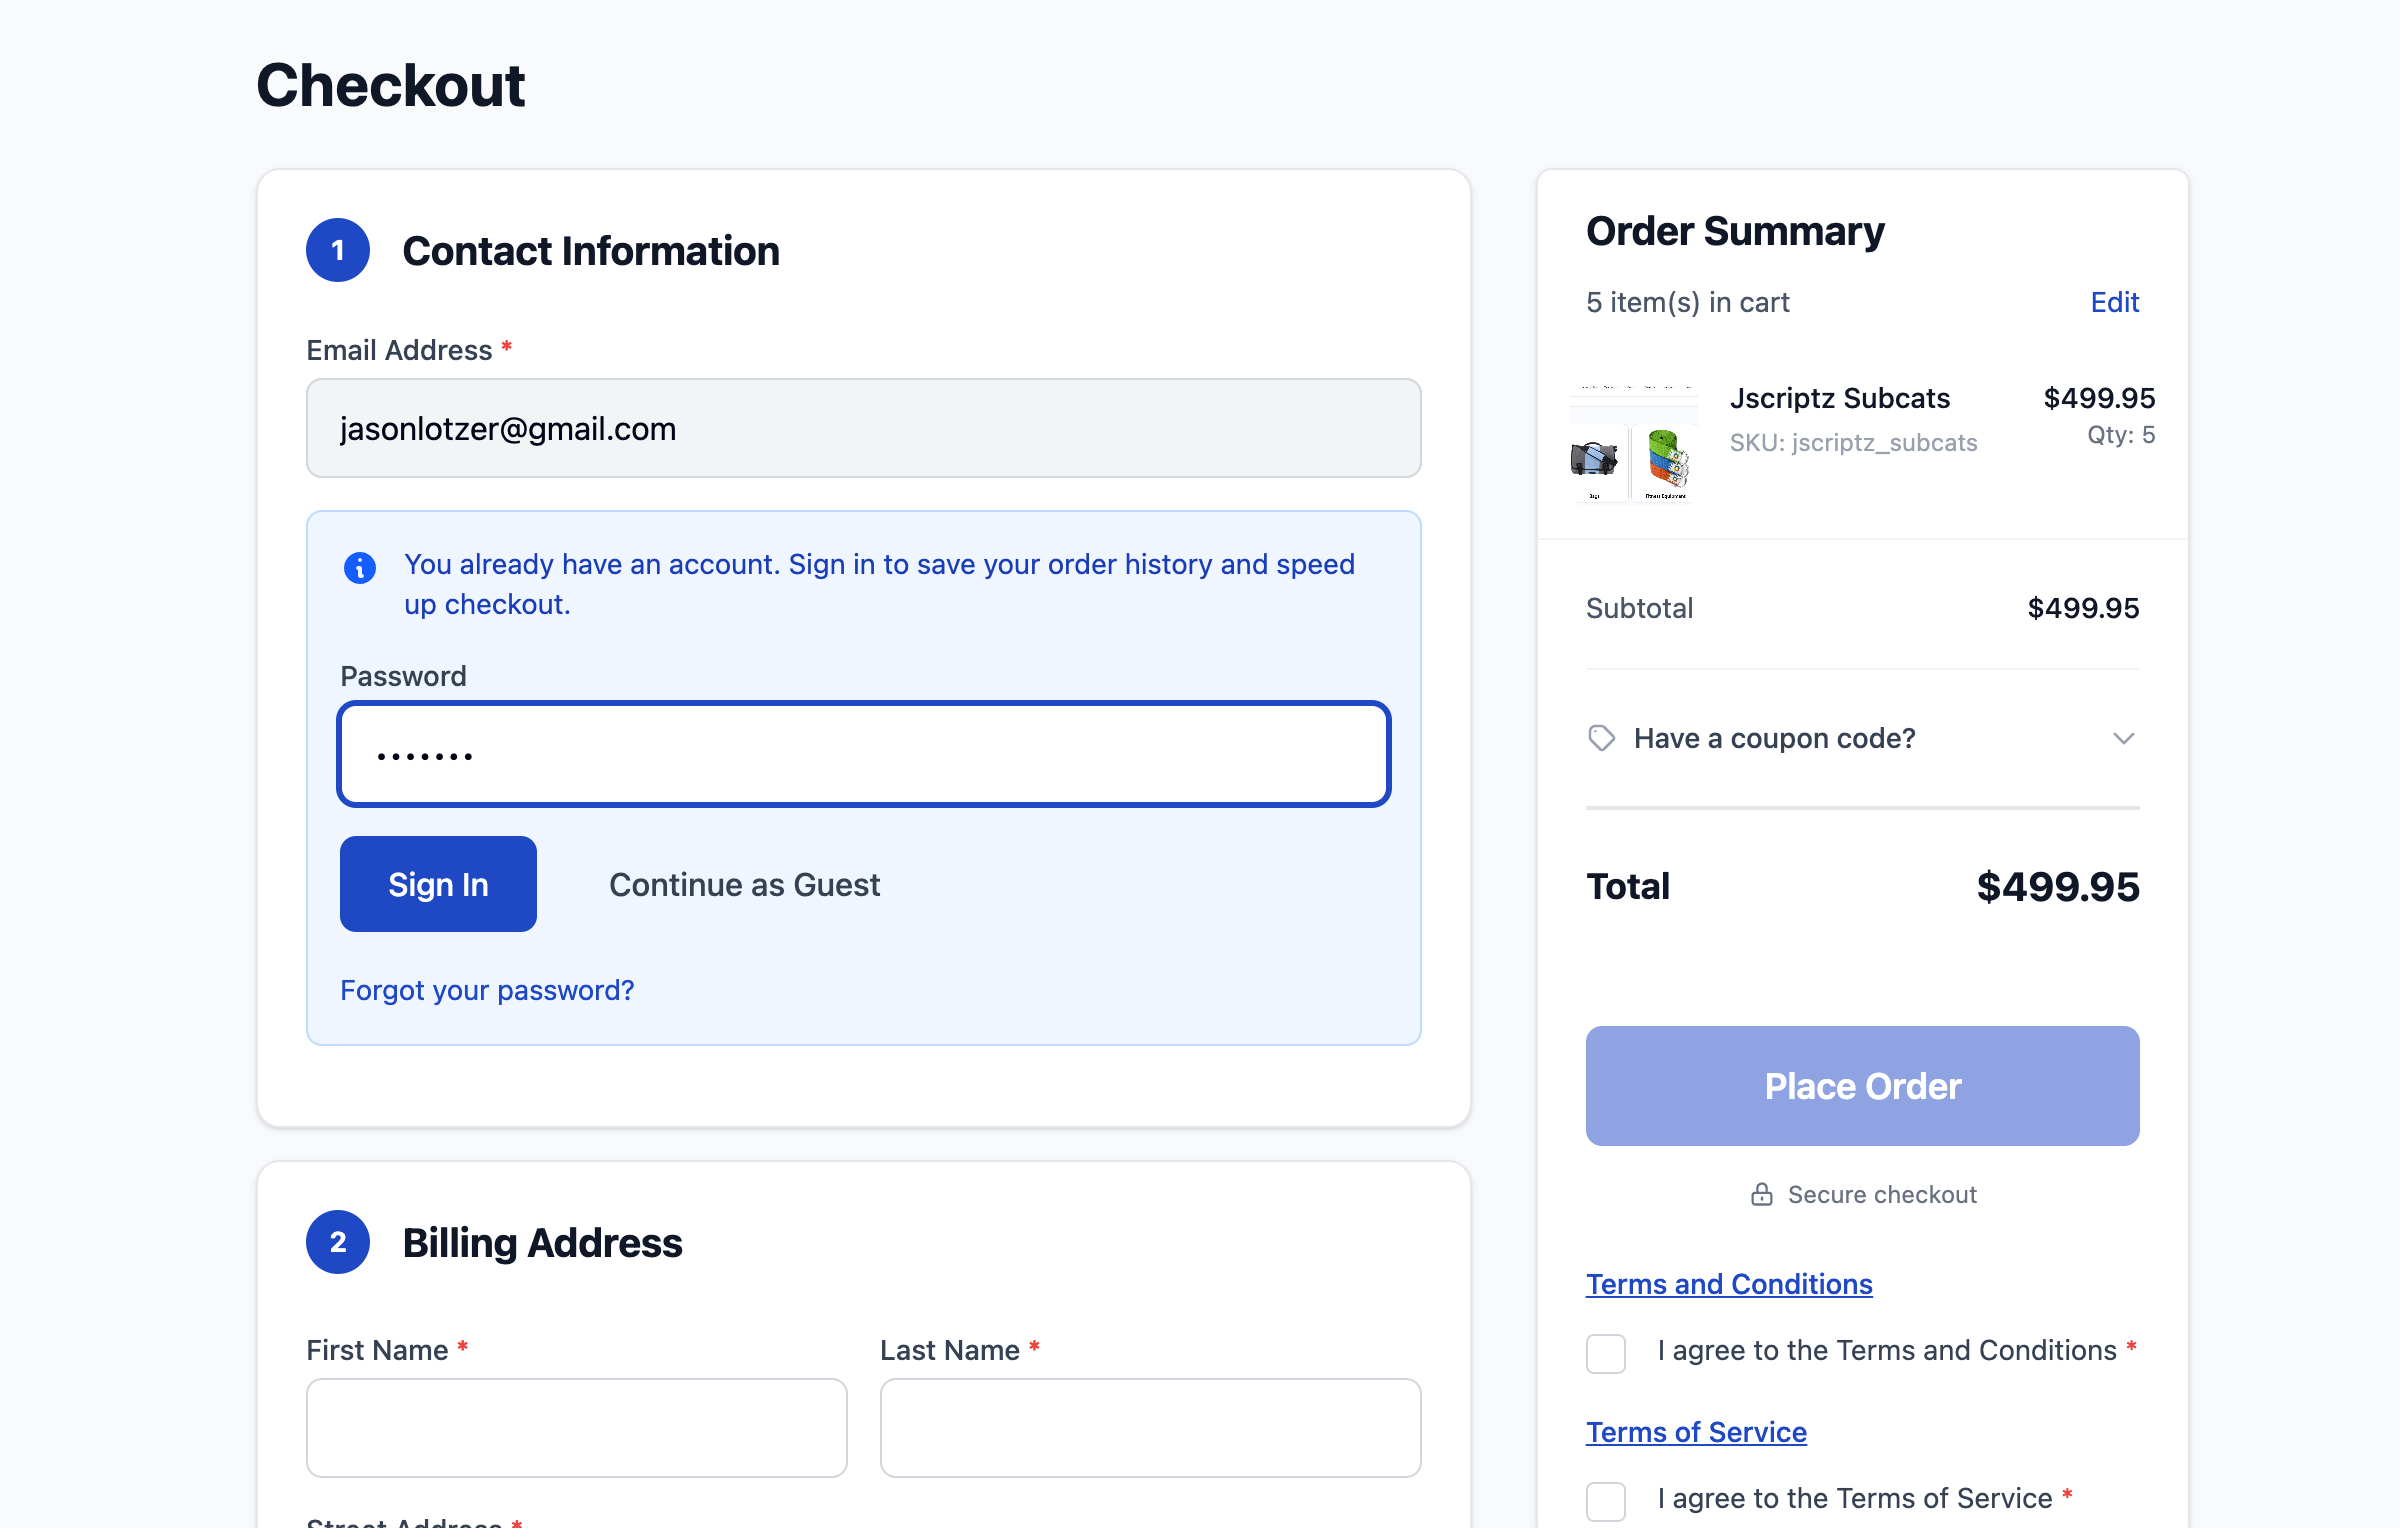
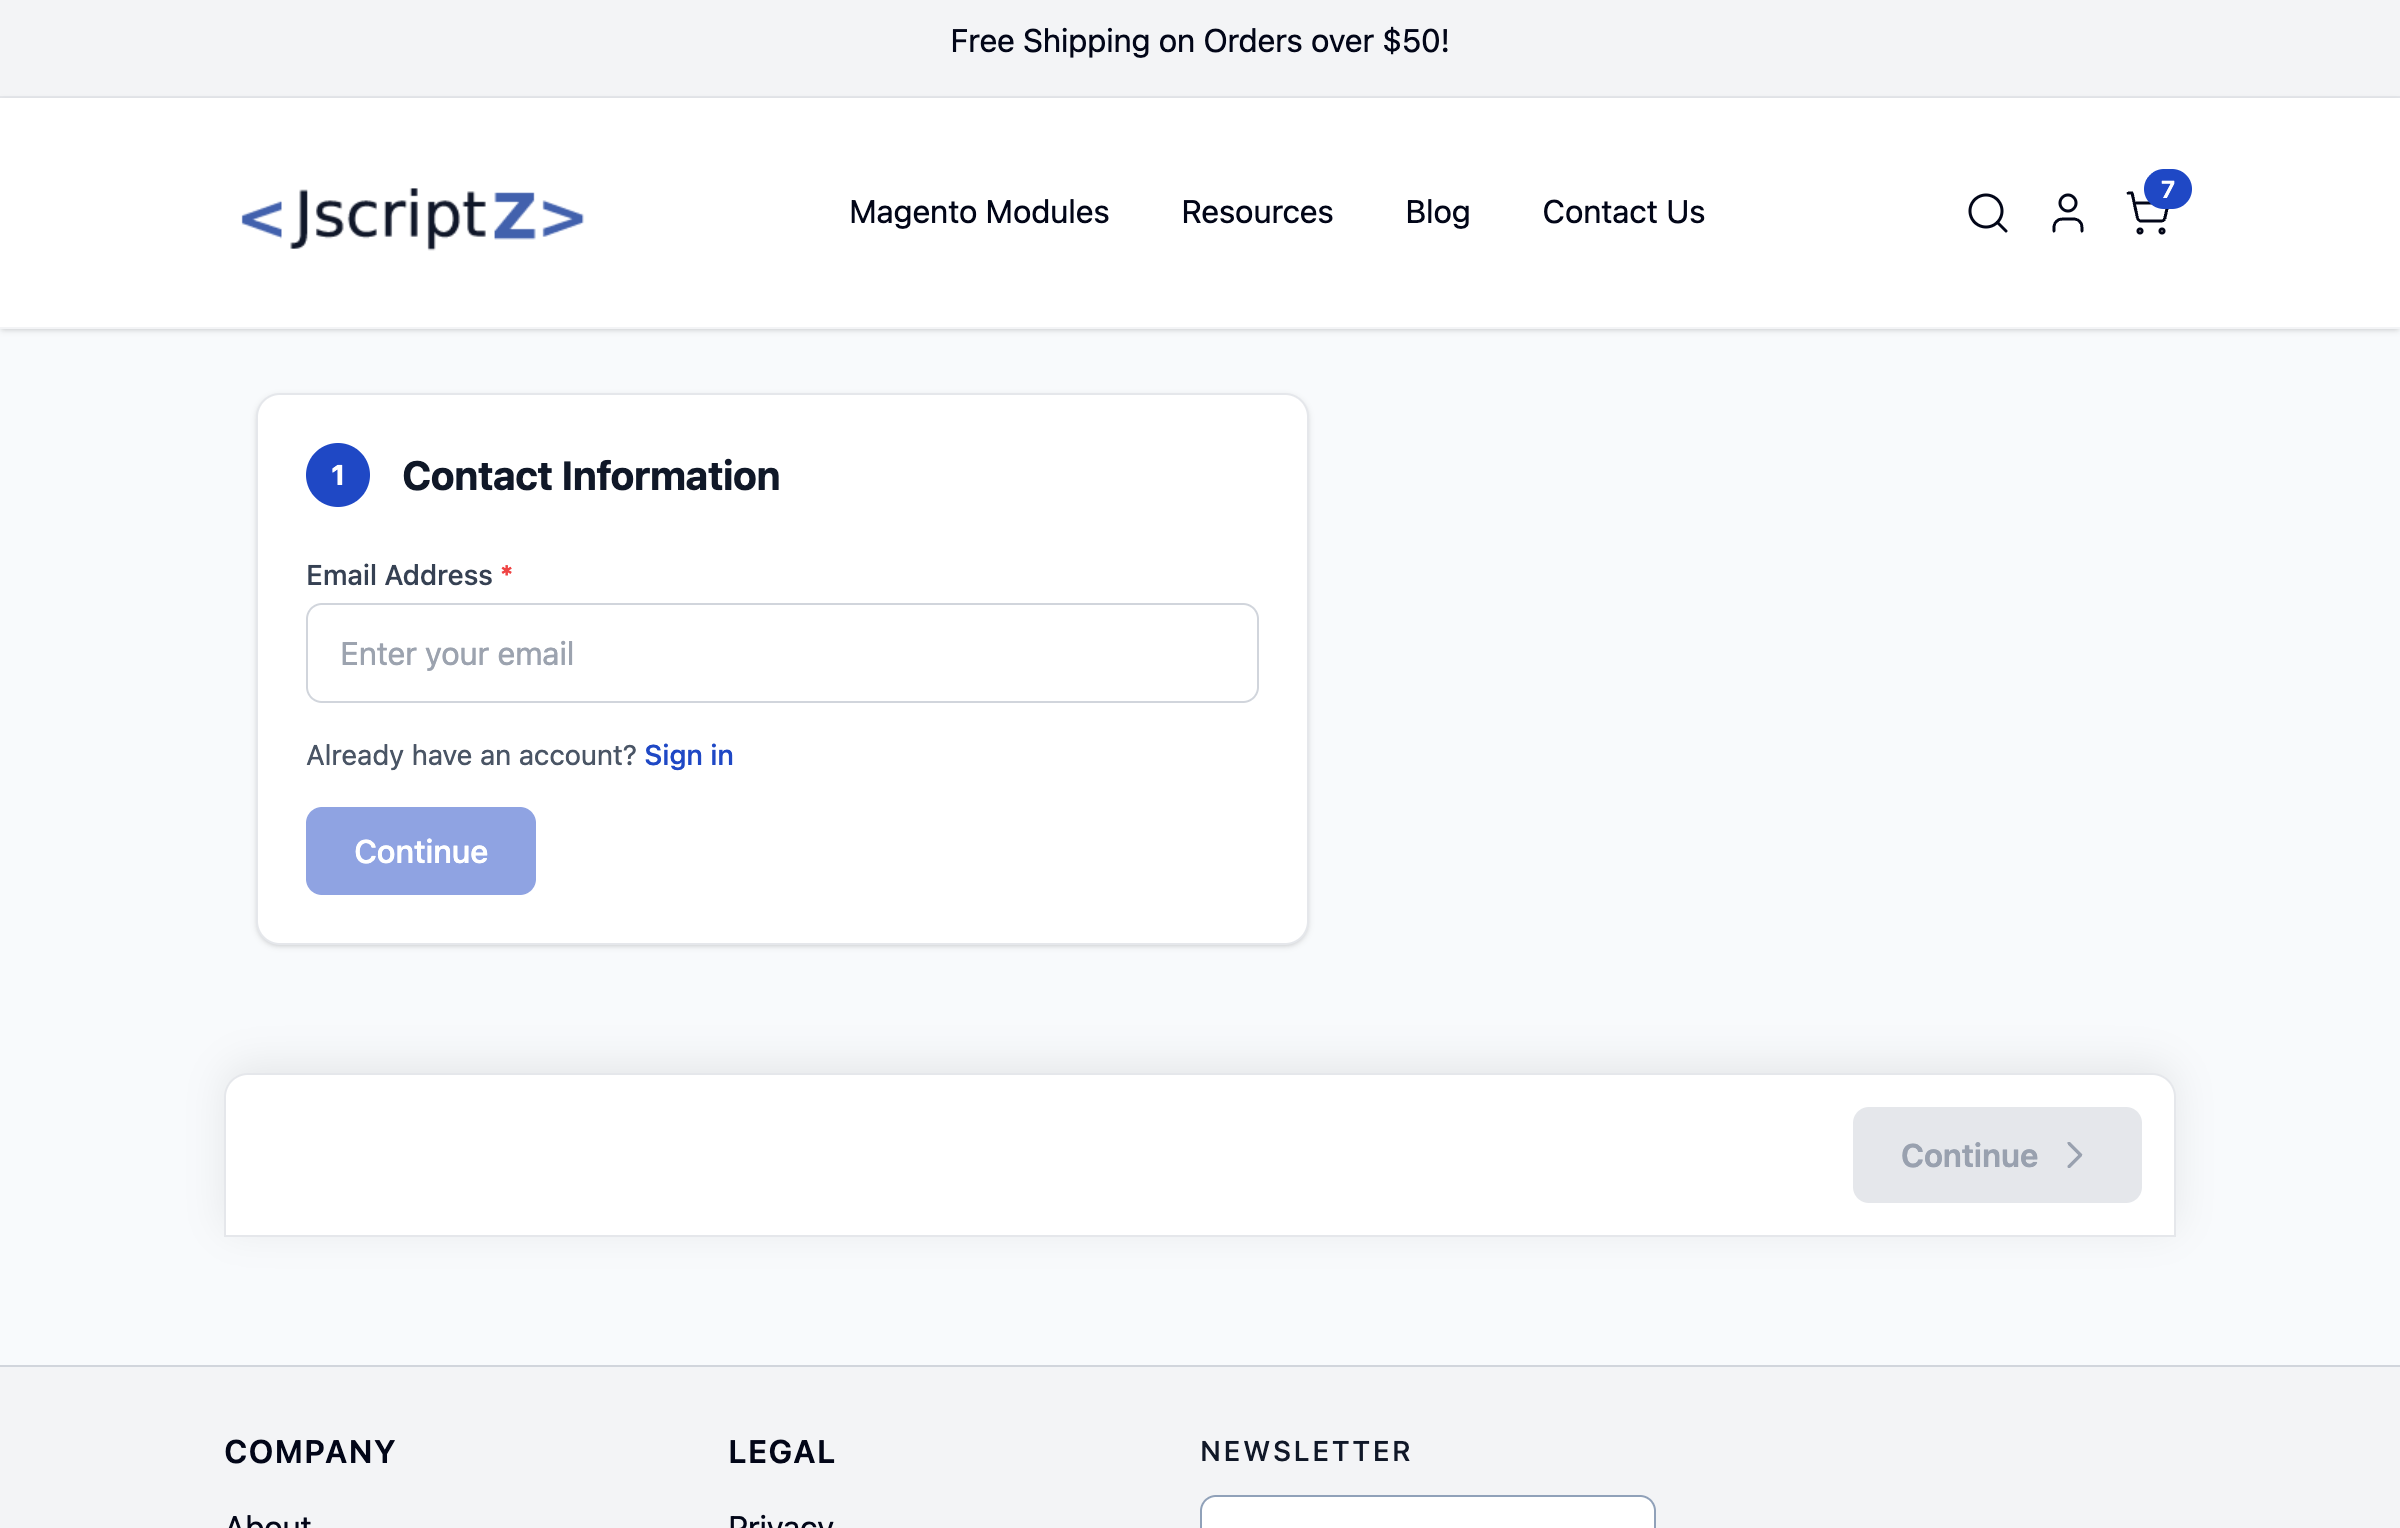
6.1 Contact Information
The first step collects the customer's email address and handles authentication.
- Email Input - Required email address field
- Email Existence Check - Real-time check if email exists in system
- Login Option - Password field for existing customers
- Create Account - Option to create account with purchase
6.2 Shipping Address
Collect shipping address with support for saved addresses and autocomplete.
- Saved Addresses - Logged-in customers can select saved addresses
- Address Autocomplete - Google Places API integration (optional)
- Field Validation - Required field validation
6.3 Billing Address
- Same as Shipping - Toggle to use shipping address
- Separate Billing - Enter different billing address
- VAT ID Field - Optional VAT ID for B2B customers
6.4 Shipping Method
Display available shipping methods with smart badges and pricing.
6.5 Payment Method
Supported payment method integrations:
| Payment Method | Features |
|---|---|
| Stripe | Card payments, saved cards, Stripe Link |
| Mollie | Multiple payment methods (iDEAL, Bancontact, etc.) |
| Braintree | PayPal, card payments, saved cards |
| PayPal | Express checkout, PayPal Credit |
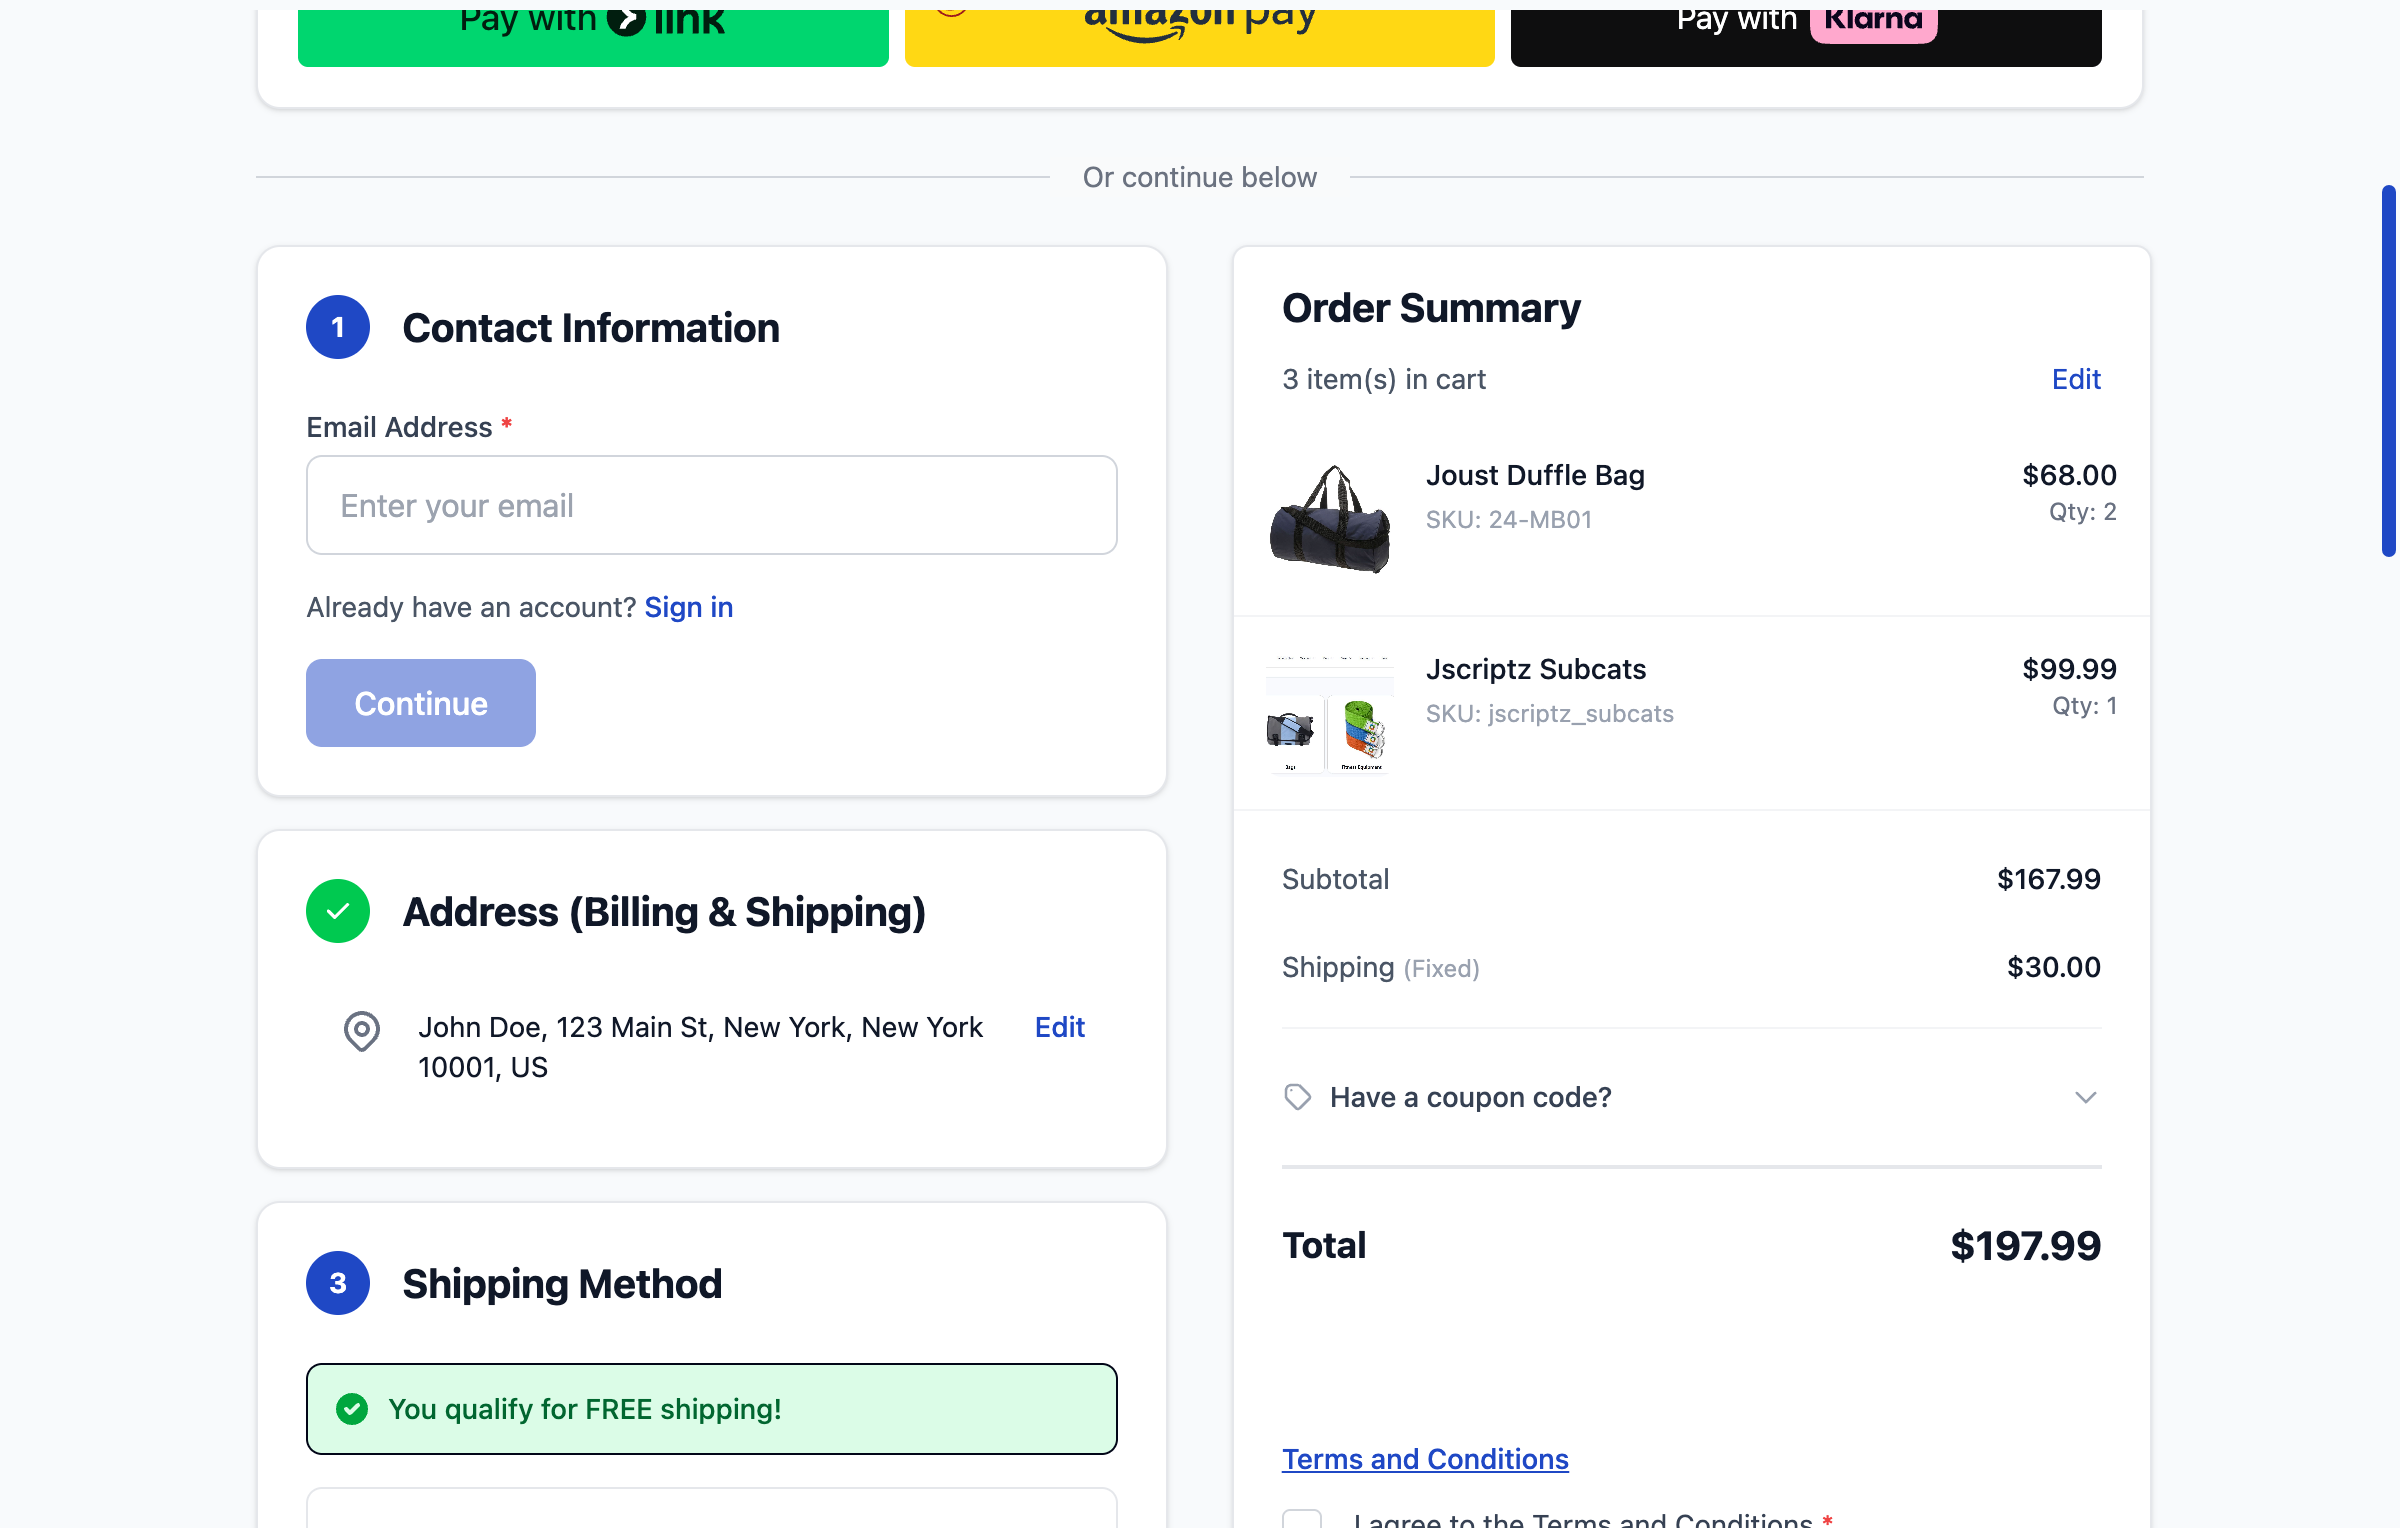
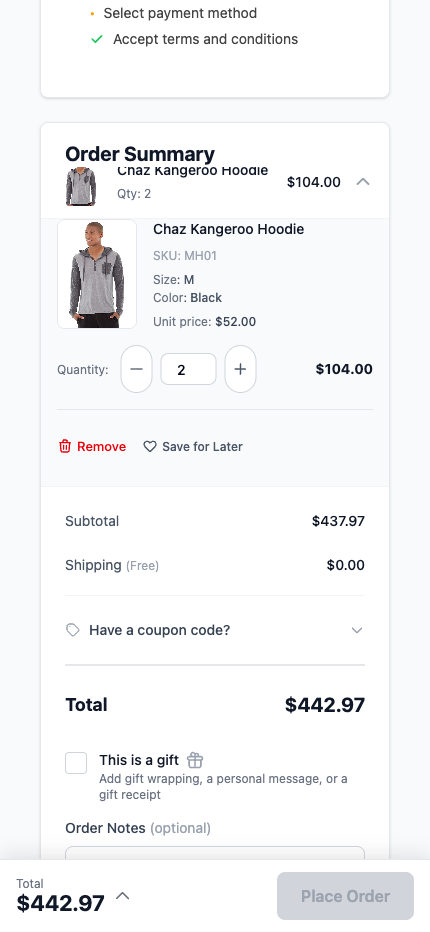
6.6 Order Summary
Displays cart contents, totals, and allows coupon/gift card entry.
- Cart Items - Expandable list with quantity adjustment
- Subtotal - Cart subtotal before shipping/tax
- Shipping - Selected shipping cost
- Tax - Calculated taxes
- Grand Total - Final order total
- Coupon Code - Apply discount codes
- Gift Card - Apply gift card balances
6.7 Gift Options
Optional gift options for the order.
7. Customer Experience
7.1 Email Existence Check
When a customer enters their email, the system checks if an account exists. If found, a login option is displayed.
7.2 Login for Existing Customers
Existing customers can log in during checkout to access:
- Saved addresses
- Saved payment methods
- Order history
- Reward points/store credit
7.3 Guest Checkout
Customers can complete checkout without creating an account.
7.4 Account Creation
Options for account creation:
- Before Order - Create account during checkout
- After Order - Option shown on success page
- Password Field - Set password when creating account
7.5 Multi-Step Wizard Mode
Alternative to one-page checkout, displaying one step at a time with Previous/Next navigation.
8. Social Login New
Allow customers to sign in or create accounts using their existing social media accounts. This simplifies the checkout process and increases conversion by reducing friction.
8.1 Overview
Social Login enables customers to authenticate using their existing social accounts during checkout. Benefits include:
Faster Checkout
No need to fill out registration forms or remember passwords
Higher Conversions
Reduce cart abandonment by streamlining authentication
Verified Emails
Social providers verify email addresses, reducing fake accounts
Customer Data
Automatically populate customer name and email from social profile
8.2 Supported Providers
| Provider | OAuth Type | Data Retrieved |
|---|---|---|
| OAuth 2.0 | Email, Name, Profile Picture | |
| OAuth 2.0 | Email, Name, Profile Picture | |
| OpenID Connect | Email, Name, Profile Picture | |
| Apple | Sign in with Apple | Email, Name (first login only) |
8.3 Google Setup
To enable Google Sign-In, you need to create OAuth 2.0 credentials in the Google Cloud Console.
Step 1: Create a Google Cloud Project
- Go to Google Cloud Console
- Click "Select a project" at the top, then "New Project"
- Enter a project name (e.g., "My Store Social Login")
- Click "Create"
Step 2: Configure OAuth Consent Screen
- In the Google Cloud Console, go to APIs & Services → OAuth consent screen
- Select External user type (or Internal if using Google Workspace)
- Fill in the required fields:
- App name: Your store name
- User support email: Your email address
- Developer contact: Your email address
- Add scopes:
email,profile,openid - Save and continue through the remaining steps
Step 3: Create OAuth Client ID
- Go to APIs & Services → Credentials
- Click Create Credentials → OAuth client ID
- Select Web application as the application type
- Enter a name (e.g., "Magento Social Login")
- Add Authorized JavaScript origins:
https://your-store.com
- Add Authorized redirect URIs:
https://your-store.com/jscriptz_checkout/sociallogin/callback/provider/google
- Click Create
Step 4: Publish the App (Production)
For production use, you need to publish your OAuth consent screen:
- Go to OAuth consent screen
- Click Publish App
- If your app requests sensitive scopes, you may need to submit for Google verification
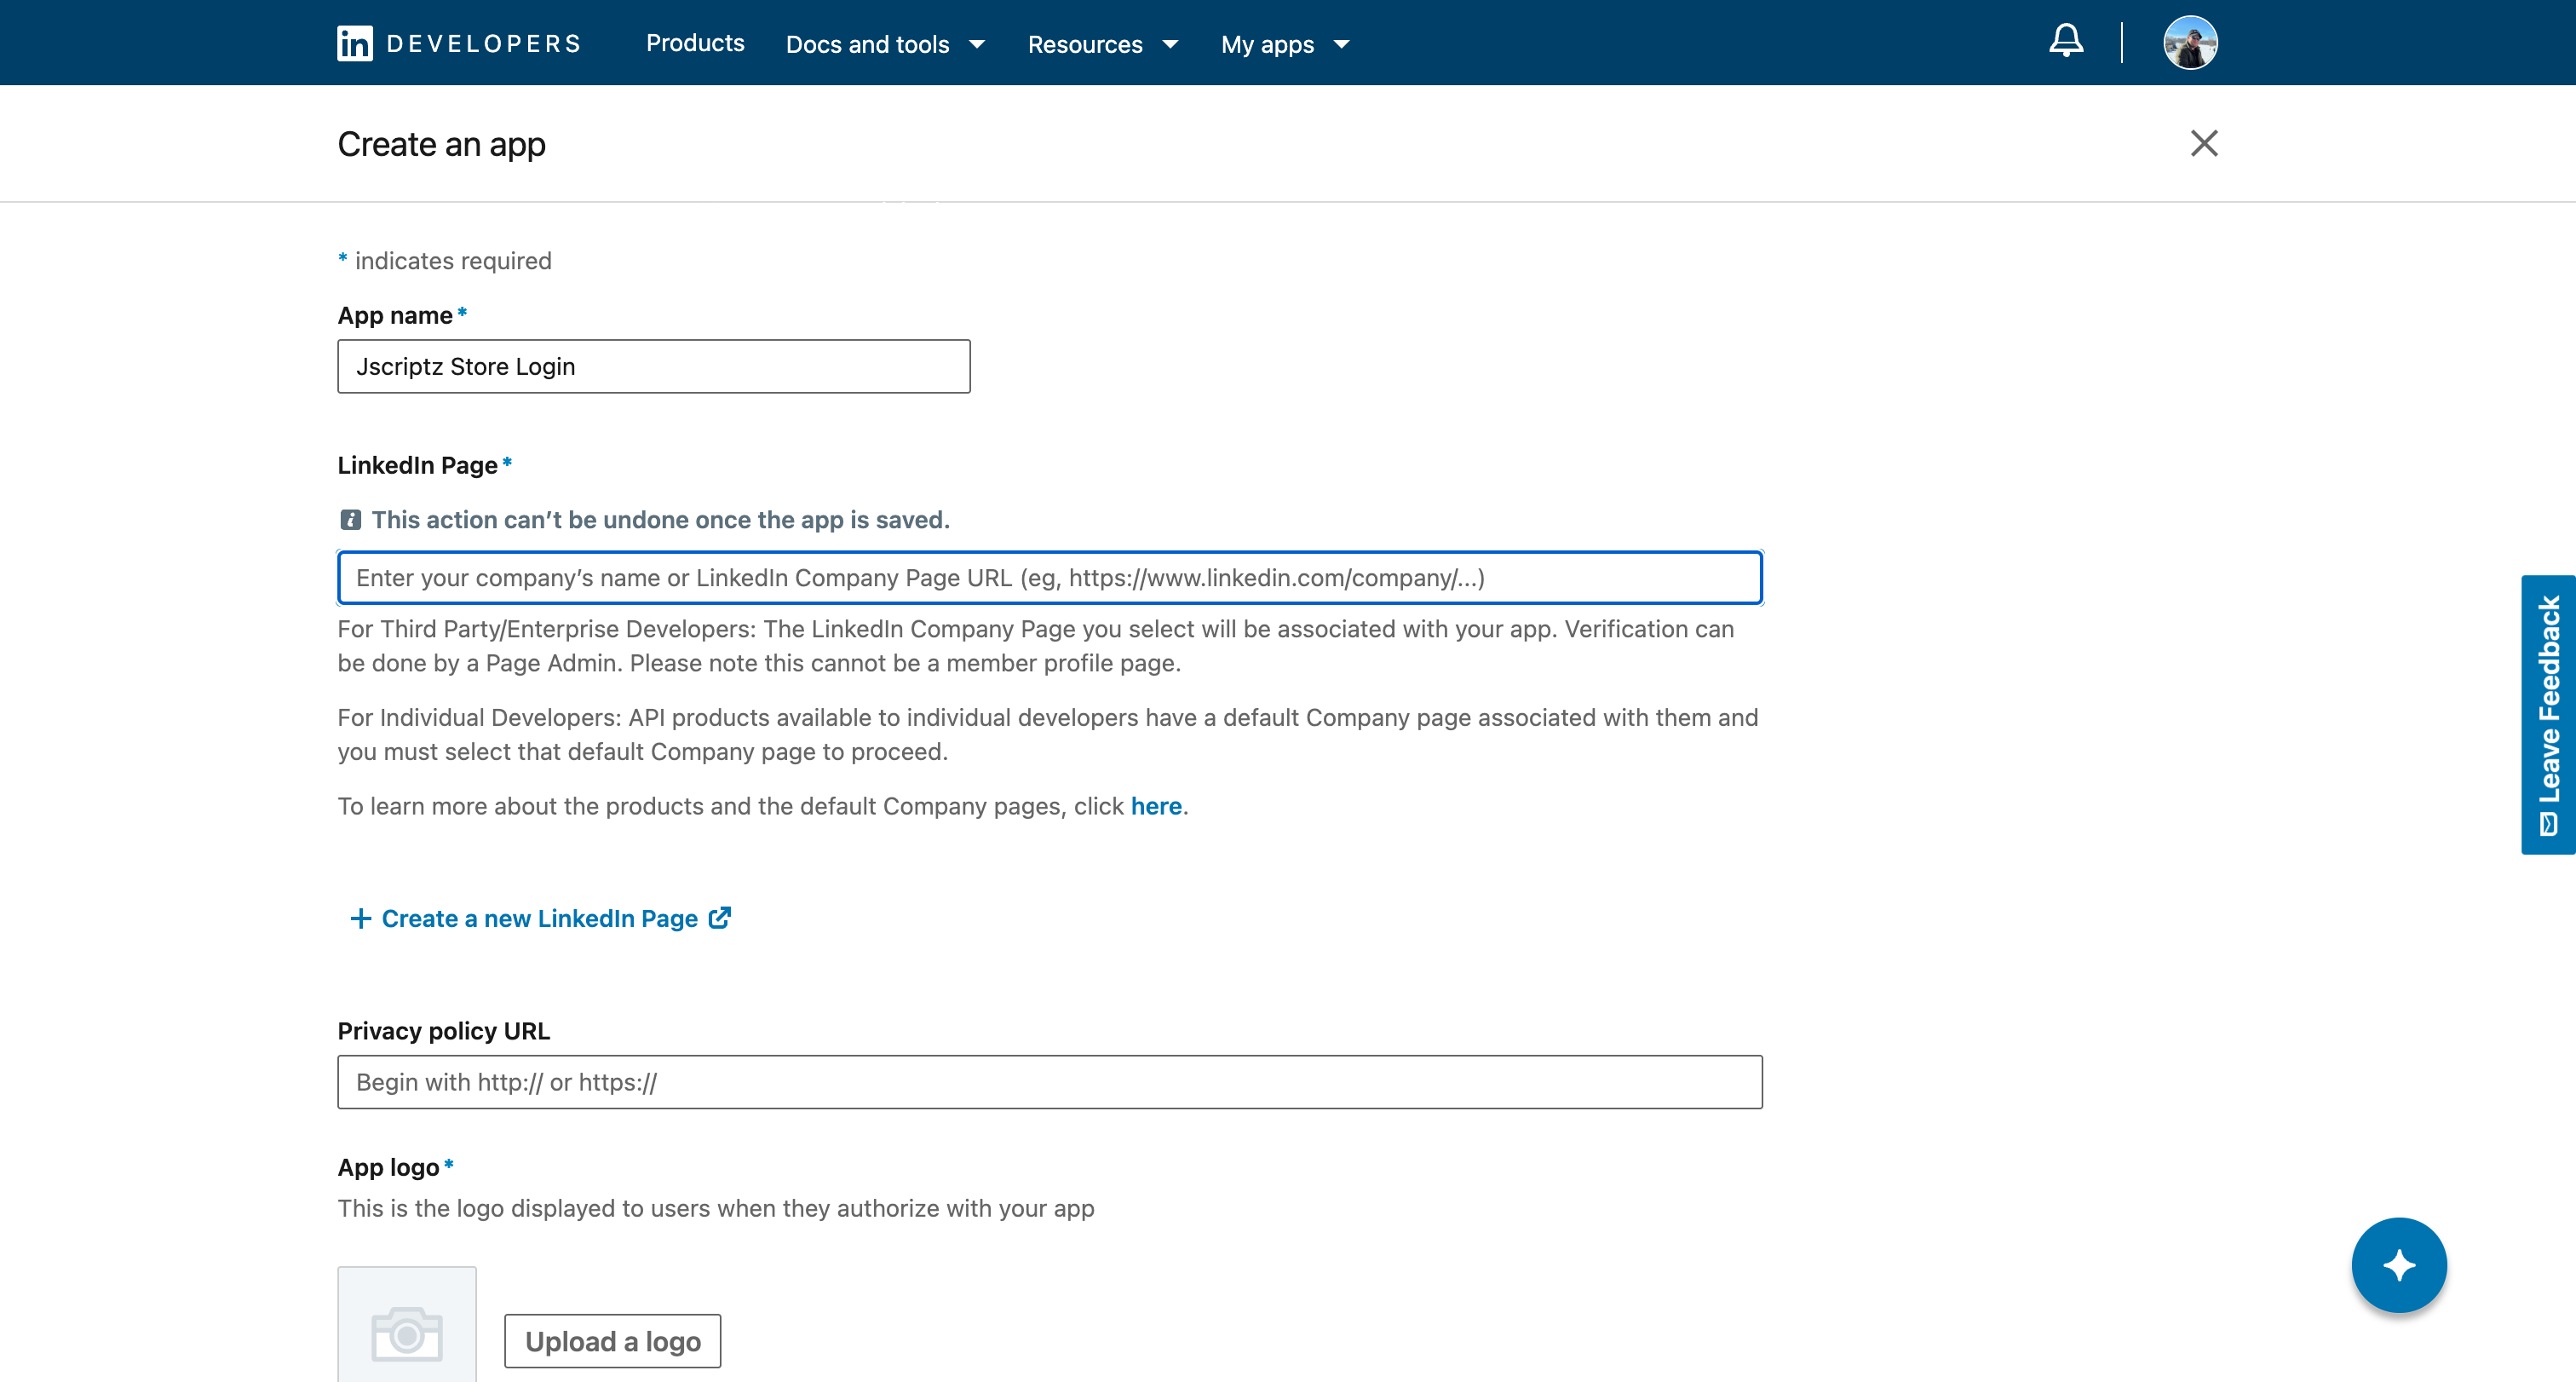
8.4 LinkedIn Setup
To enable LinkedIn Sign-In, you need to create an application in the LinkedIn Developer Portal.
Step 1: Create a LinkedIn App
- Go to LinkedIn Developer Portal
- Click Create app
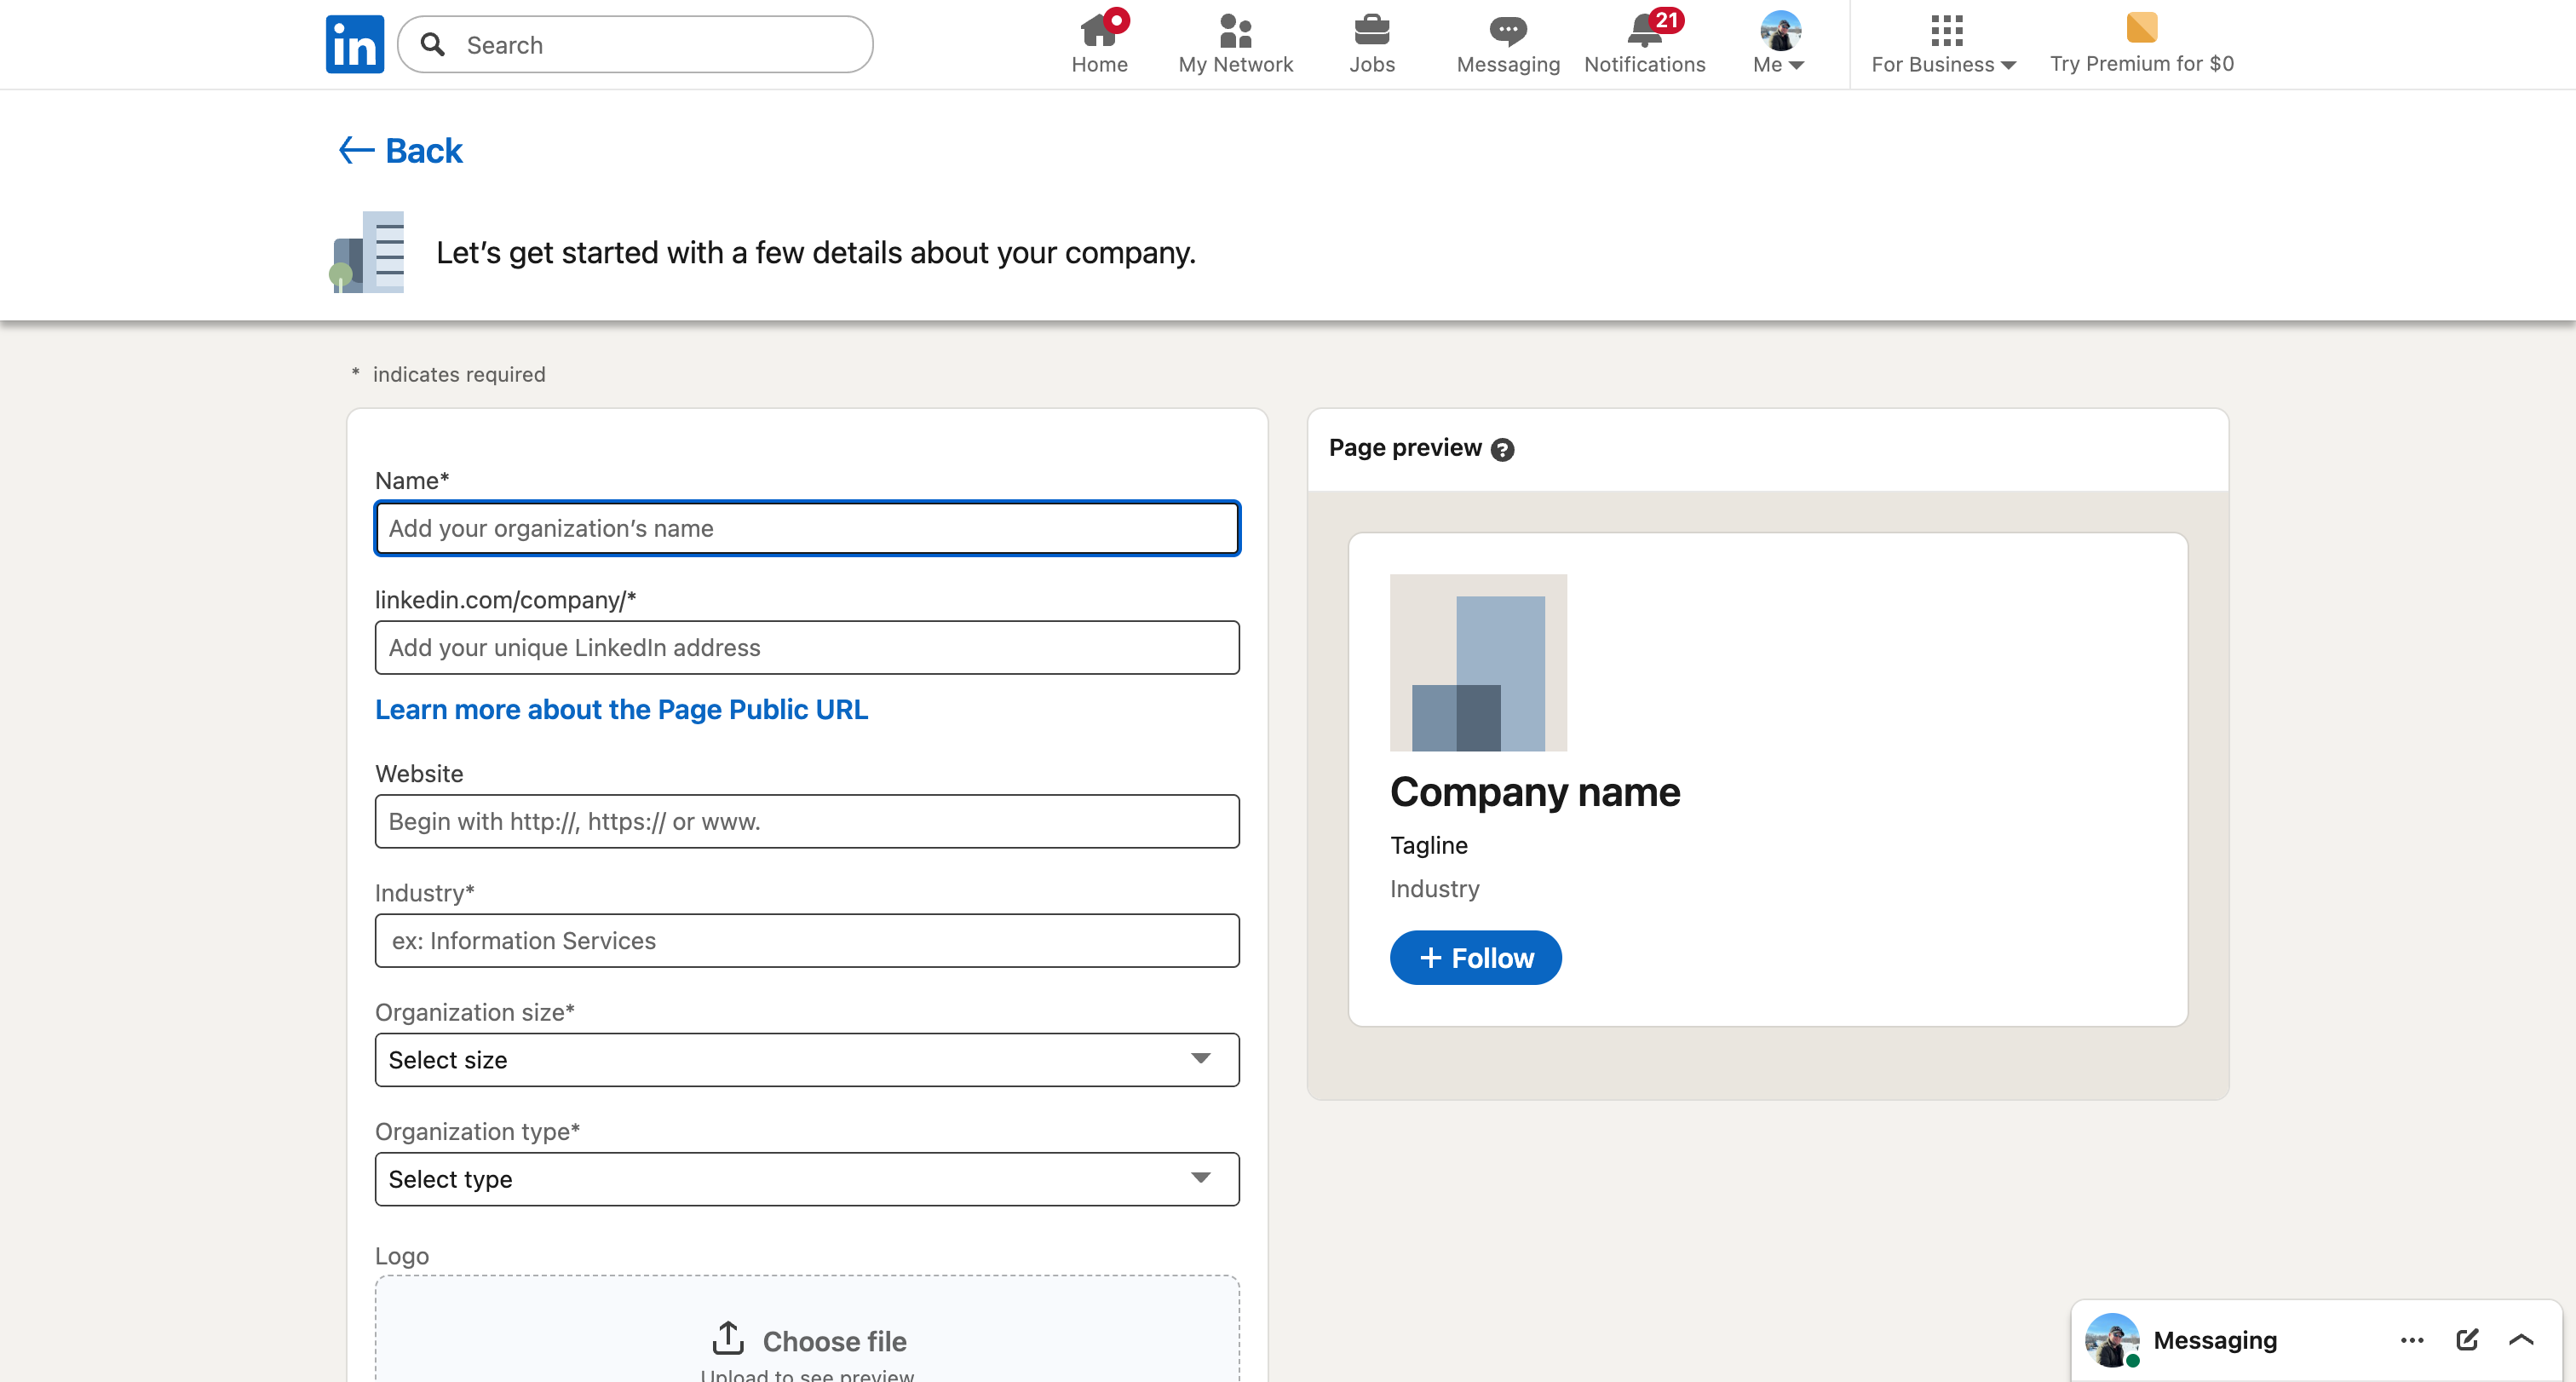
- Fill in the required fields:
- App name: Your store name
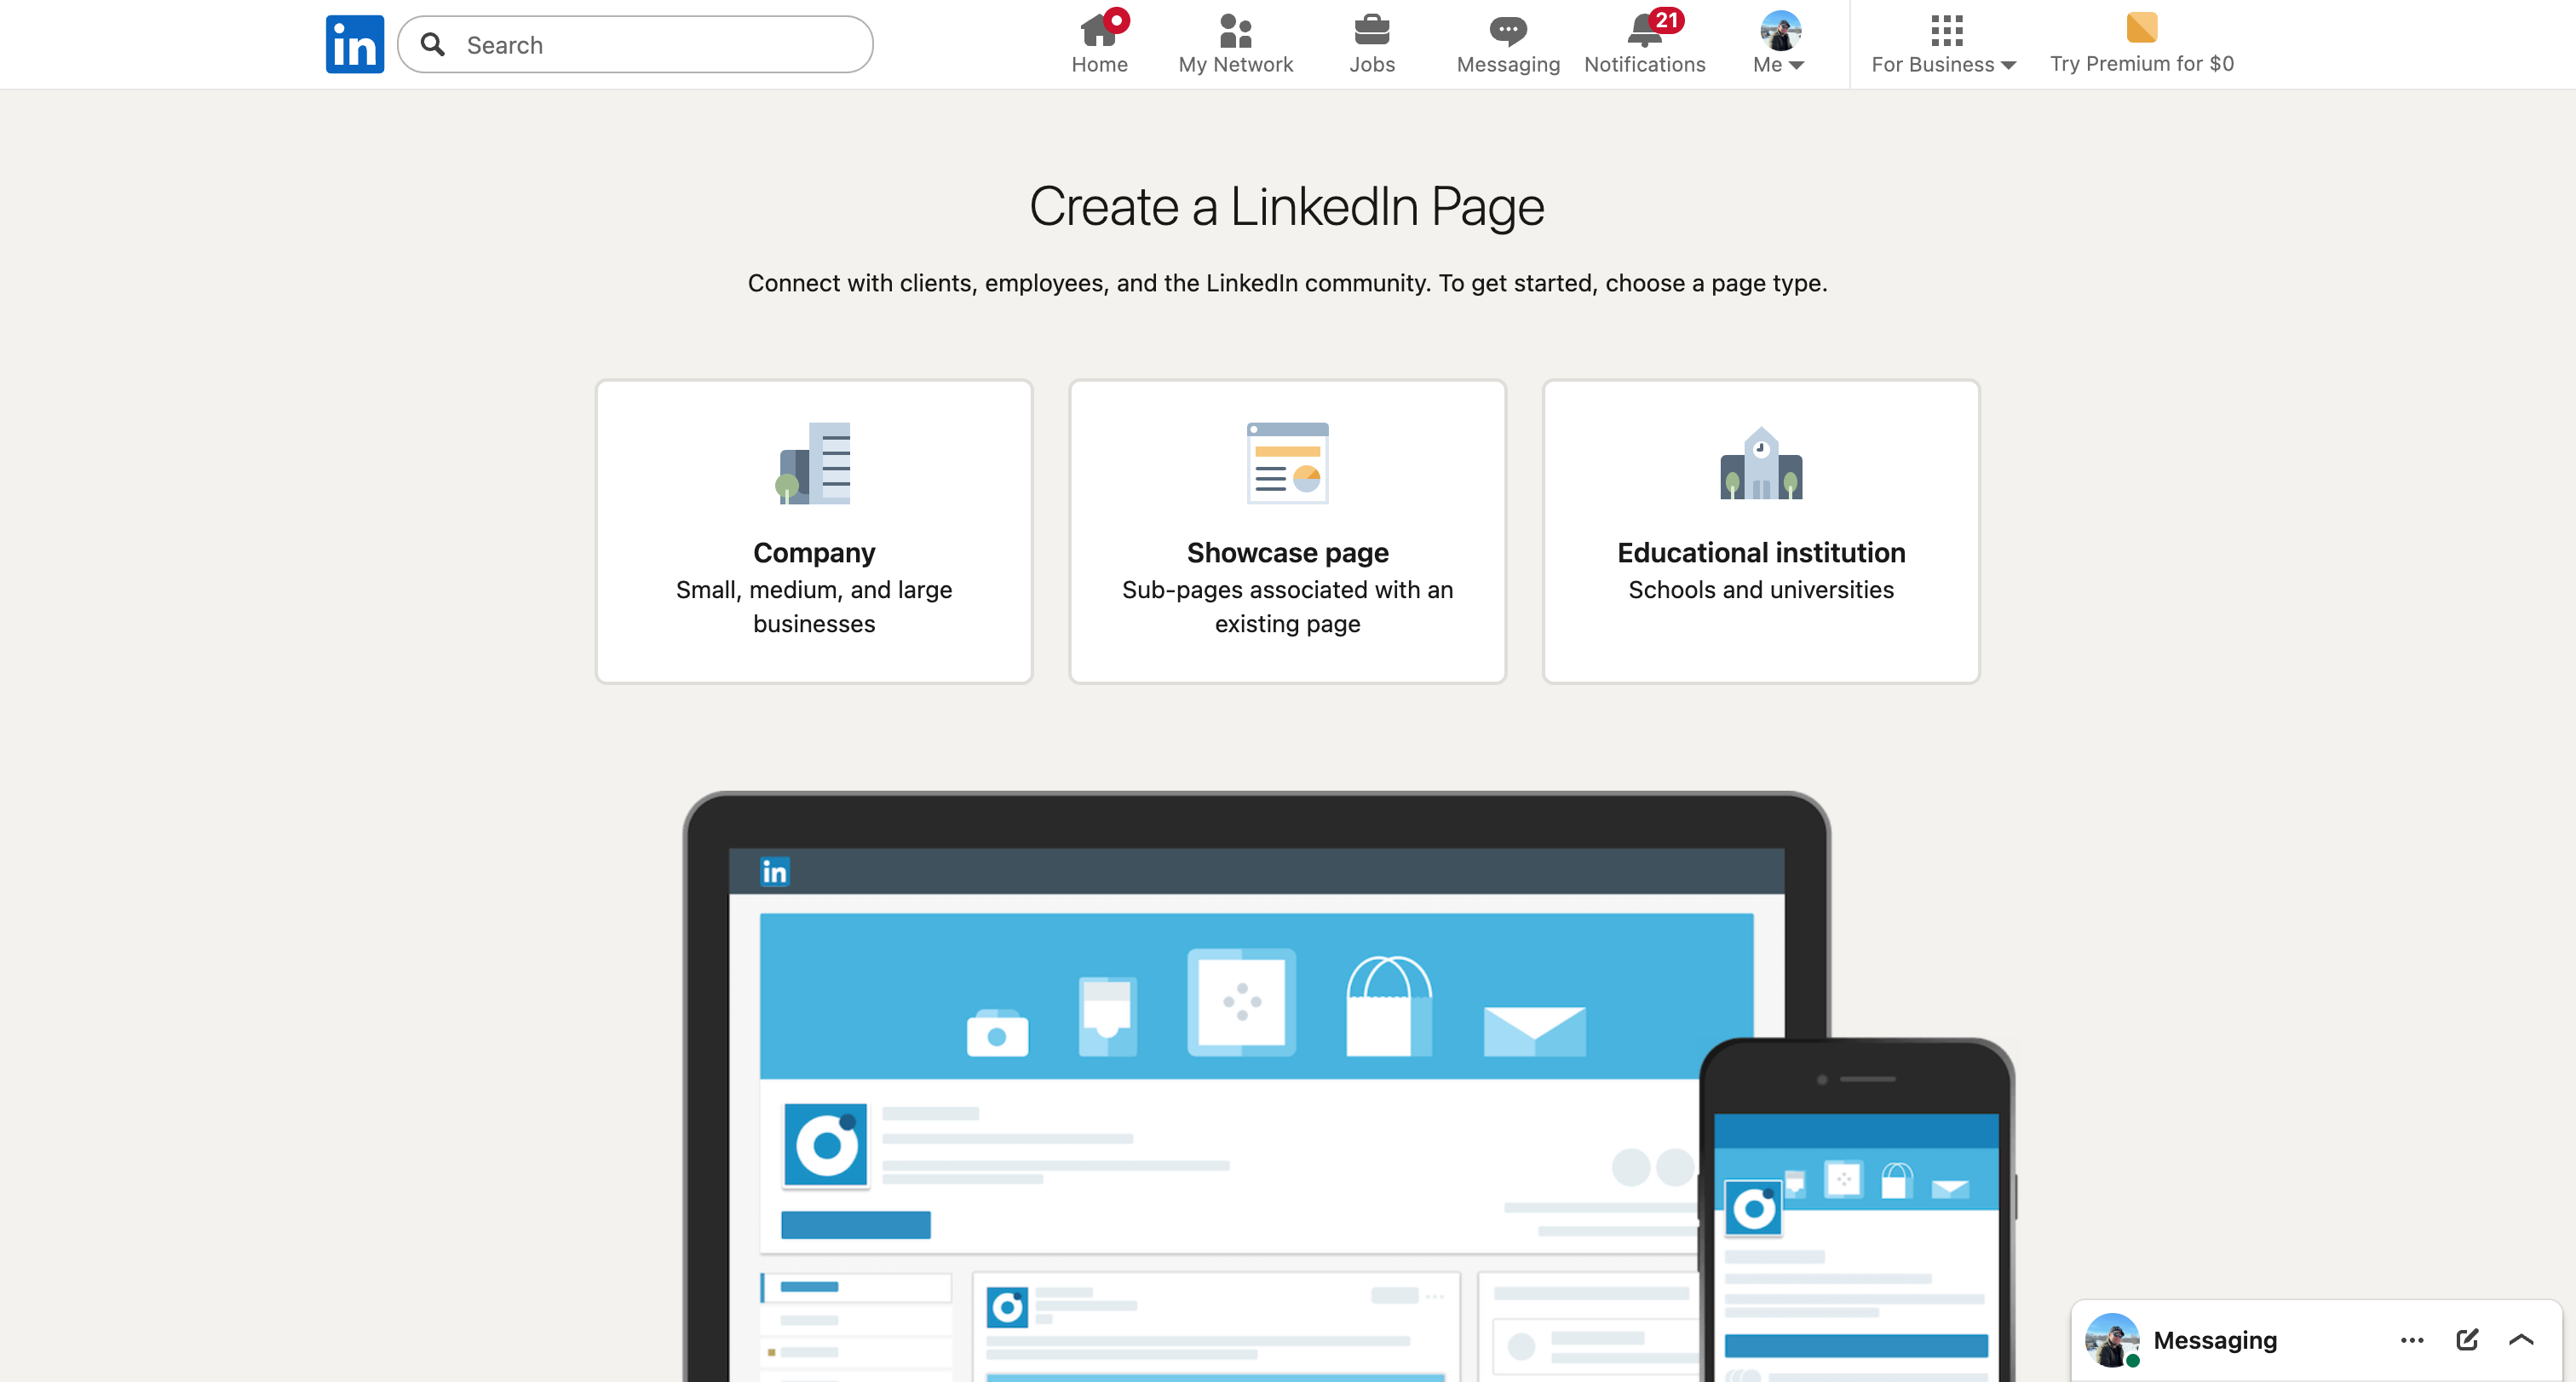
- LinkedIn Page: Select your company page (or create one)
- Privacy policy URL: Your store's privacy policy URL
- App logo: Upload your store logo (100x100px minimum)
- Accept the terms and click Create app
Step 2: Request Sign In with LinkedIn using OpenID Connect
- In your app's settings, go to the Products tab
- Find Sign In with LinkedIn using OpenID Connect
- Click Request access
- Accept the terms to enable the product
Step 3: Configure OAuth 2.0 Settings
- Go to the Auth tab in your app
- Add the following Authorized redirect URL:
https://your-store.com/jscriptz_checkout/sociallogin/callback/provider/linkedin
- Copy your Client ID and Client Secret from this page
8.5 Facebook Setup
To enable Facebook Login, you need to create an application in the Facebook Developer Portal.
Step 1: Create a Facebook App
- Go to Facebook Developers
- Click My Apps in the top right corner
- Click Create App
- Select Consumer as the app type
- Enter your app name (e.g., "Your Store Checkout") and contact email
- Click Create App
Step 2: Add Facebook Login Product
- In your app dashboard, click Add Product in the left sidebar
- Find Facebook Login and click Set Up
- Skip the quickstart wizard - we'll configure manually
Step 3: Configure Facebook Login Settings
- In the left sidebar, go to Facebook Login → Settings
- Configure the OAuth settings:
- Client OAuth Login: Yes
- Web OAuth Login: Yes
- Enforce HTTPS: Yes
- Add the following Valid OAuth Redirect URI:
https://your-store.com/jscriptz_checkout/sociallogin/popupcallback/provider/facebook/
- Click Save Changes
/subcats/), include it in the redirect URI:
https://your-store.com/subcats/jscriptz_checkout/sociallogin/popupcallback/provider/facebook/
Step 4: Get App Credentials
- In the left sidebar, go to Settings → Basic
- Copy your App ID (visible at top)
- Click Show next to App Secret and copy it
Step 5: App Review (Production)
For production use with real customers:
- Go to App Review in the left sidebar
- Click Permissions and Features
- Request email permission (usually auto-approved)
- Submit for review
8.6 Apple Setup
To enable Sign in with Apple, you need an Apple Developer Program membership ($99/year) and must configure several identifiers and keys.
Step 1: Enroll in Apple Developer Program
- Go to Apple Developer Program
- Click Enroll
- Sign in with your Apple ID (or create one)
- Complete the enrollment process ($99/year)
- Wait for enrollment approval (can take up to 48 hours)
Step 2: Create an App ID
- Go to Certificates, Identifiers & Profiles
- Click Identifiers in the sidebar
- Click the + button to create a new identifier
- Select App IDs and click Continue
- Select App type and click Continue
- Fill in the details:
- Description: Your store name (e.g., "My Store")
- Bundle ID: Explicit, use reverse domain (e.g., "com.yourstore.checkout")
- Scroll down and check Sign In with Apple
- Click Continue, then Register
Step 3: Create a Services ID
- In Identifiers, click the + button again
- Select Services IDs and click Continue
- Fill in the details:
- Description: Your store name
- Identifier: A unique ID (e.g., "com.yourstore.signin")
- Click Continue, then Register
- Click on the newly created Services ID
- Check Sign In with Apple and click Configure
- Configure the web authentication:
- Primary App ID: Select the App ID you created
- Domains: your-store.com
- Return URLs:
https://your-store.com/jscriptz_checkout/sociallogin/popupcallback/provider/apple/
- Click Save, then Continue, then Save
Step 4: Create a Sign In Key
- Go to Keys in the sidebar
- Click the + button to create a new key
- Enter a Key Name (e.g., "Sign In with Apple Key")
- Check Sign In with Apple
- Click Configure next to Sign In with Apple
- Select your Primary App ID and click Save
- Click Continue, then Register
- Important: Download the key file (.p8) immediately - you can only download it once!
- Note the Key ID shown on the page
Step 5: Get Your Team ID
- Go to Apple Developer Account
- Your Team ID is shown in the top right corner of the Membership page, or in the URL when viewing identifiers
Step 6: Configure Magento Admin
In Magento admin, go to Stores → Configuration → JSCRIPTZ → Jscriptz Checkout → Social Login and expand the Apple section:
| Setting | Description |
|---|---|
| Enable Apple Login | Set to Yes to enable |
| Apple Services ID | The Services ID identifier (e.g., "com.yourstore.signin") |
| Apple Team ID | Your 10-character Team ID from Apple Developer account |
| Apple Key ID | The Key ID from when you created the Sign In key |
| Apple Private Key | Paste the entire contents of your .p8 key file (including BEGIN/END lines) |
-----BEGIN PRIVATE KEY----- and -----END PRIVATE KEY----- lines.
Apple-Specific Behaviors
- Name only on first login: Apple only provides the user's name on the very first authorization. Subsequent logins won't include name data.
- Private relay email: Users can choose to hide their email. In this case, Apple provides a private relay address (e.g., xyz123@privaterelay.appleid.com) that forwards to the user's real email.
- Two-factor authentication: Apple requires 2FA on all Apple IDs used for Sign in with Apple.
8.7 Magento Configuration
After setting up your OAuth provider(s), configure them in Magento admin.
General Settings
| Setting | Description | Options |
|---|---|---|
| Enable Social Login | Enable/disable all social login functionality | Yes / No |
| Placement | Where to show social login buttons | Email Step / Express Area / Both |
| Button Style | Visual style of social buttons | Icons Only / Text Only / Icon + Text |
| Heading Text | Text above social login buttons | Text (e.g., "Or continue with") |
Provider Configuration
For each provider (Google, LinkedIn, etc.), configure:
| Setting | Description |
|---|---|
| Enable [Provider] | Enable this specific provider |
| Client ID | OAuth Client ID from the provider's developer portal |
| Client Secret | OAuth Client Secret from the provider's developer portal |
https://your-store.com/jscriptz_checkout/sociallogin/callback/provider/[provider_code]Provider codes:
google, facebook, linkedin, apple, amazon, microsoft, twitter
Login Page Integration
Social Login can also be displayed on the customer login page (/customer/account/login):
| Setting | Description |
|---|---|
| Show on Login Page | Display social login buttons on the standard login page |
| Login Page Alignment | Position of social buttons (Above Form / Below Form / Side by Side) |
| Compact Form Layout | Use a more compact layout with social and form side-by-side |
9. Order Processing
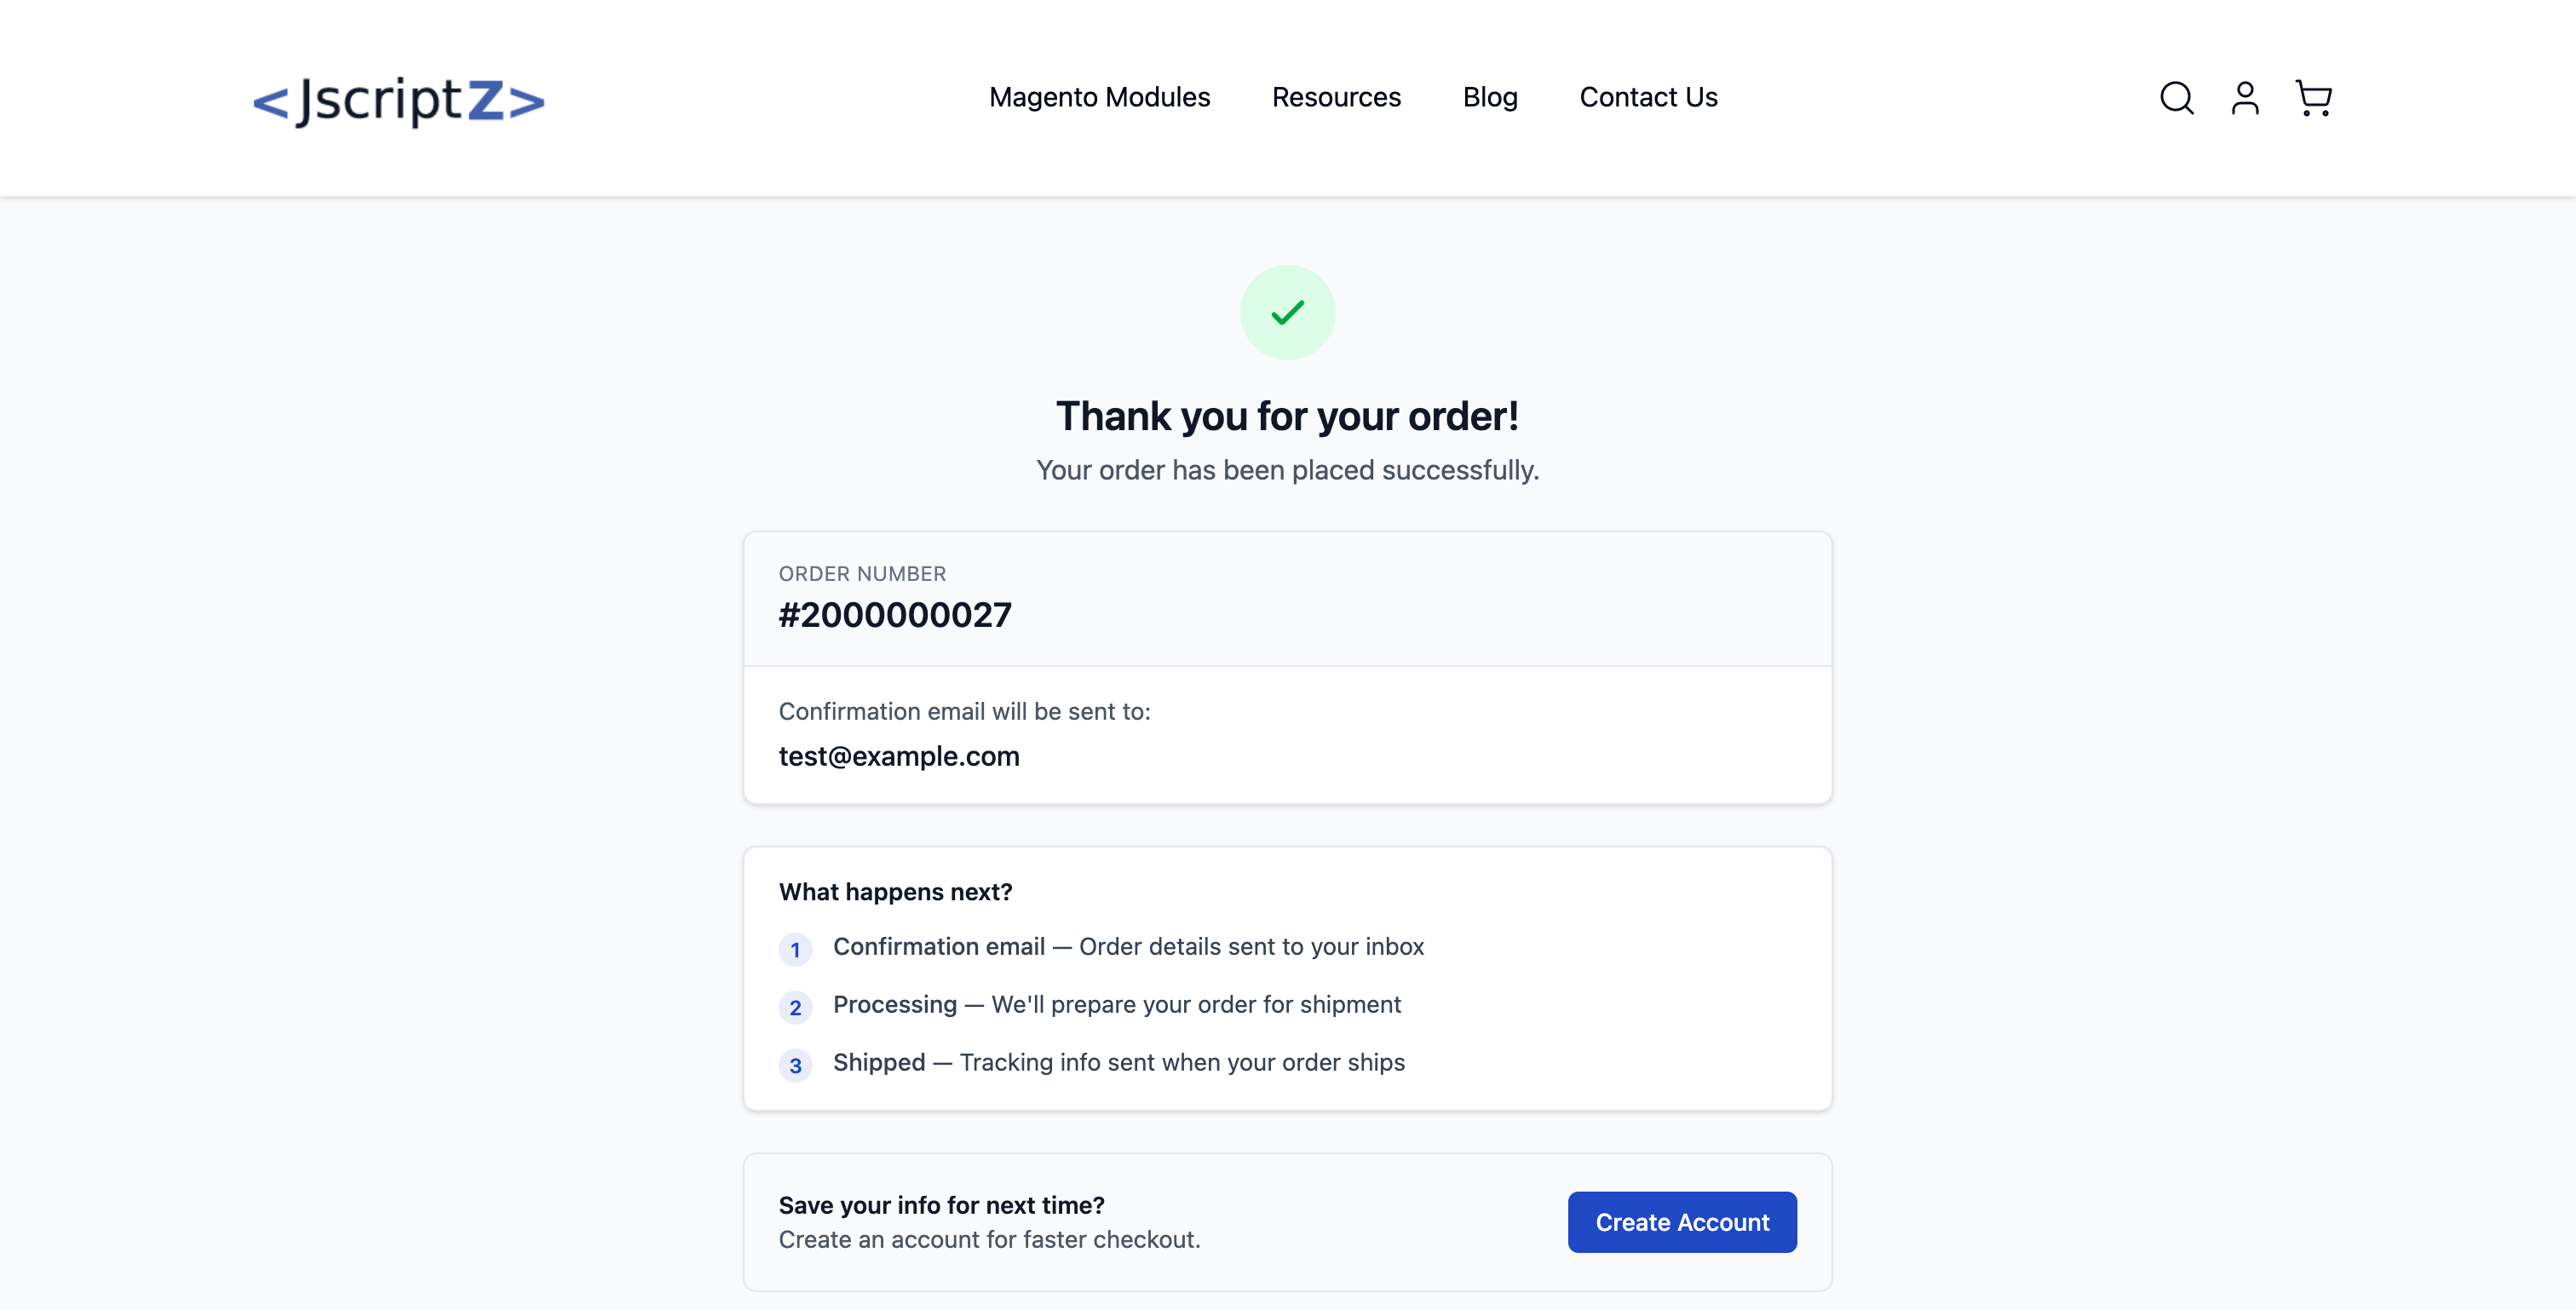
9.1 Order Success Page
After successful order placement, customers see a confirmation page with:
- Order number and confirmation
- Order summary details
- Option to create account (for guests)
- Continue shopping links
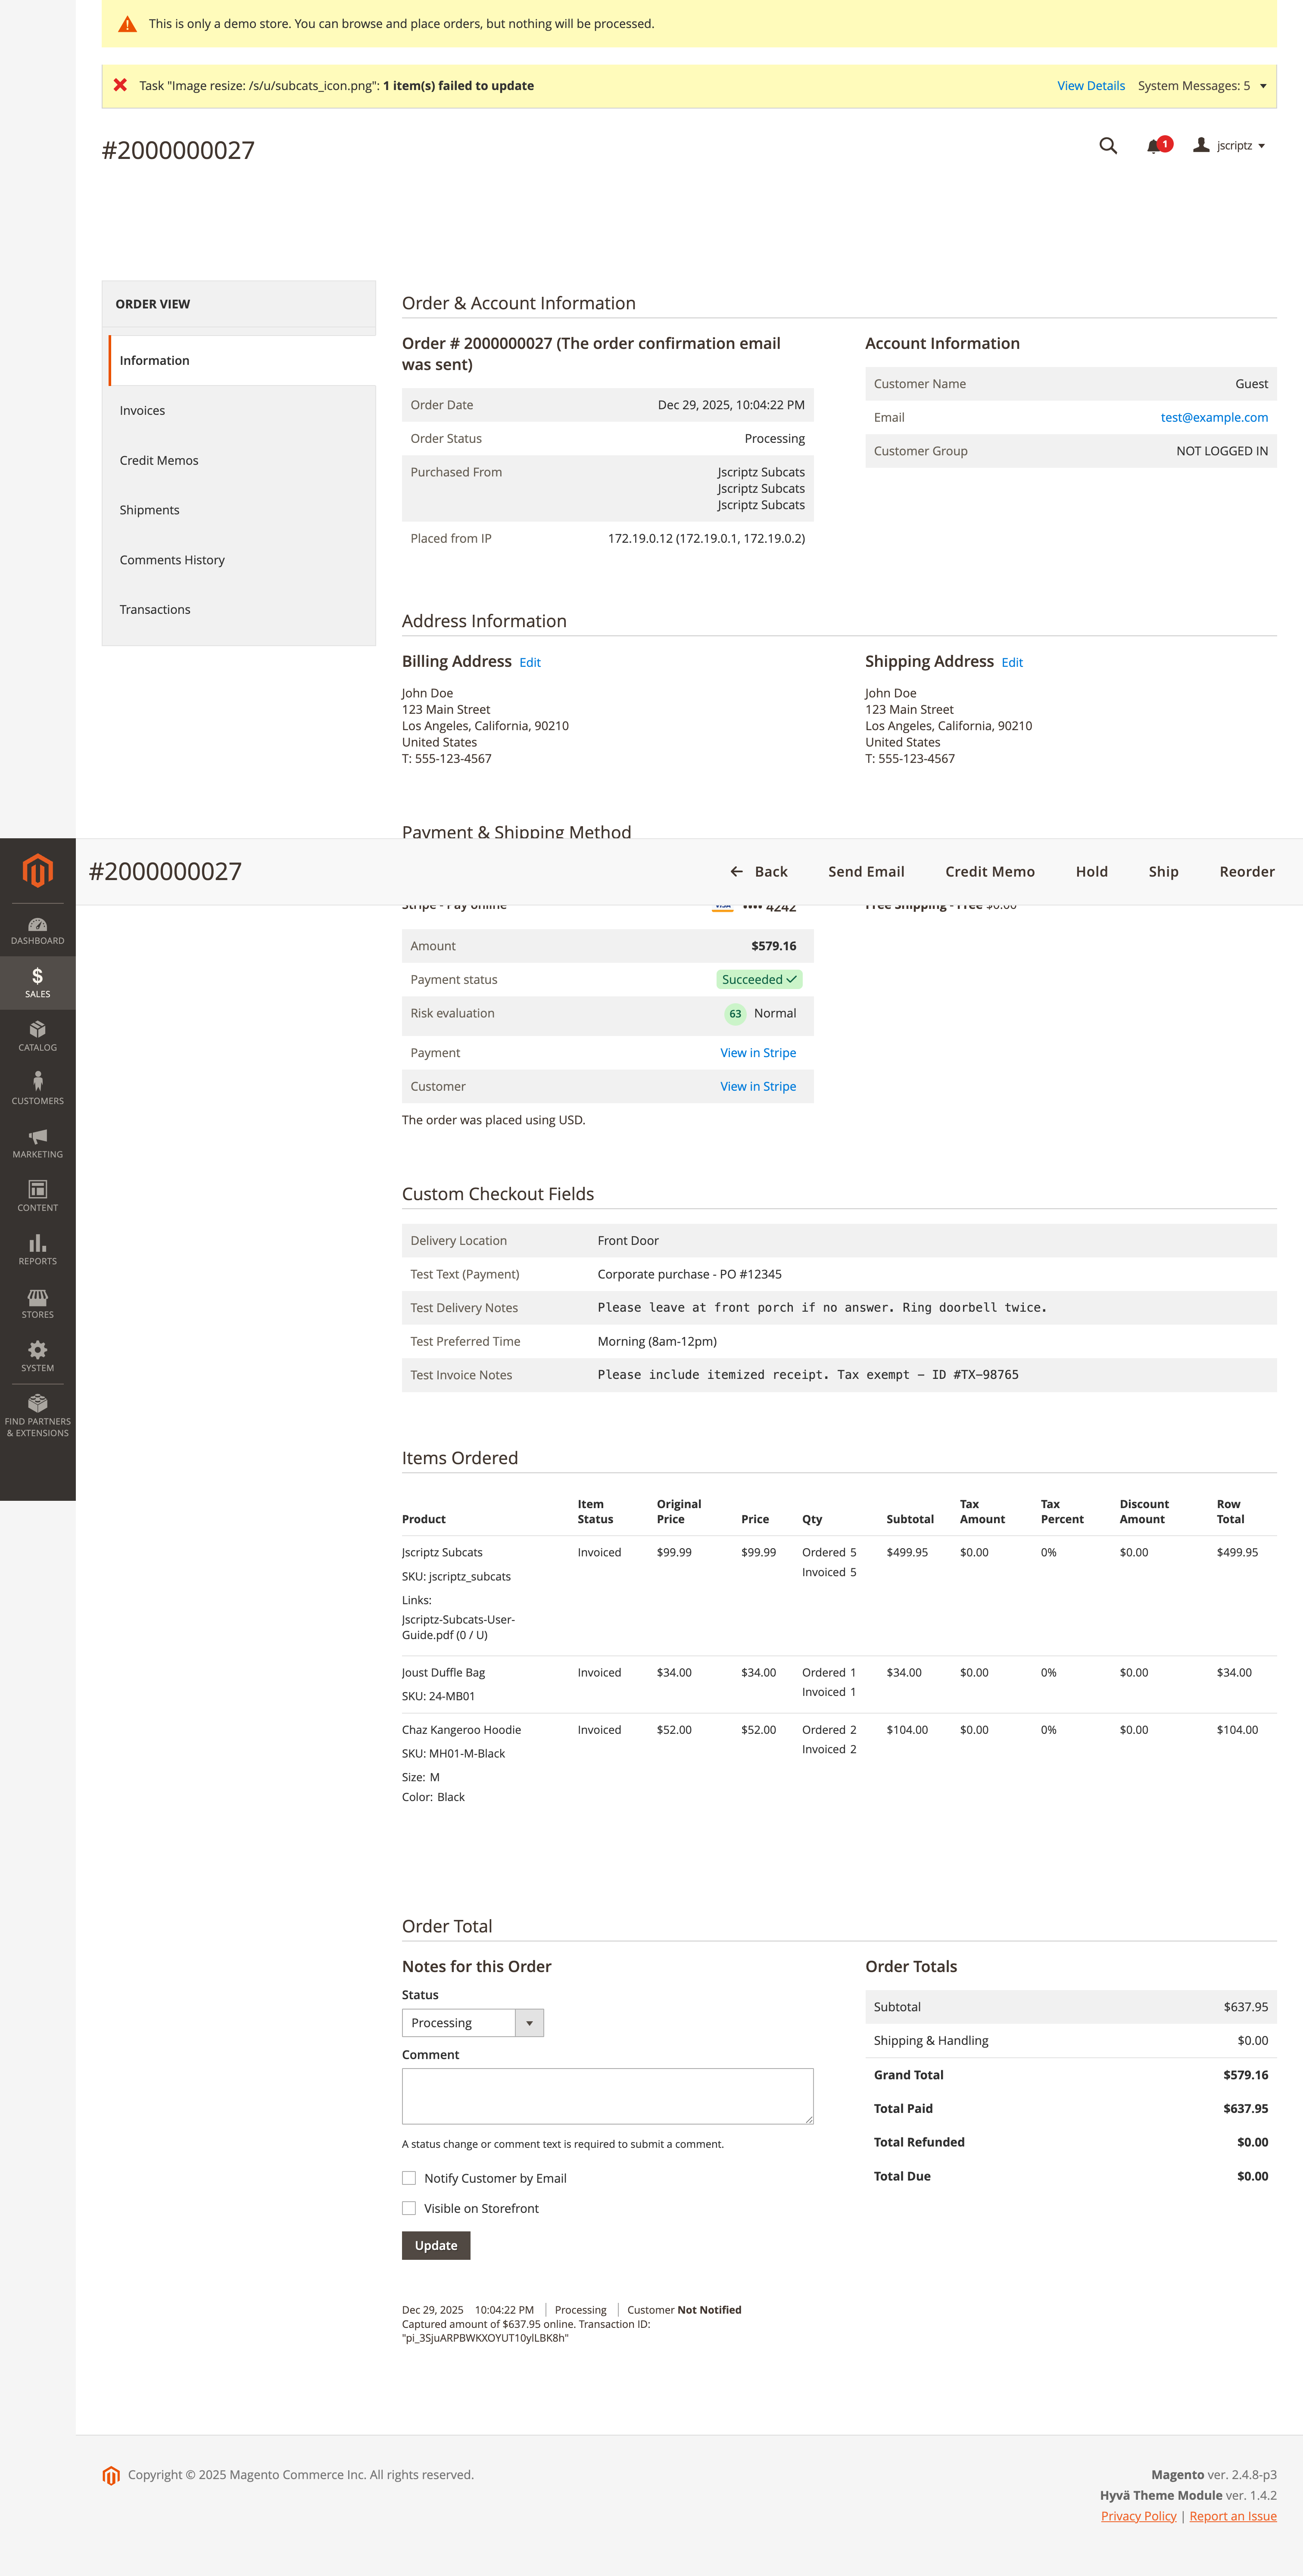
9.2 Admin Order View
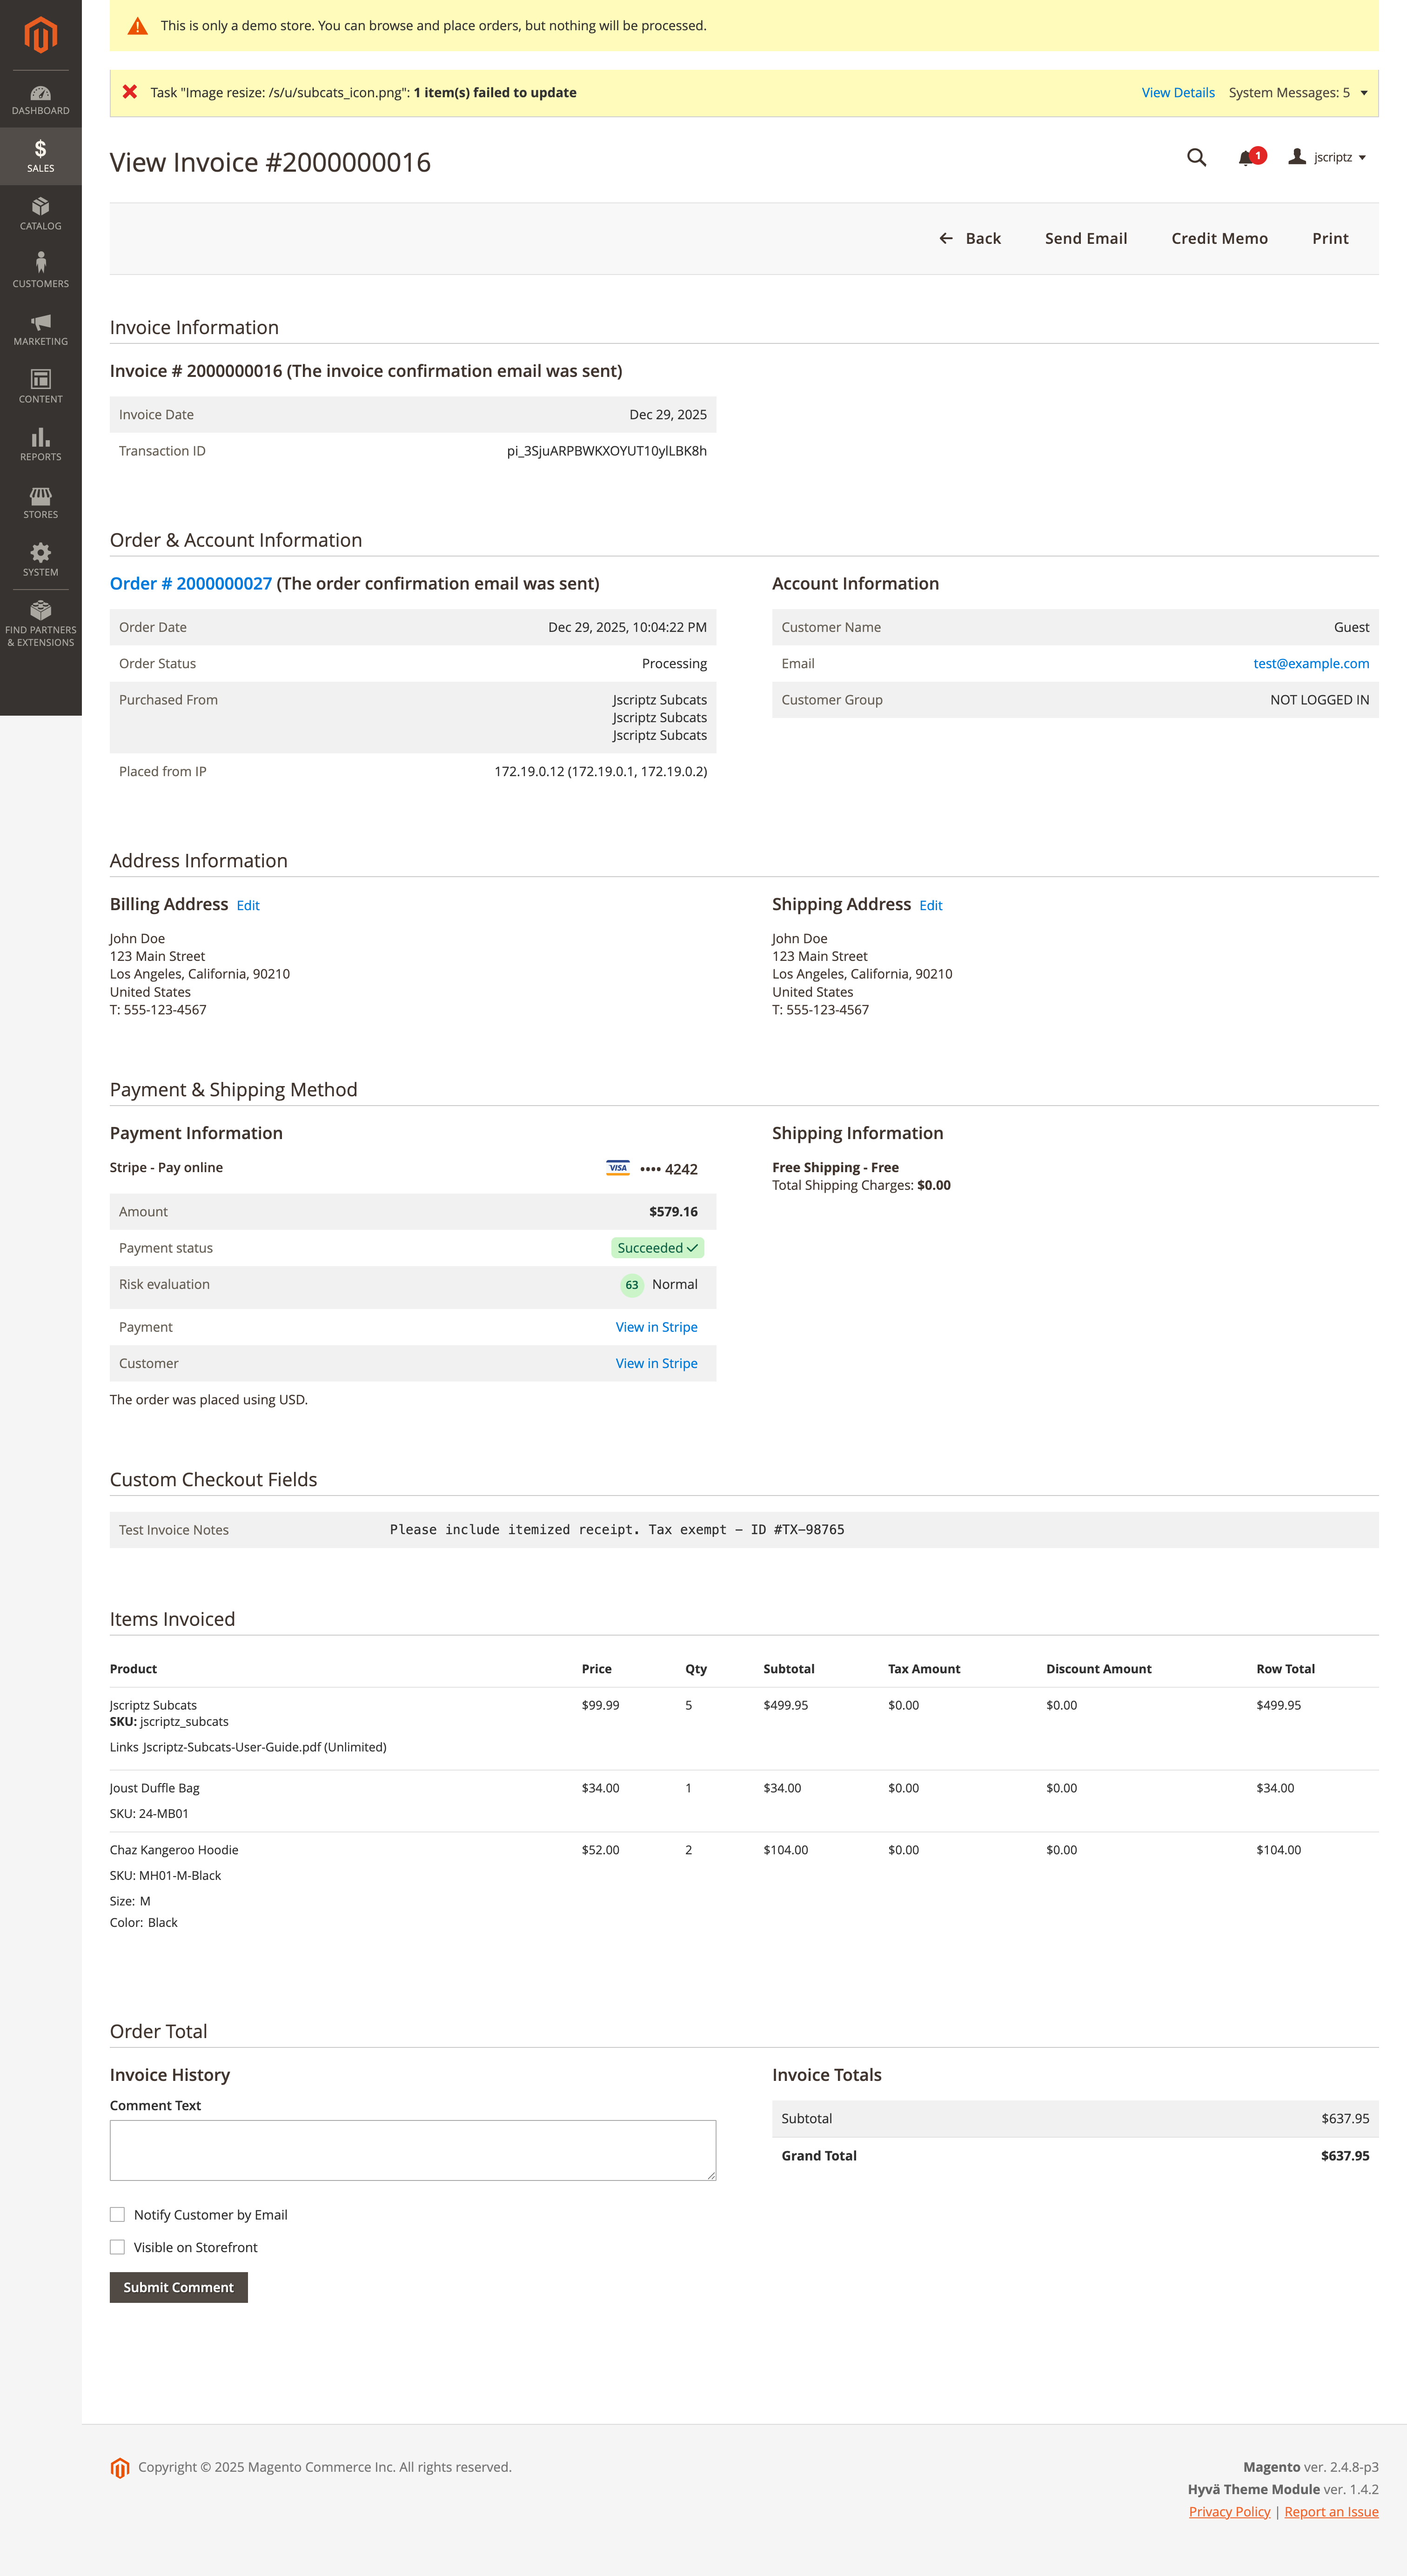
Custom field values are displayed in the admin order view when "Show in Order View" is enabled.
9.3 Invoice & Shipment Views
Custom fields appear on invoices and shipments when configured.
9.4 Order Emails
Custom fields are automatically included in order confirmation emails.
{{var custom_checkout_fields_html|raw}} to display custom fields.
10. Mobile Experience
The checkout is fully responsive with mobile-specific features.
Mobile Features
- Responsive Layout - Tailwind breakpoints (sm/md/lg) for adaptive design
- Mobile Sticky Order Summary - Fixed bottom bar with expandable drawer
- Touch-Optimized Controls - Larger tap targets for mobile input
- Device-Specific Layouts - Configure unique layouts for mobile in Builder

11. Order Bumps (Upsells)
Add upsell products to the checkout to increase average order value.
Order Bump Features
| Feature | Description |
|---|---|
| Source Types | Manual product selection, Related, Upsell, or Cross-sell products |
| Placement | Before place order, order summary, or both locations |
| Discount | Optional percentage or fixed discount on bump products |
| Custom Label | Override product name with promotional copy |
12. Analytics Dashboard
Track checkout performance with built-in analytics.
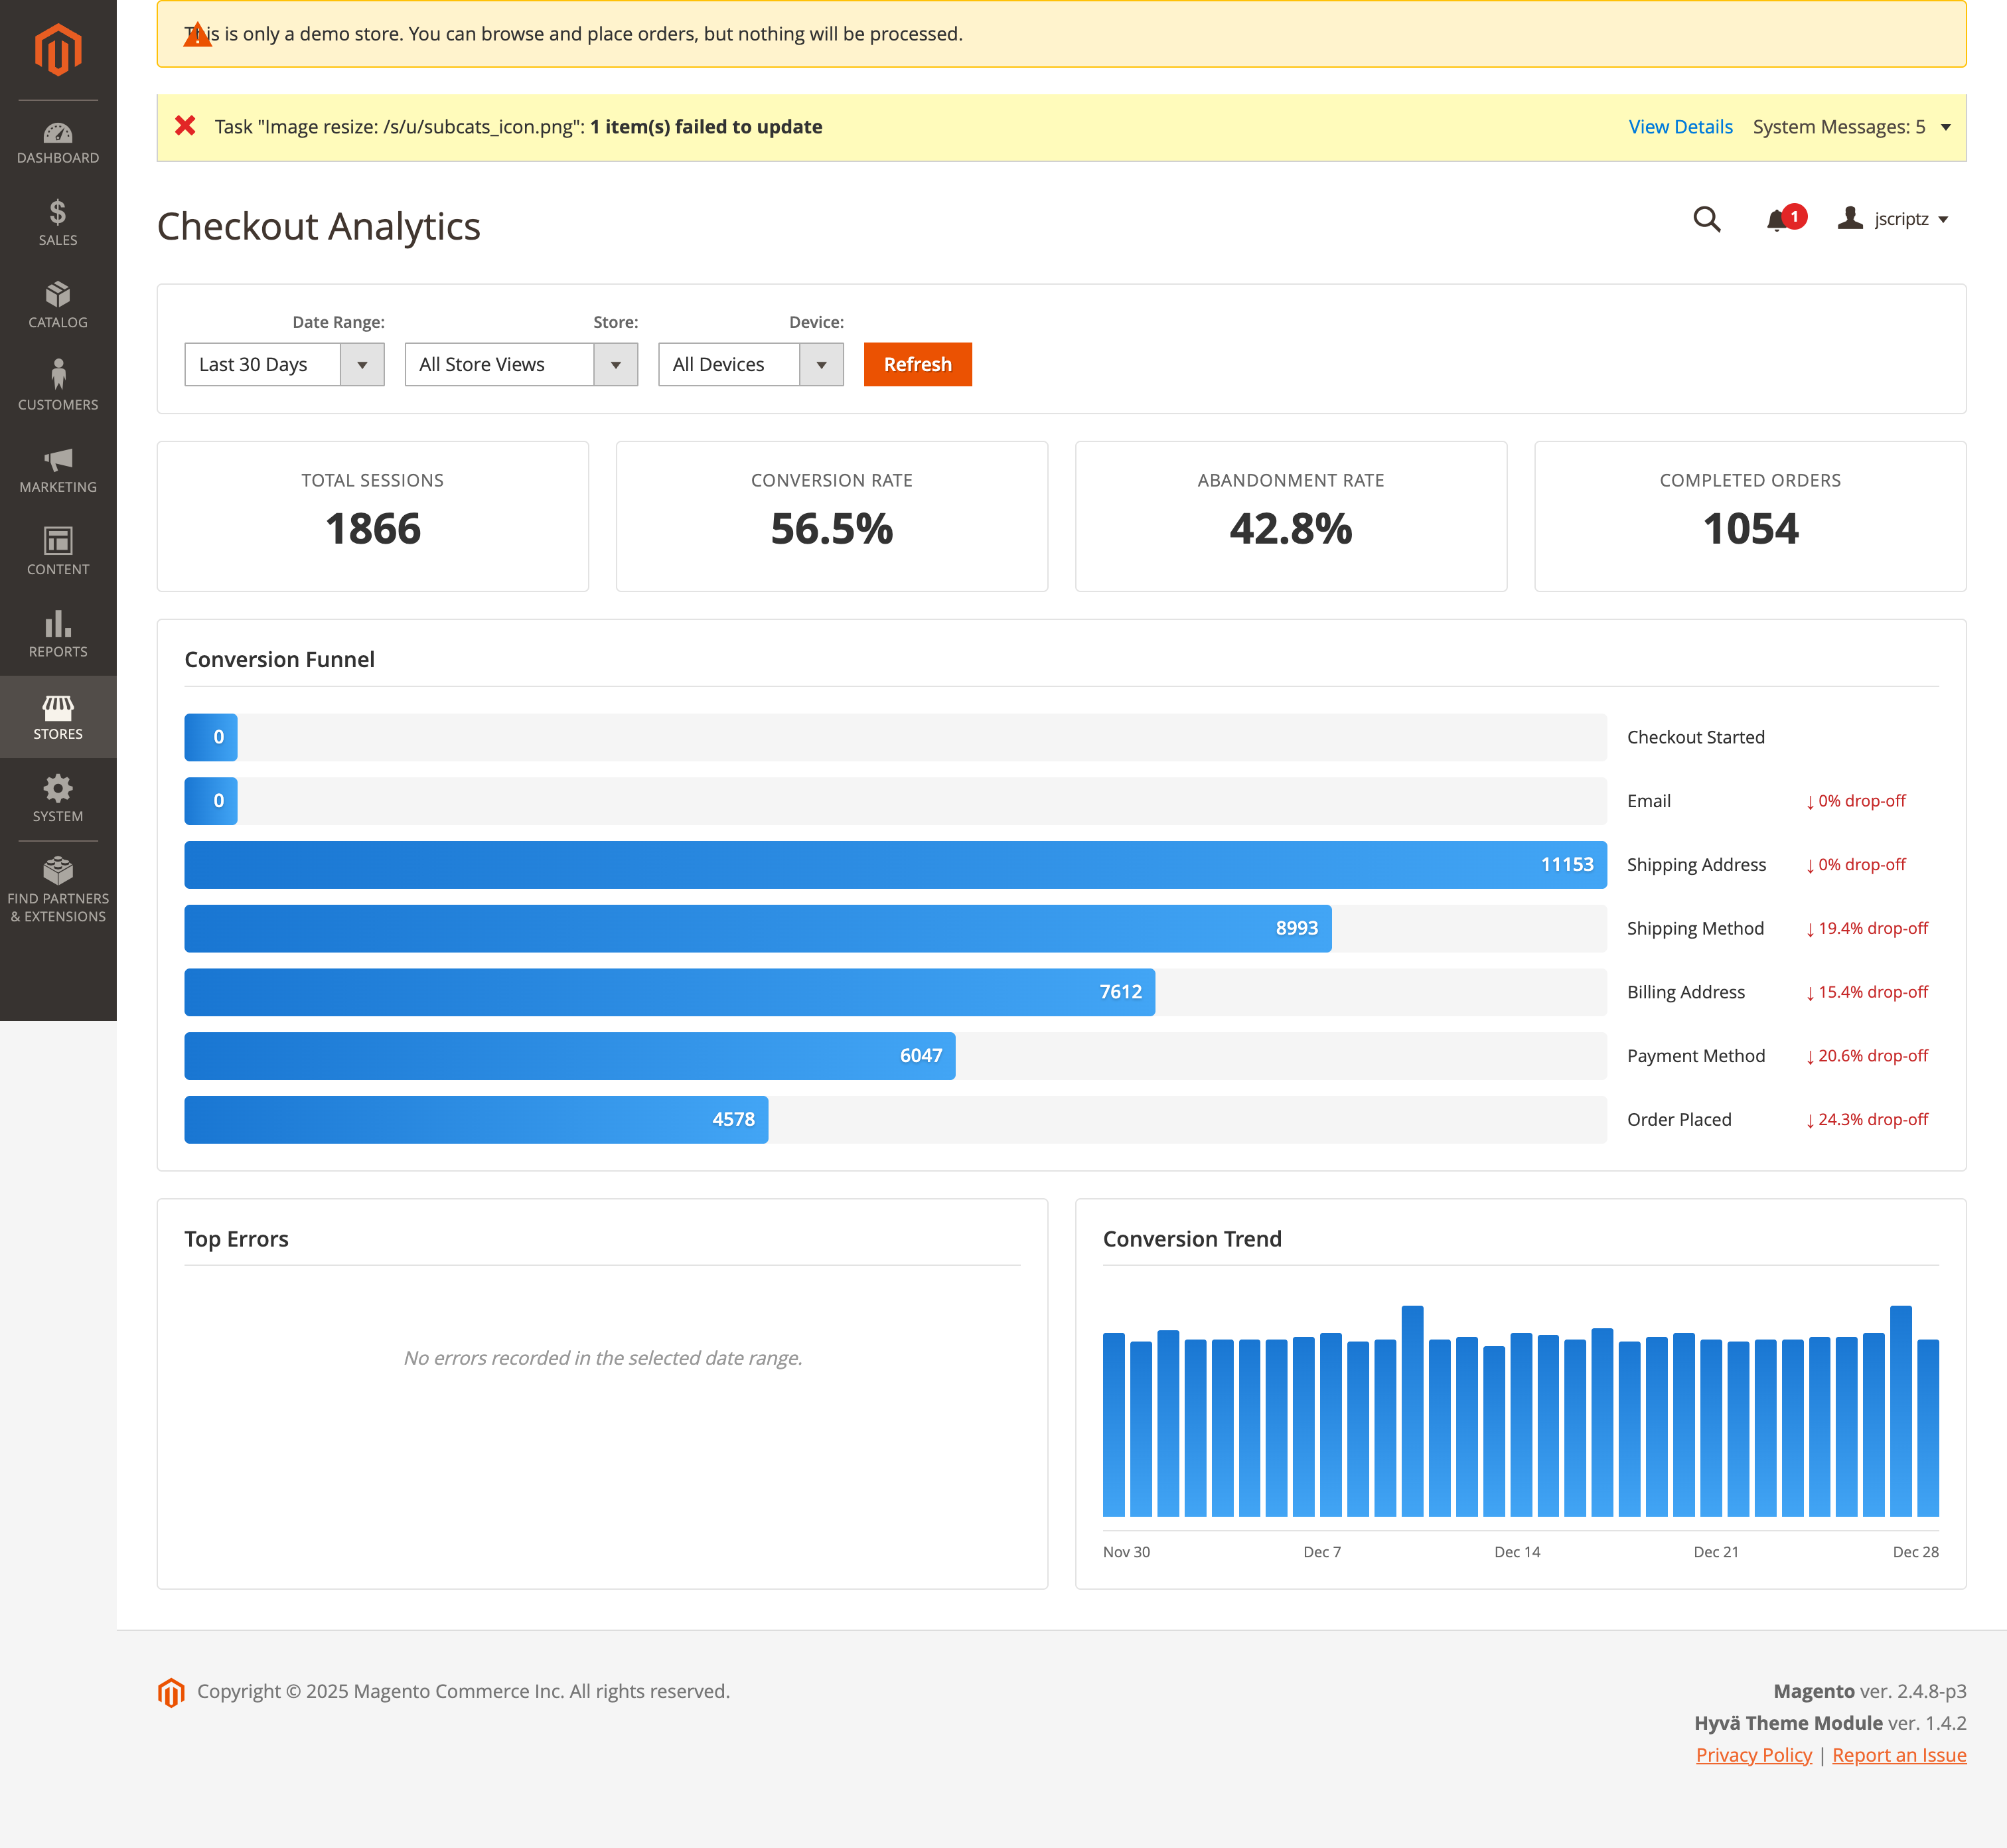
12.1 Conversion Funnel
Visualize checkout progression and identify drop-off points.
- Sessions per Step - How many sessions reached each step
- Drop-off Rates - Percentage abandoning at each step
- Completion Rate - Overall checkout completion percentage
12.2 Error Tracking
Monitor validation errors and payment failures.
- Top Errors - Most common error messages
- Error Count - Total occurrences per error
- Error Percentage - Relative frequency of each error
13. A/B Testing
Run split tests to optimize checkout conversion.
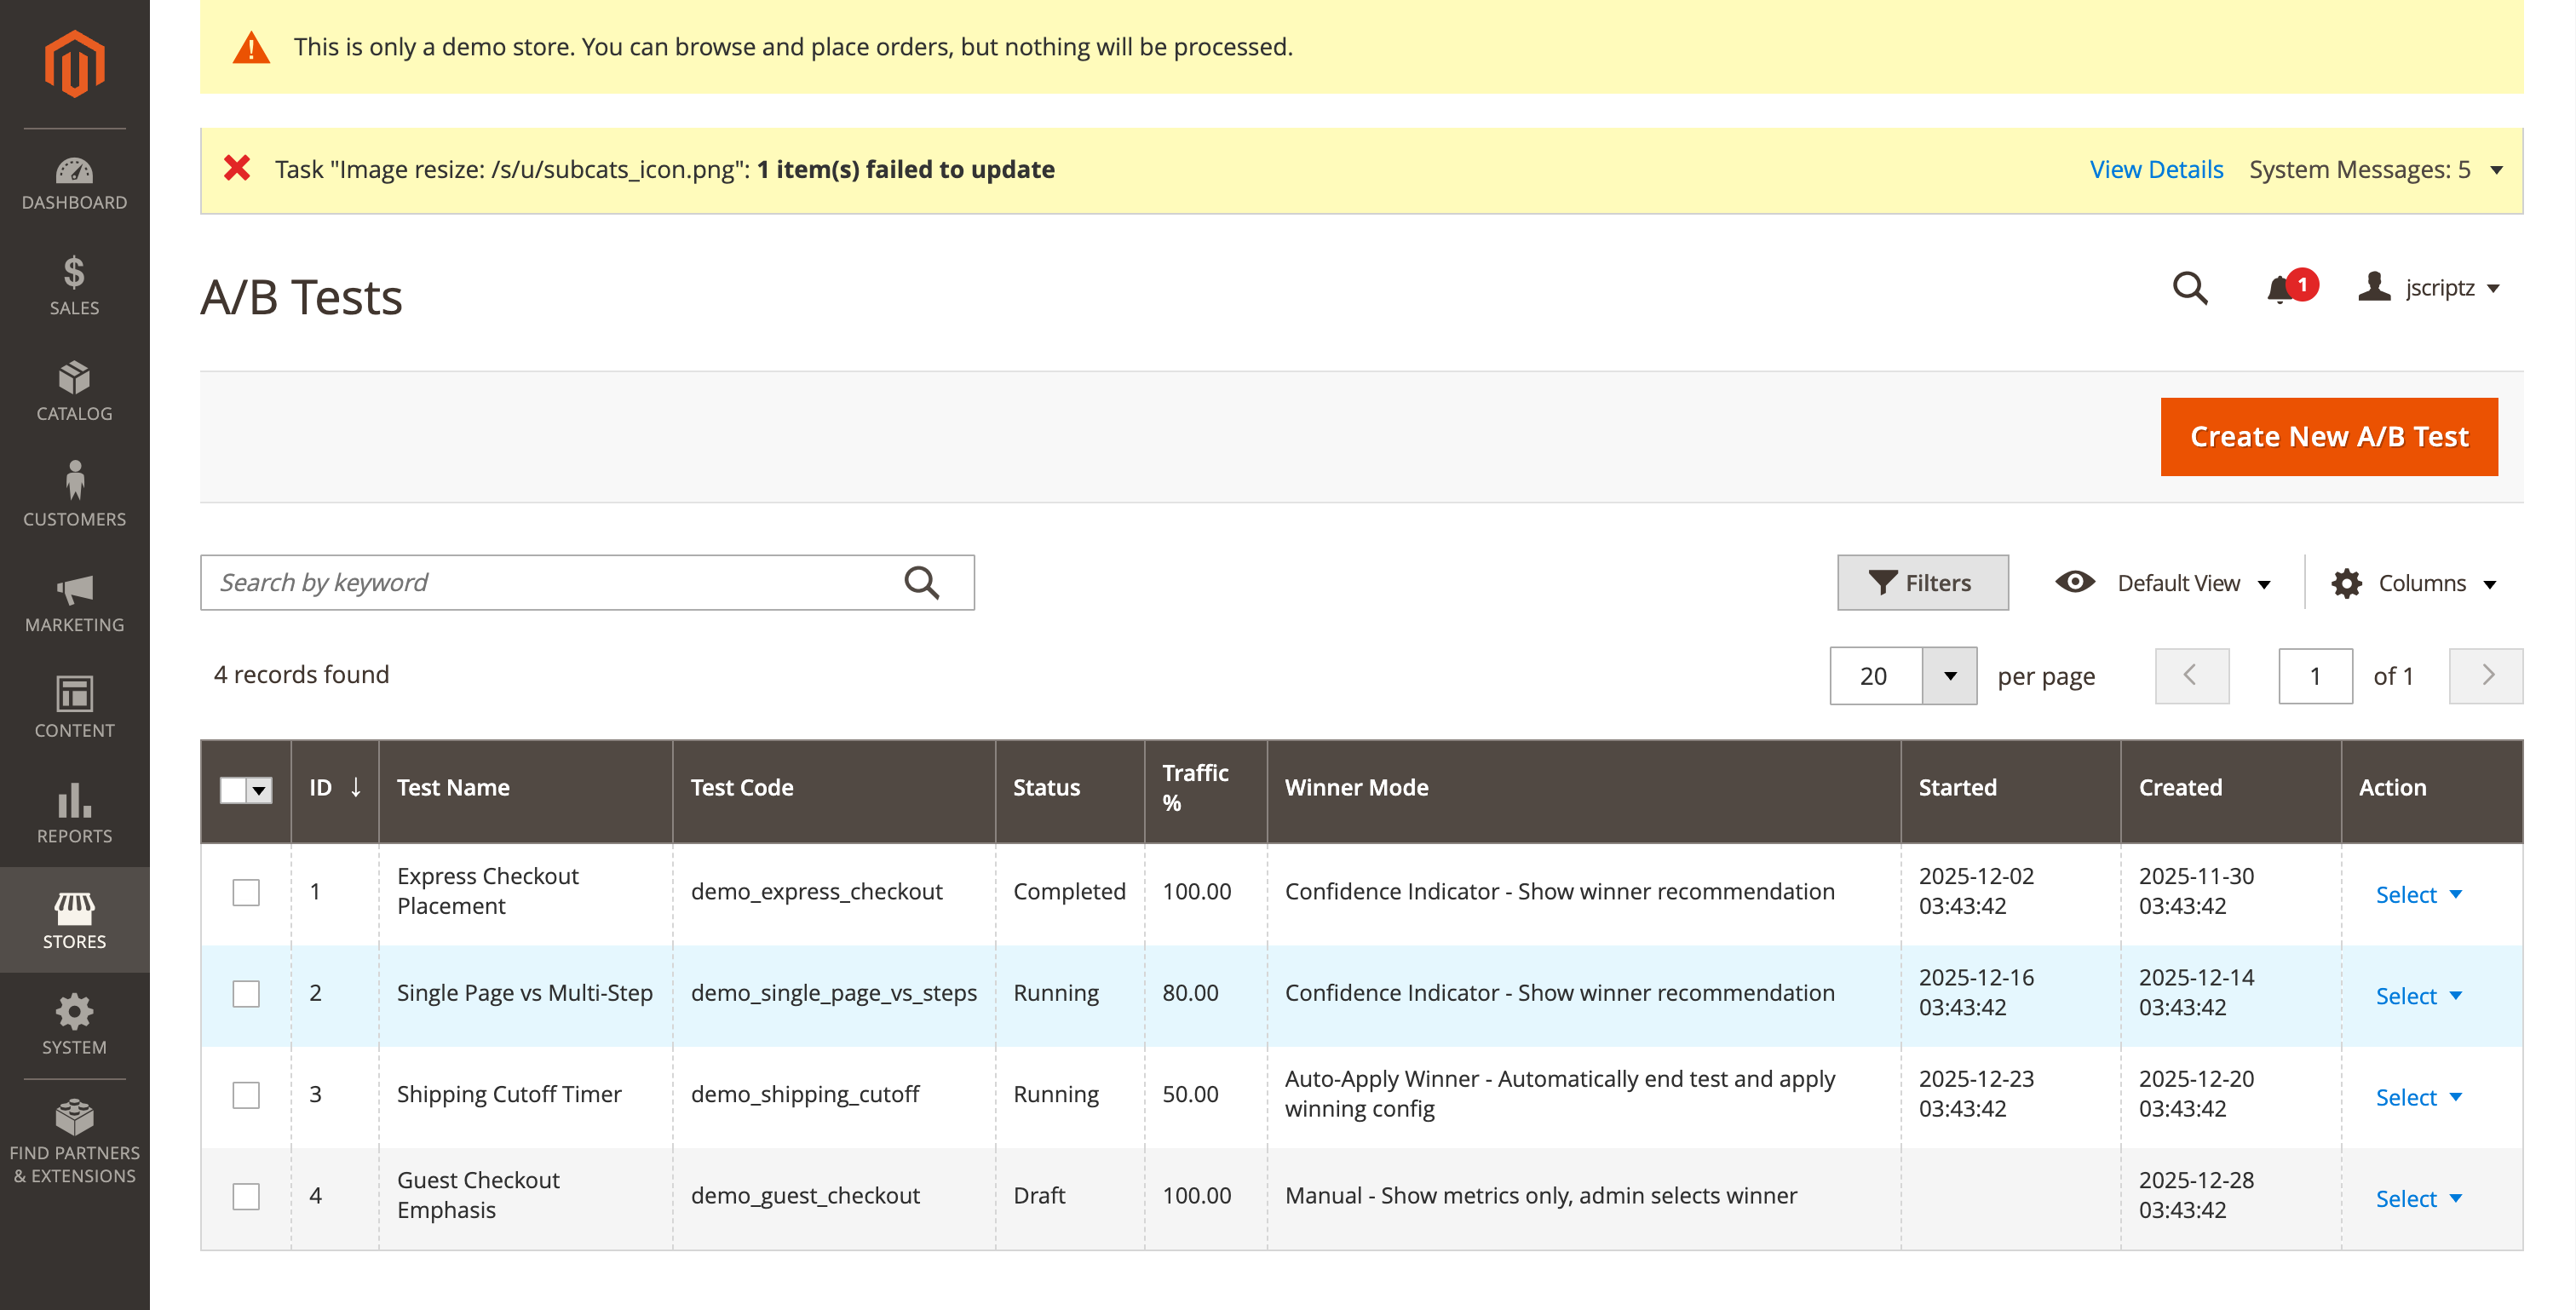
13.1 Creating Tests
| Setting | Description |
|---|---|
| Test Name | Descriptive name for the test |
| Variants | Control + one or more test variants |
| Traffic Allocation | Percentage of traffic per variant |
| Winner Selection | Manual, confidence-based, or auto-apply winner |
13.2 Test Results
View test performance metrics including:
- Conversion rate per variant
- Revenue per variant
- Statistical significance
- Recommended winner
14. Abandoned Cart Recovery
Automatically recover abandoned carts with email campaigns.
Recovery Process
- Detection - Hourly cron identifies abandoned sessions
- Email 1 - Sent immediately after abandonment
- Email 2 - Sent 6 hours later (configurable)
- Email 3 - Sent 24 hours later (configurable)
- Recovery - Token-based link restores cart for completion
Webhook Integration
Send abandoned cart data to third-party services (Klaviyo, Mailchimp, etc.) via webhooks.
15. VAT/Tax Integration
EU VAT ID validation and B2B tax exemption.
Features
| Feature | Description |
|---|---|
| VAT ID Field | Optional field for B2B customers to enter VAT ID |
| VIES Validation | Real-time validation against EU VIES database |
| Tax Exemption | Automatic 0% tax for valid intra-EU B2B orders |
| Company Name Lookup | Retrieves company name from VIES database |
16. Developer Reference
Adding Custom Fields via DI
Add custom fields programmatically in your module's etc/di.xml:
<type name="Jscriptz\Checkout\ViewModel\CustomFields">
    <arguments>
        <argument name="billingAddressFields" xsi:type="array">
            <item name="my_field" xsi:type="array">
                <item name="type" xsi:type="string">text</item>
                <item name="label" xsi:type="string">My Field</item>
                <item name="sortOrder" xsi:type="number">100</item>
            </item>
        </argument>
    </arguments>
</type>
GraphQL Mutations
Save Custom Fields
mutation {
  setJscriptzCheckoutFields(input: {
    cart_id: "masked_cart_id"
    fields: [
      { field_code: "my_field", value: "my_value" }
    ]
  }) {
    success
    message
  }
}
Track Analytics
mutation {
  trackCheckoutAnalytics(input: {
    session_token: "unique_token"
    event_type: "step_viewed"
    step_code: "shipping_address"
  }) {
    success
    session_token
  }
}
Email Template Variable
For custom email templates, add this variable to display custom fields:
{{var custom_checkout_fields_html|raw}}
CLI Commands
# Clear checkout-related caches
bin/magento cache:clean layout block_html full_page config

# Run setup after schema changes
bin/magento setup:upgrade

# Deploy static content
bin/magento setup:static-content:deploy -f
17. Troubleshooting
Common Issues
| Issue | Solution |
|---|---|
| Checkout not loading | Clear all caches: bin/magento cache:flush |
| Custom fields not showing | Verify field is enabled and assigned to a step in Builder |
| Styles not updating | Rebuild Tailwind CSS: cd view/frontend/tailwind && npm run build |
| GraphQL errors | Check Magento logs: var/log/graphql/debug.log |
| Payment not working | Verify payment method credentials and test in developer mode |
bin/magento cache:clean layout block_html full_page
18. Quick Reference
Admin Menu Locations
| Section | Path |
|---|---|
| Configuration | Stores → Configuration → JSCRIPTZ → Jscriptz Checkout |
| Checkout Fields | Stores → Jscriptz Checkout → Checkout Fields |
| Order Bumps | Stores → Jscriptz Checkout → Order Bumps |
| Checkout Builder | Stores → Jscriptz Checkout → Checkout Builder |
| Analytics | Stores → Jscriptz Checkout → Analytics |
| A/B Tests | Stores → Jscriptz Checkout → A/B Tests |
Field Types Reference
| Type | Description | Has Options |
|---|---|---|
| text | Single-line text input | No |
| Email input with validation | No | |
| textarea | Multi-line text input | No |
| tel | Telephone number input | No |
| number | Numeric input | No |
| select | Dropdown selection | Yes |
| multiselect | Multiple selection | Yes |
| radio | Radio button group | Yes |
| checkbox | Single checkbox | No |
| yesno | Yes/No toggle | No |
| date | Date picker | No |
| time | Time picker | No |
| file | File upload | No |
| html | Static HTML content | No |
| heading | Heading text | No |
| paragraph | Paragraph text | No |
Database Tables
| Table | Purpose |
|---|---|
| jscriptz_checkout_step | Step definitions |
| jscriptz_checkout_field | Custom field definitions |
| jscriptz_checkout_field_option | Field options (select/radio) |
| jscriptz_checkout_field_value | Stored field values |
| jscriptz_checkout_layout | Layout configuration |
| jscriptz_checkout_template | Saved templates |
| jscriptz_checkout_analytics_session | Session tracking |
| jscriptz_checkout_analytics_event | Event tracking |
| jscriptz_checkout_ab_test | A/B test configuration |